

Zawsze wyjścia są dwa, te drogi masz do wyboru –
mówią malarze prawdy, mistrzowie dwóch kolorów.
Chyba już tutaj bylem, dziś jutro pojutrze wczoraj
czasu nie marnuj, wybieraj, żyj lub umieraj.
Pogubię myśli biegnąc zwinnym krokiem w przyszłość
jak już ucieknę stąd znów je pozbieram.
Sięgam wyżej, witraże pokrył lepki pył
złote ołtarze, artysty podpis czas już zmył
kiedyś się skrył tu porządek, dotyk czułej dłoni
dziś magazyn broni, generał przy mikrofonie
pokój swój wam daje nie proszę o nic w podzięce
dobre intencje czyste ręce.
Subtelnym gestem drzazgę wbijasz w serce.
Pokory więcej nęcę drzew szelestem.
Jestem protestem w ramie twej woli testem,
zniszczenia w planie, architekt postawił kreskę
z kurzu tej ziemi freskiem, co stóp naszych pamięta dotyk,
ciała splątanie umysłu słodki narkotyk,
pamięta twych oczu moc zaklętą spokojem
jeszcze zanim było moje i twoje.
Wracam znów, po bitwie został lepki pył.
Chciałem już uciec, znów robię dwa kroki w tył
mózgu klepki zlepki paplanin kolebki, treści mieści
każdy tekścik wierz mi bierz i nieść to zechciej w świat
opowieści dźwięk i sęk z drzewa co zbiera
życie przez sieć korzeni pęk w końcu umiera.
Walkower?
Składam broń, już jestem po swojej stronie,
wiem ze rozumiesz i tobie pulsują skronie.
W koronie płomień potrzebny tlenu obronie,
przed ołtarzem prawd cicho się pokłonię.
Piękno i rozkosz zdobią świątyni ściany,
radosnym krokiem, z tobą, szczęściem pijany
do wielkiej sali, gdzie wszystko jest tylko moje
z rozkoszy więdnę i dumnie samotny stoję.
Pytają czemu to robisz lub czemu bezczynnie stoisz,
nie widzisz prawdy, przed życiem nie czujesz trwogi.
Strach wiąże usta, oślepia, kat łamie kości
w kojącym cieple stosów ofiar miłości.
Kiedy boli muszę wątpić czy szczerze,
mądrości zbierają poszukiwacze prawdy,
wiec kładę życie w szali przetrwania świata
i wiem dokładnie co potrzebne w ofierze.
Wojenne barwy wyblakły od czasu.
W cieniu sztandarów prorok wychwala słońce.
Już za chwilę znowu ruszę do walki
ze samym sobą, początkiem i końcem.
More crashes: VTX and Frame
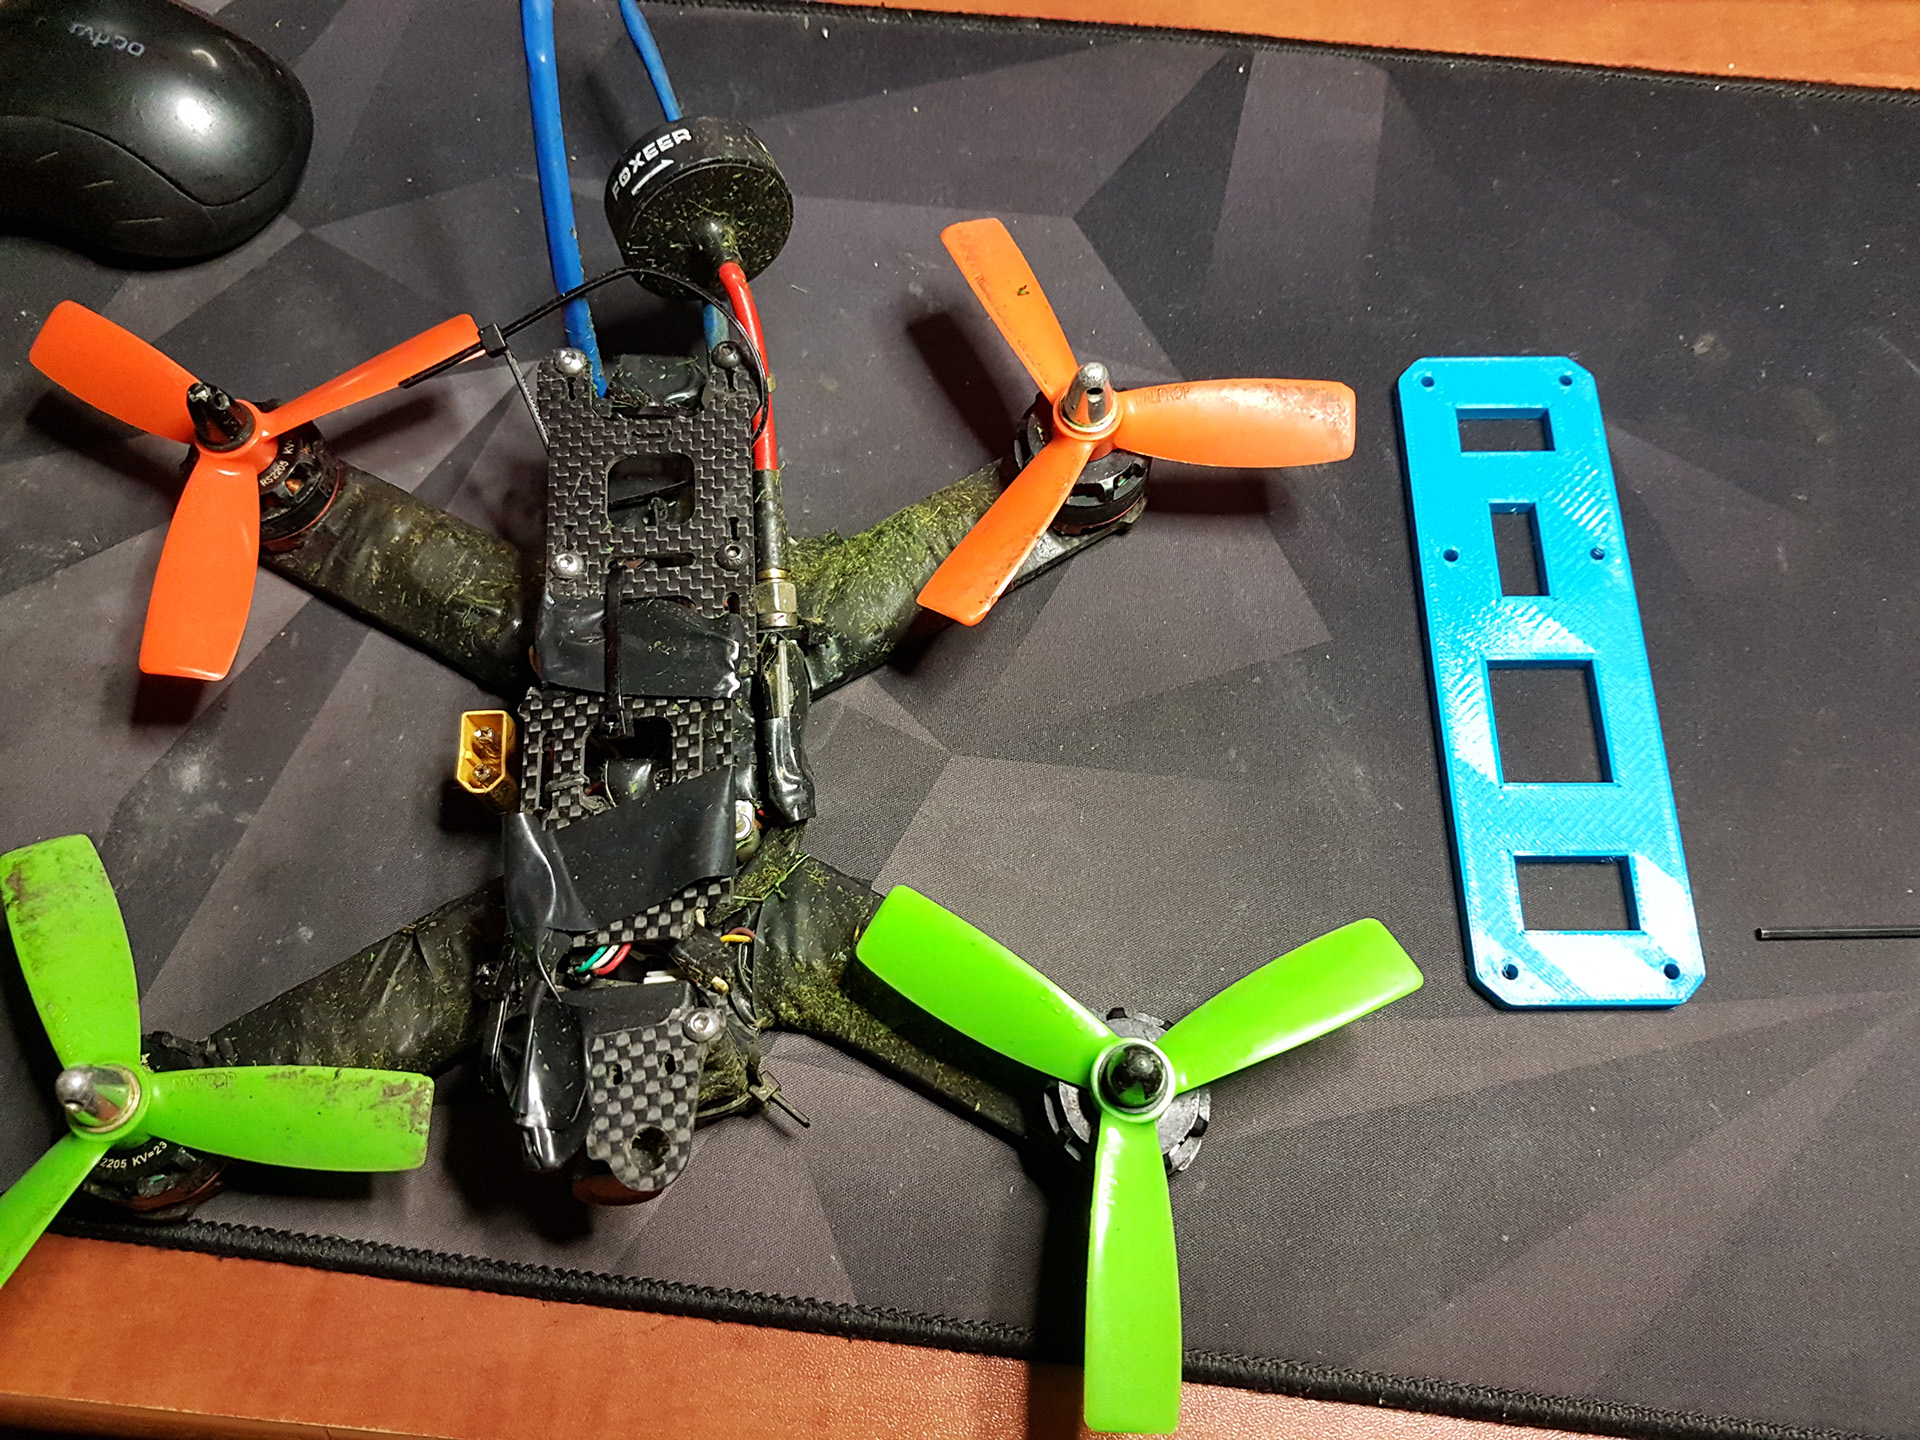
Learning to fly something has it’s obvious problems – things tend to fall to the ground in case something goes wrong. I’ve already had my share of both, yet this drone refuses to die – and I love it – so I just keep fixing it. This time I did break some frame pieces, some more 3D-printed frame pieces and a VTX (Video Transmitter).
The frame I’m using consists mainly of 2 ‘plates’. The bottom one is thick and still in one piece 🙂 The top one, however, was not so lucky – where a battery goes, so when the drone experiences ‘shock accelerations’ this puts a lot of load onto this frame piece.
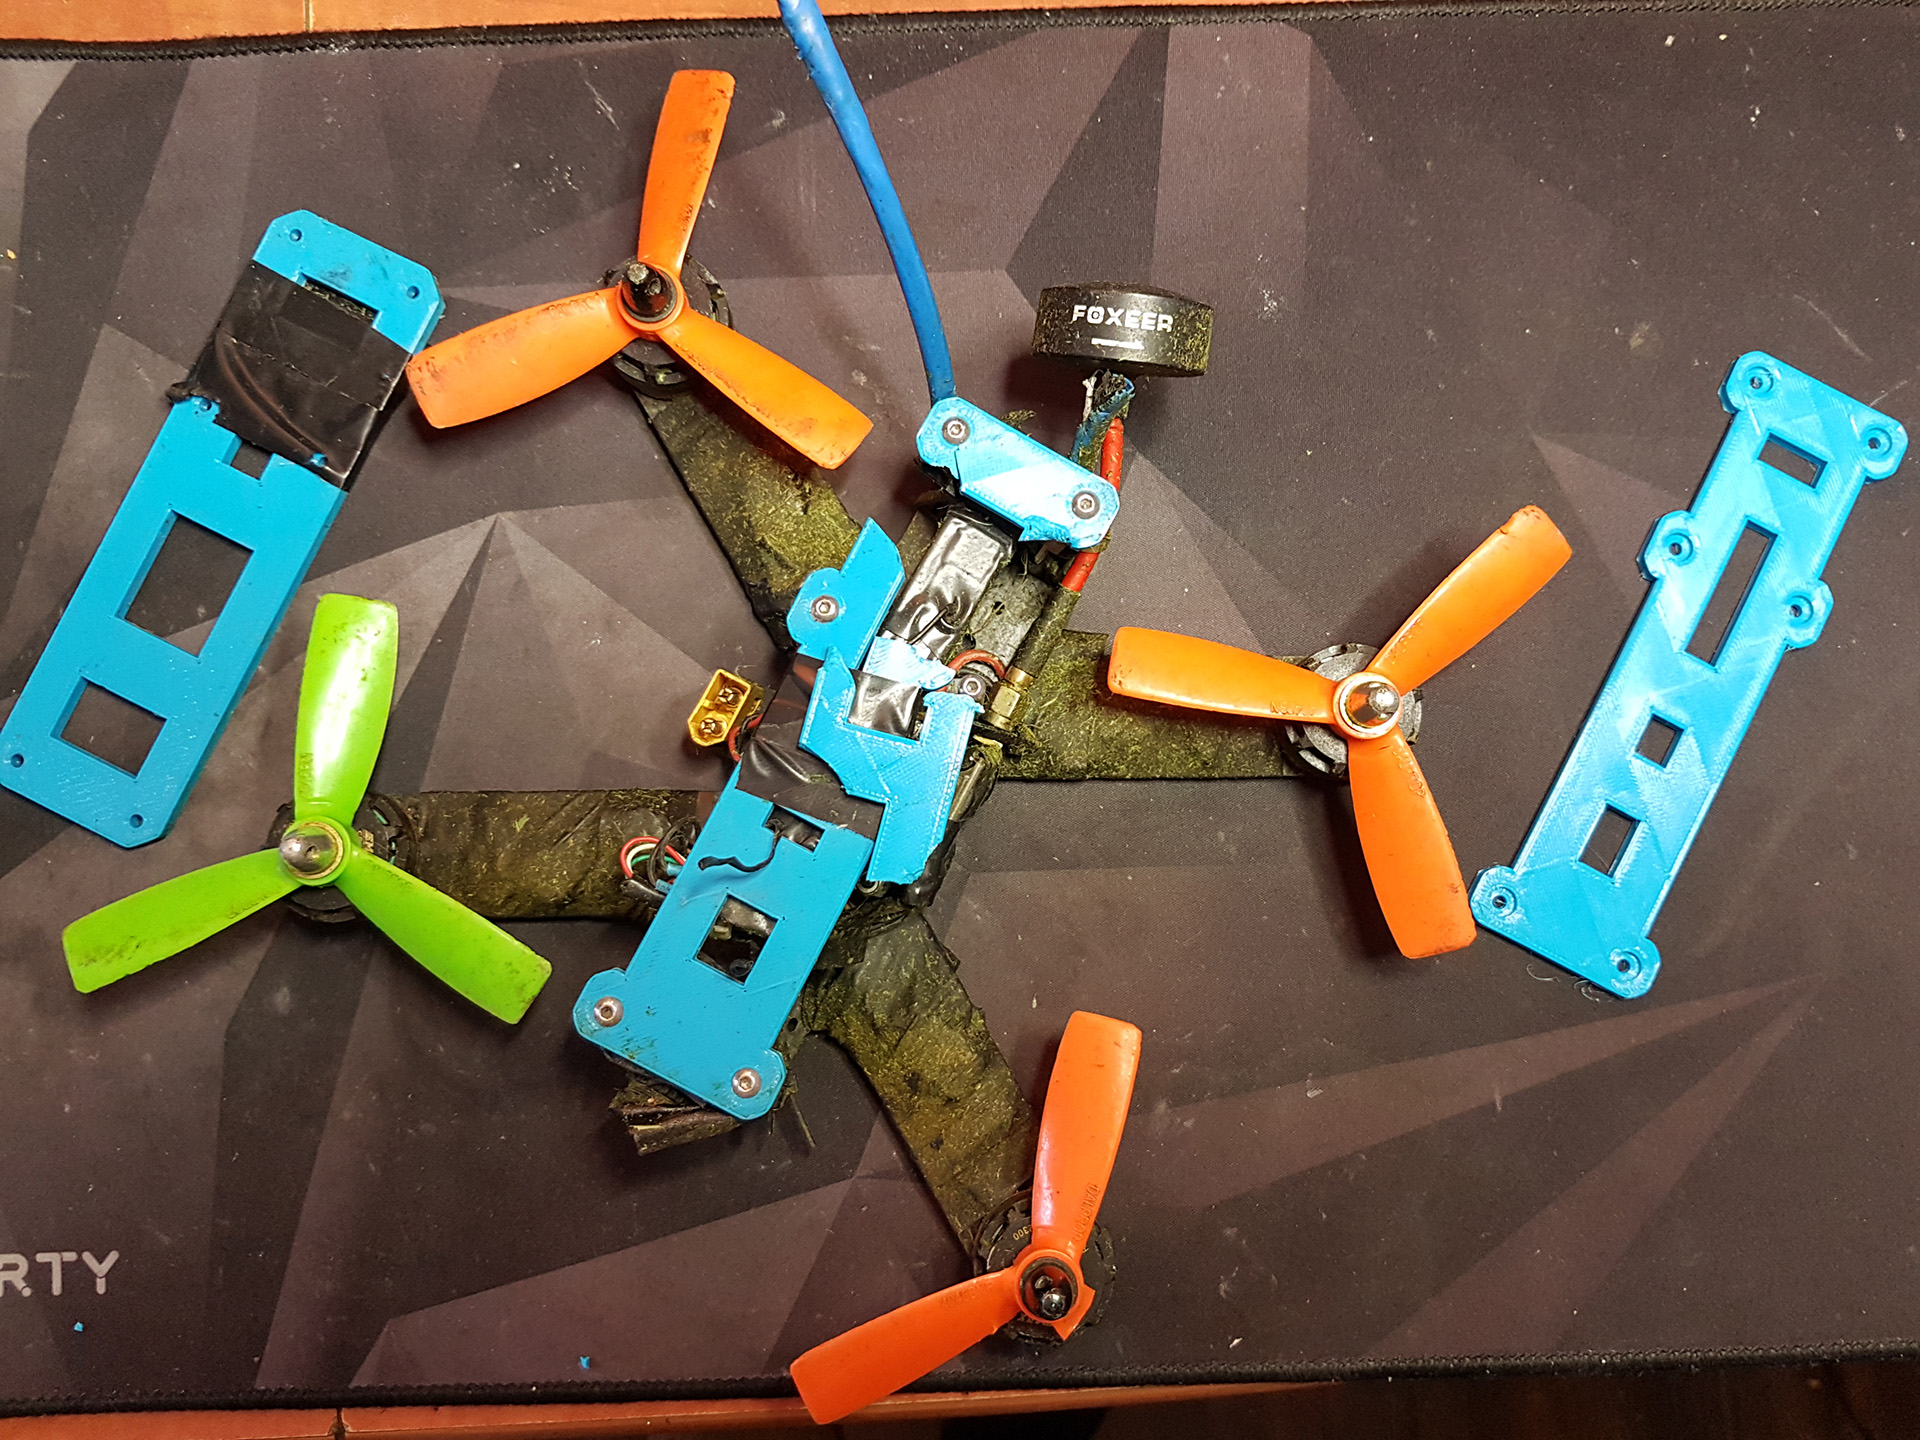
So – the majority of the frame is fine. Could the missing piece be 3D-printed then? Well, I tried it. I designed a simple part in FreeCad and used my Prusa to bring it to life. I used PET-G with 0,3mm layer height and close to 100% fill:
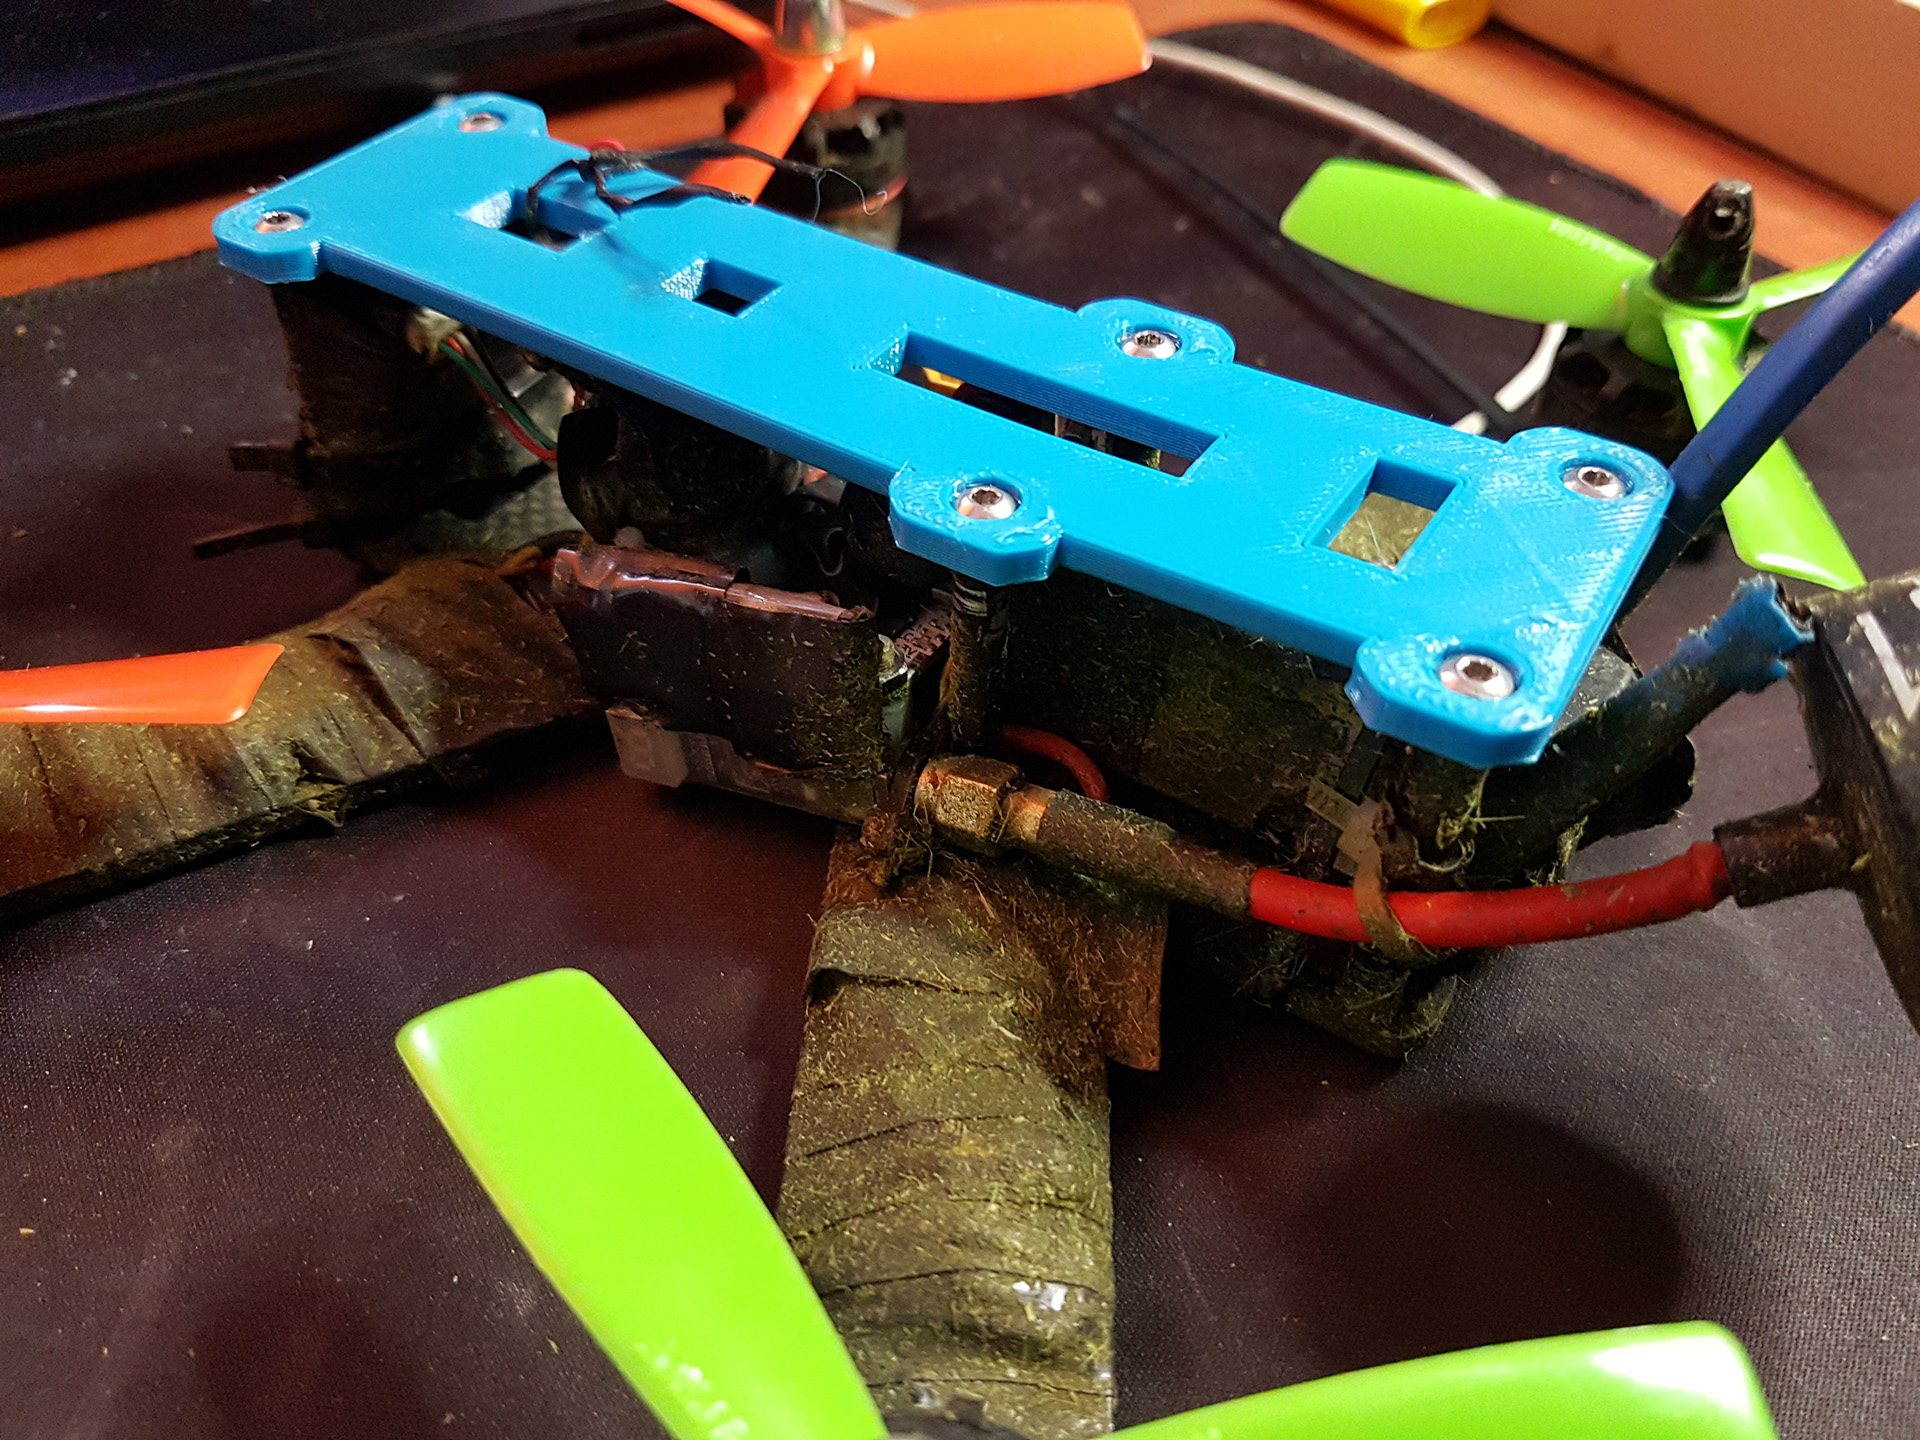
It worked great…. for a short while, until I crashed the drone hard enough ^^ So i printed another one, and another one, while adjusting the project. They all break eventually xD
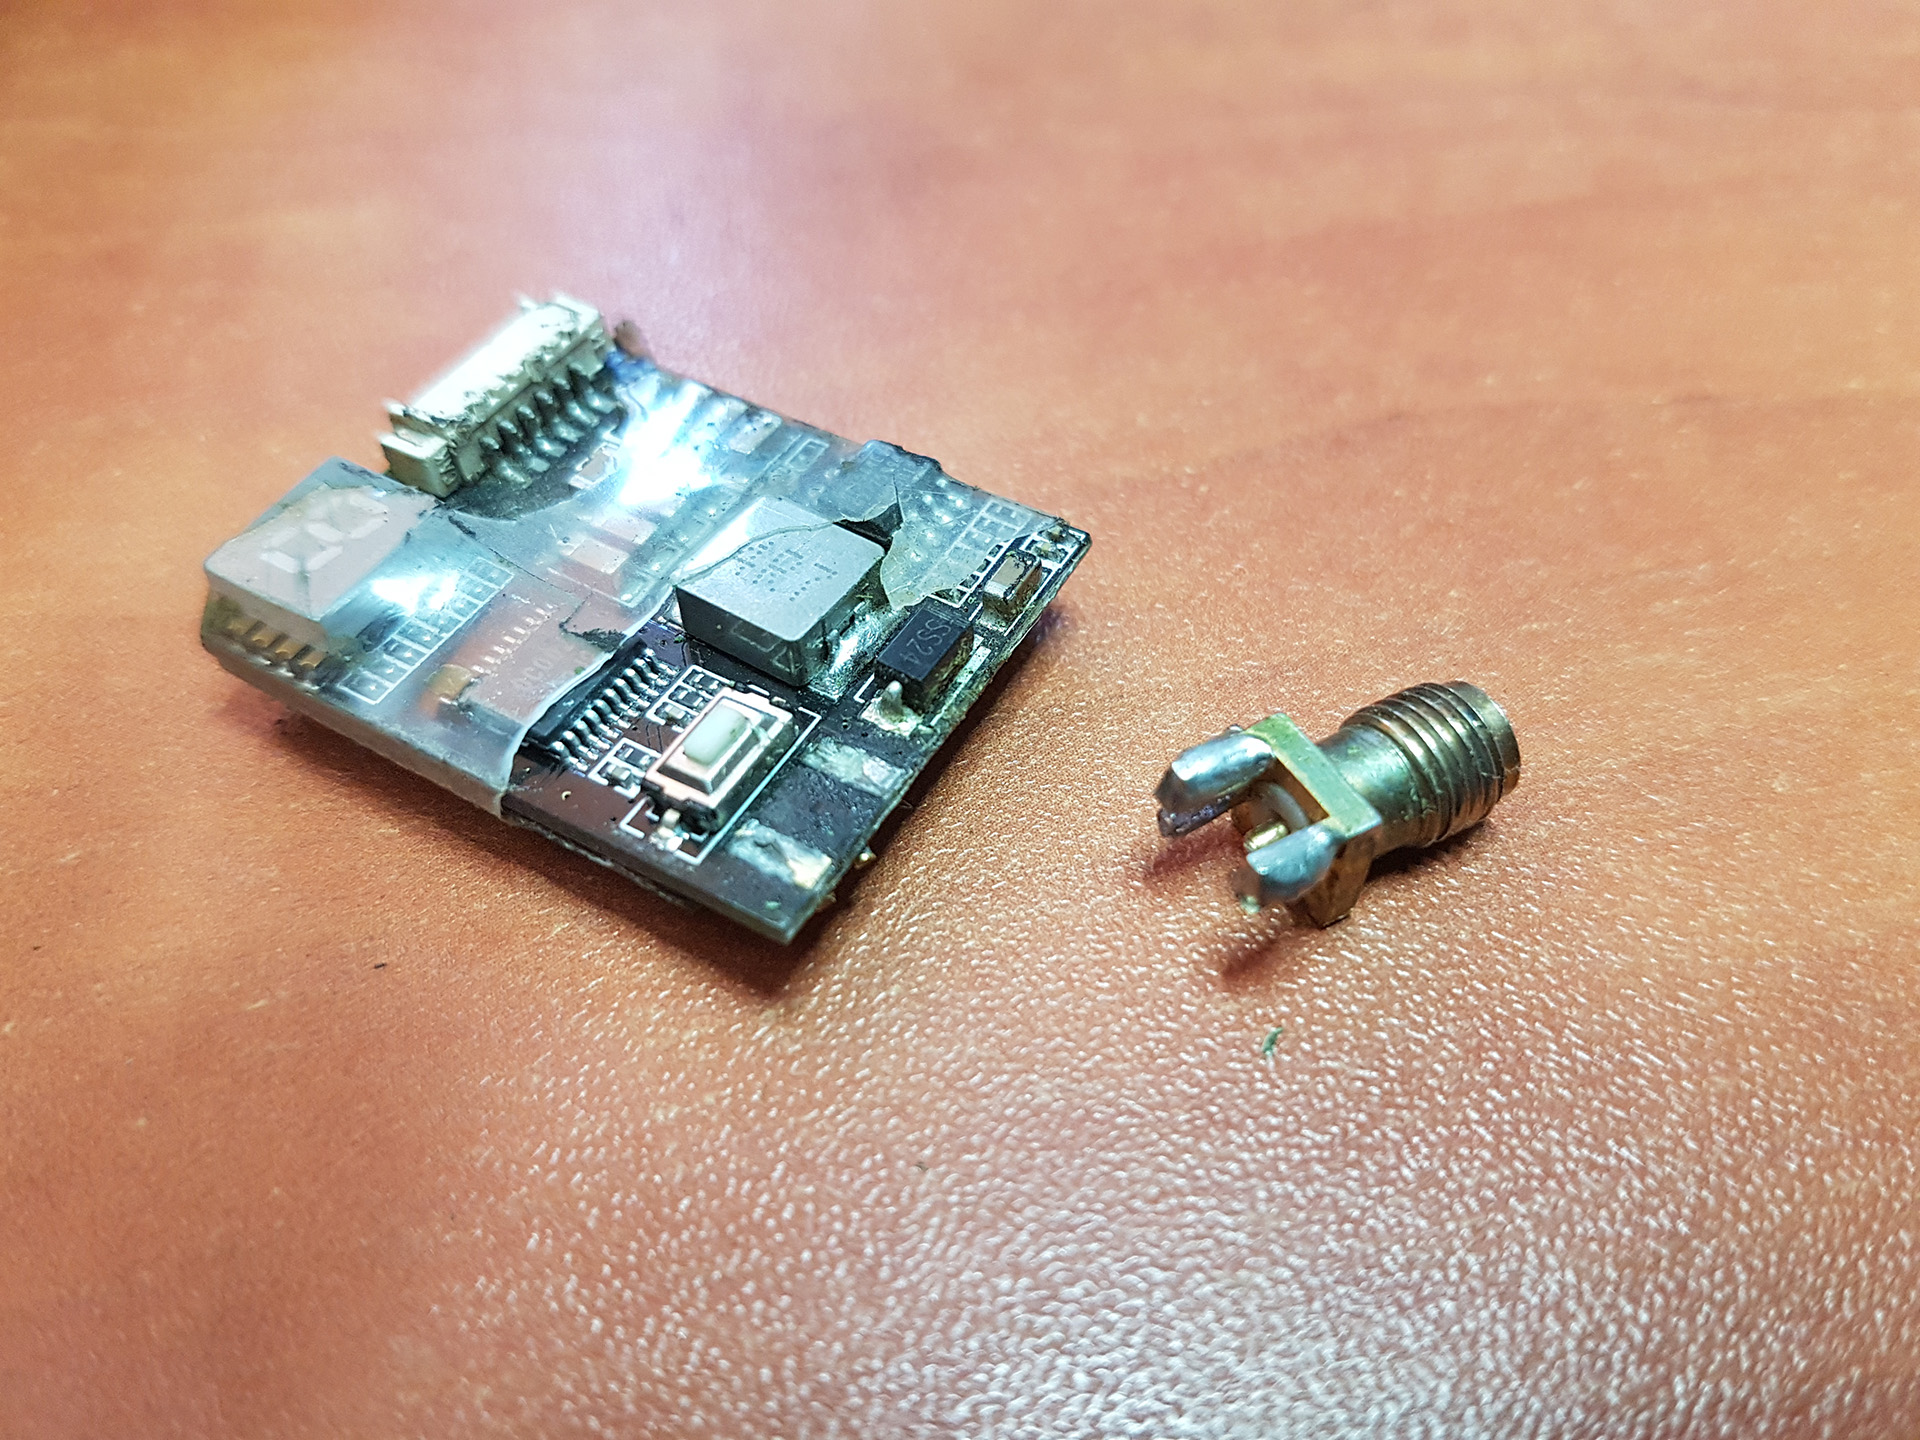
Thats fine though. Im gonna be crashing less and less, right? It’s gonna be fine. However, in the meantime I managed to destroy something else: the VTX antenna port (and yet another frame piece as well):
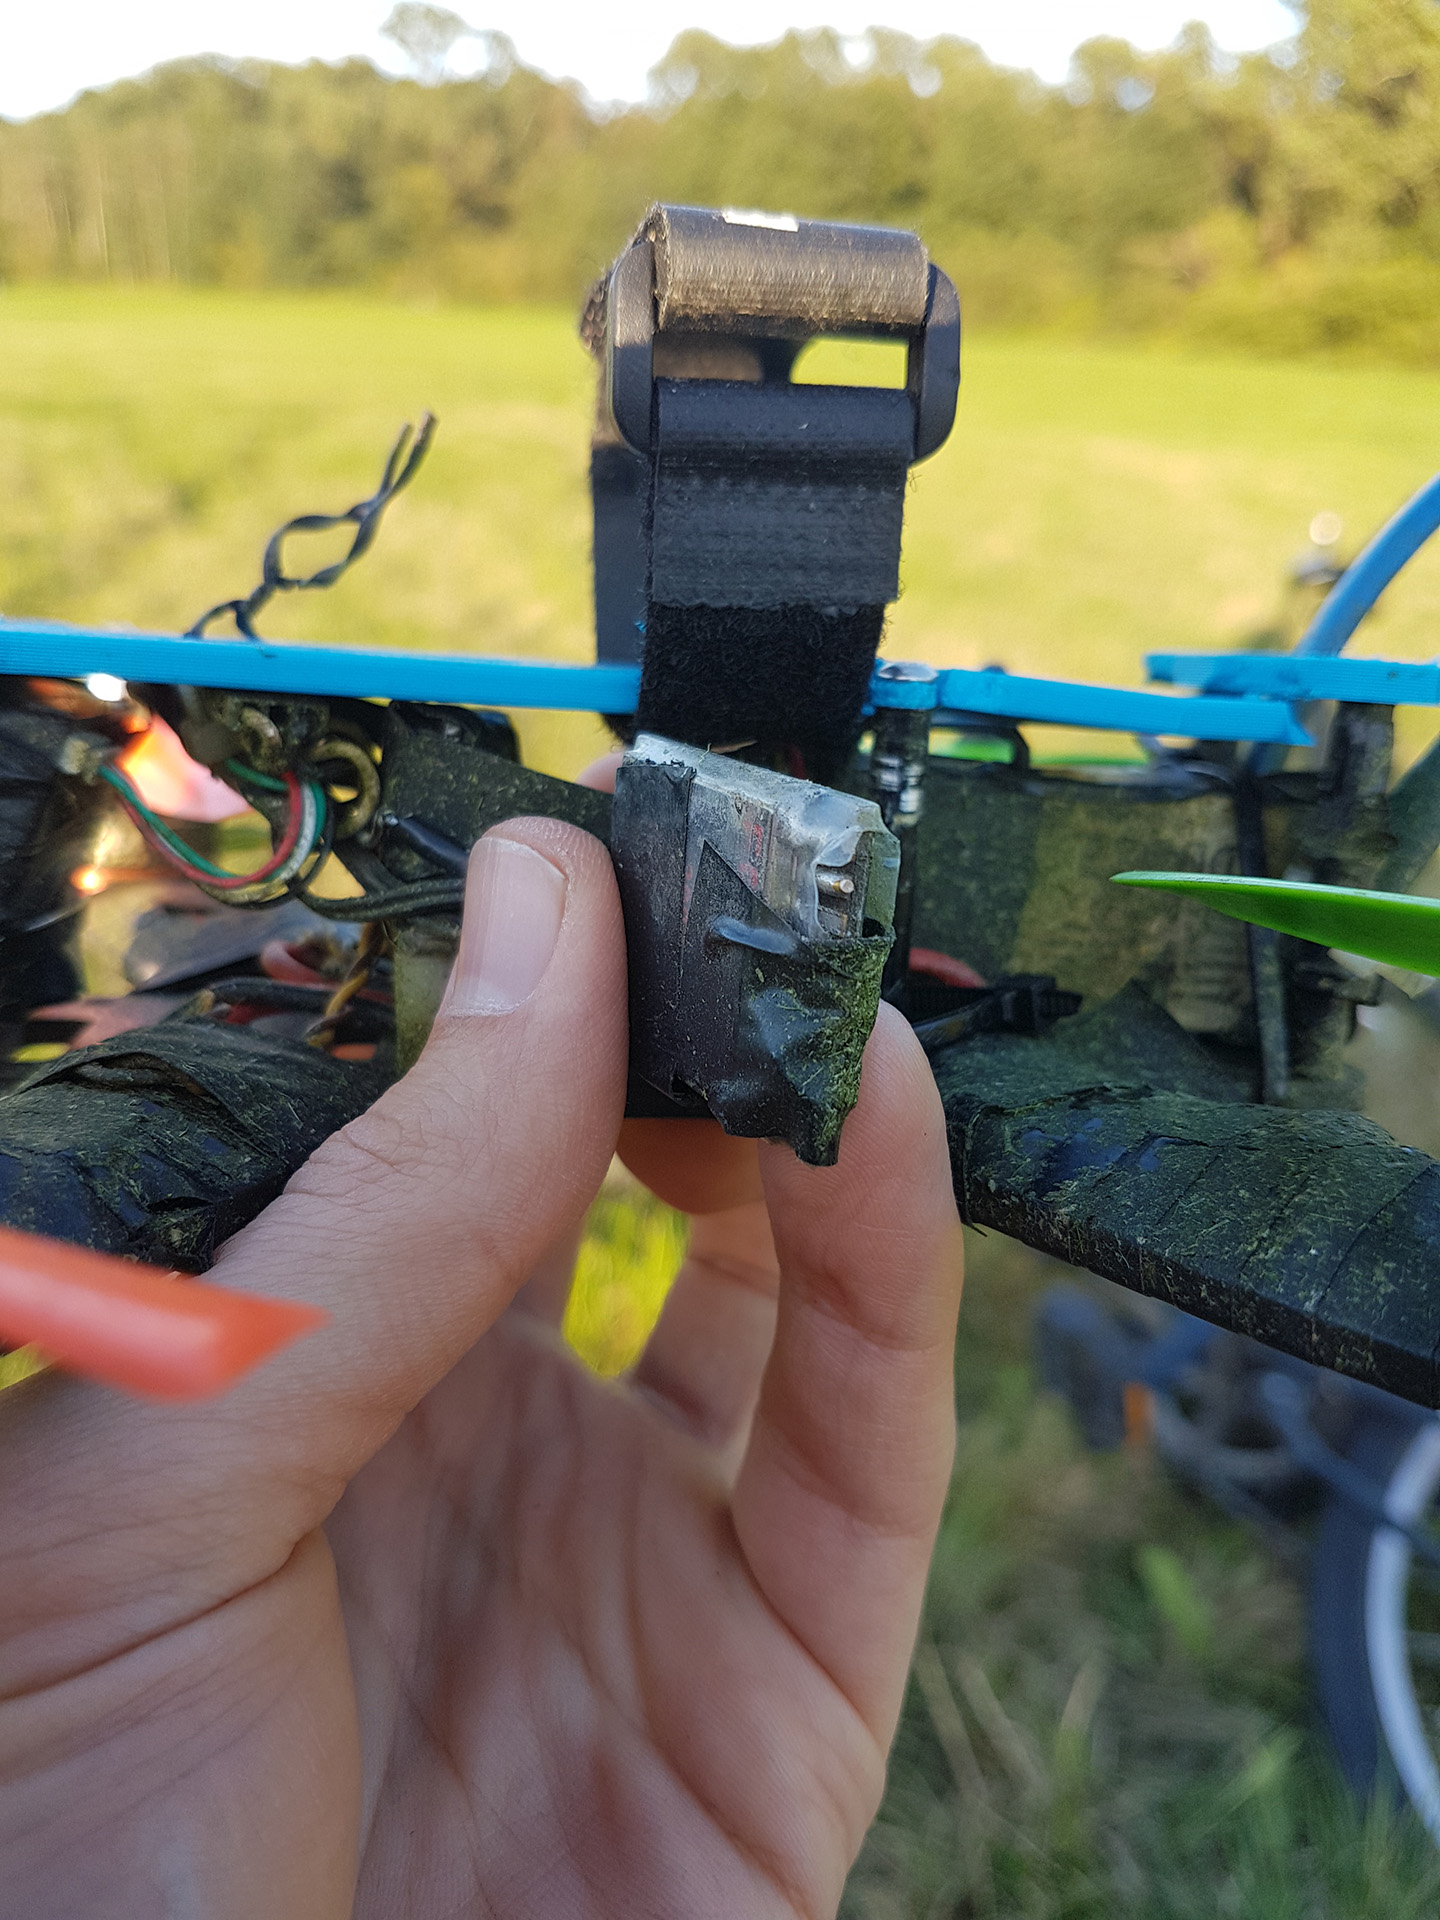
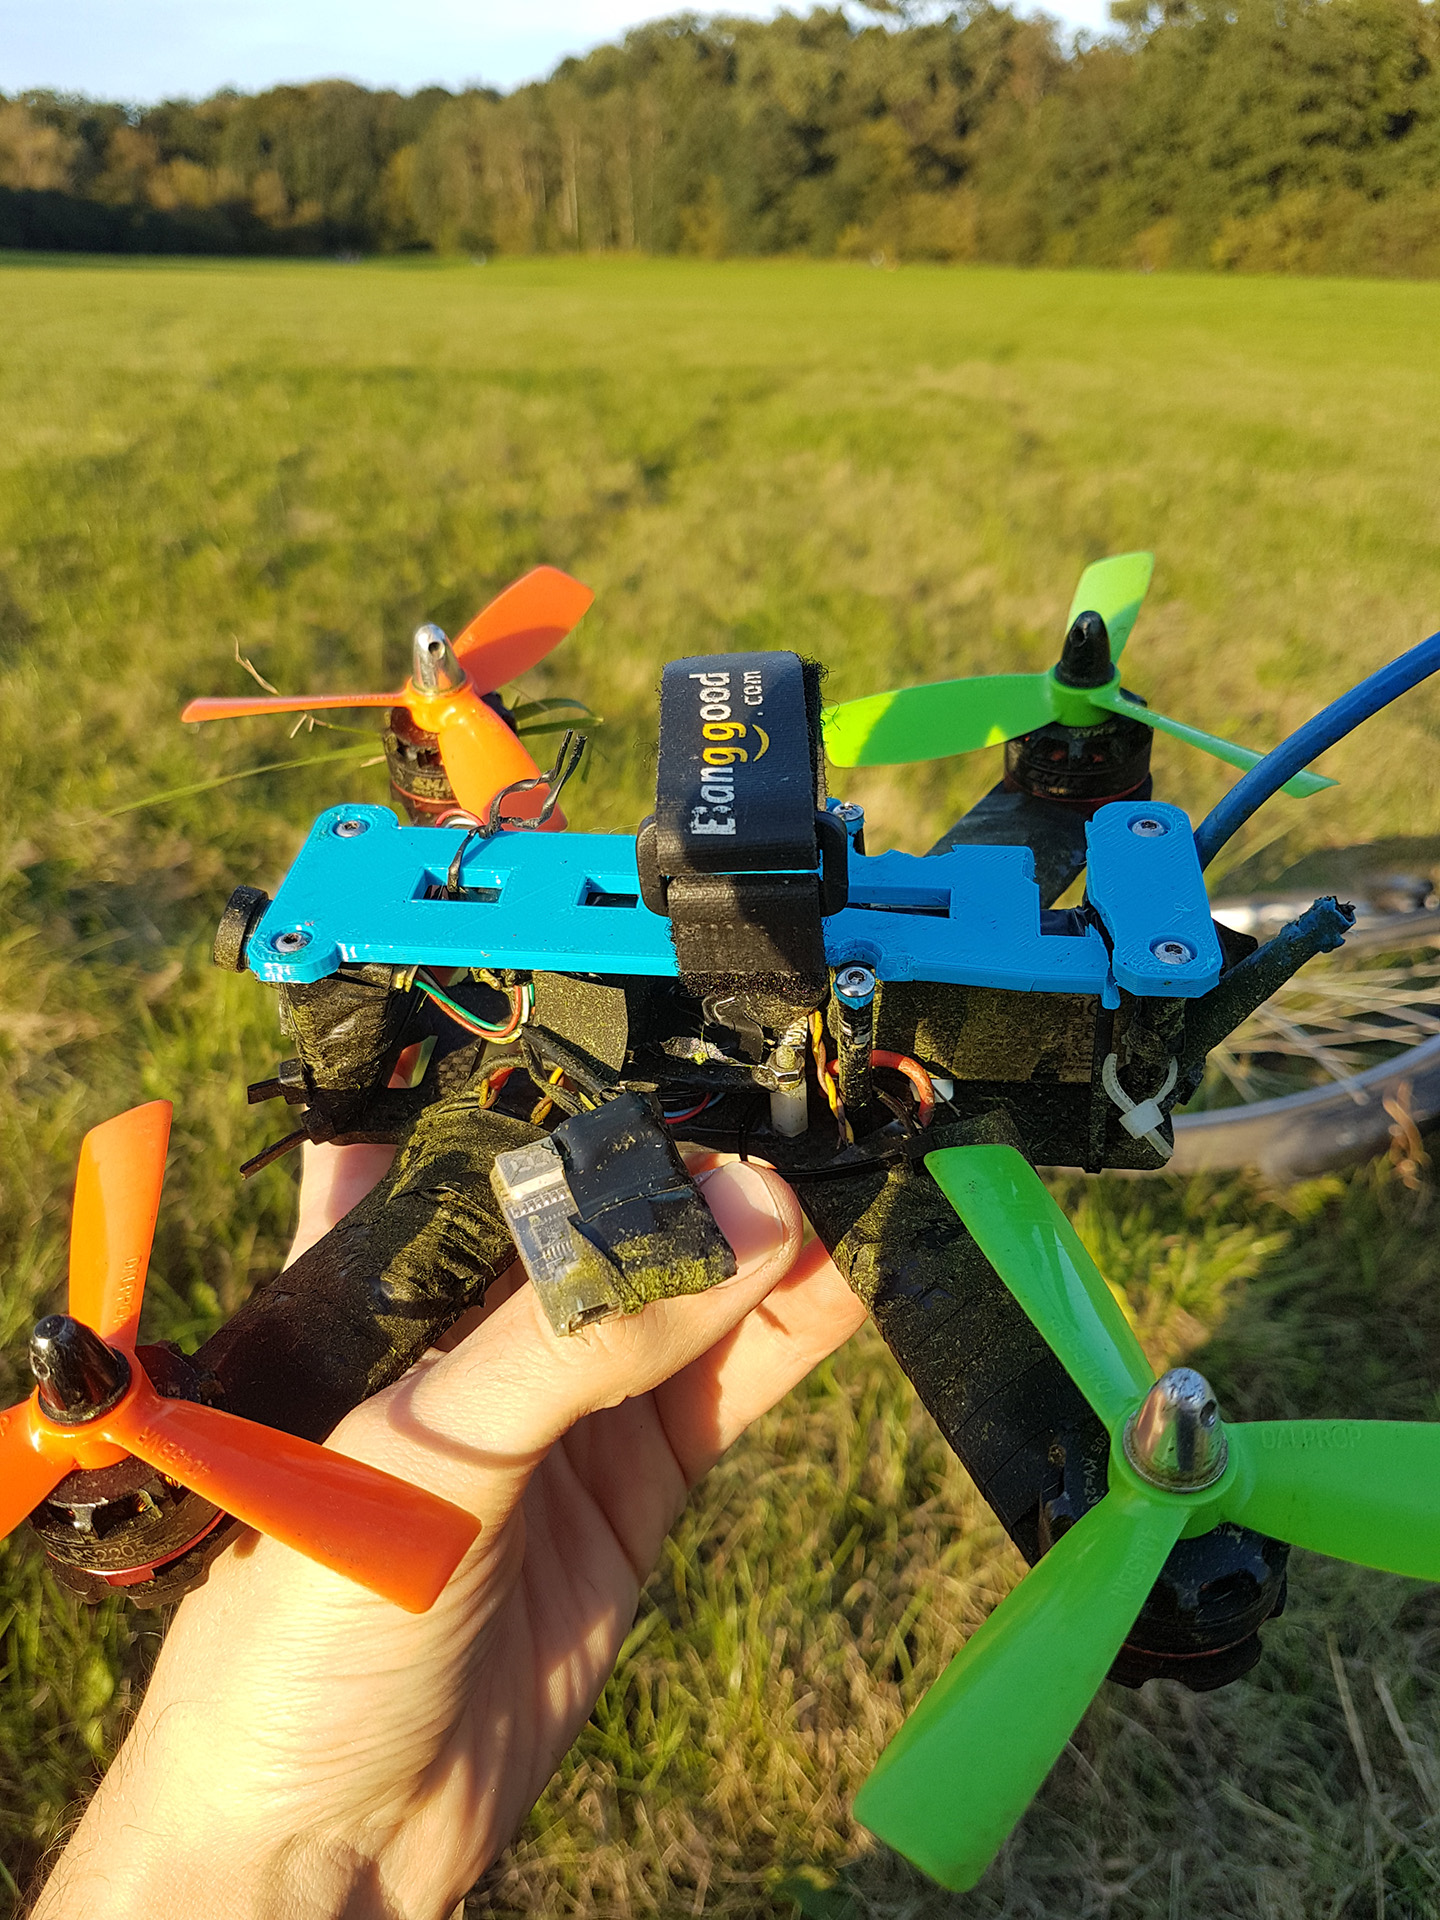
Luckily I didn’t loose the antenna, and the socket was still there. Still possible and easy to fix.
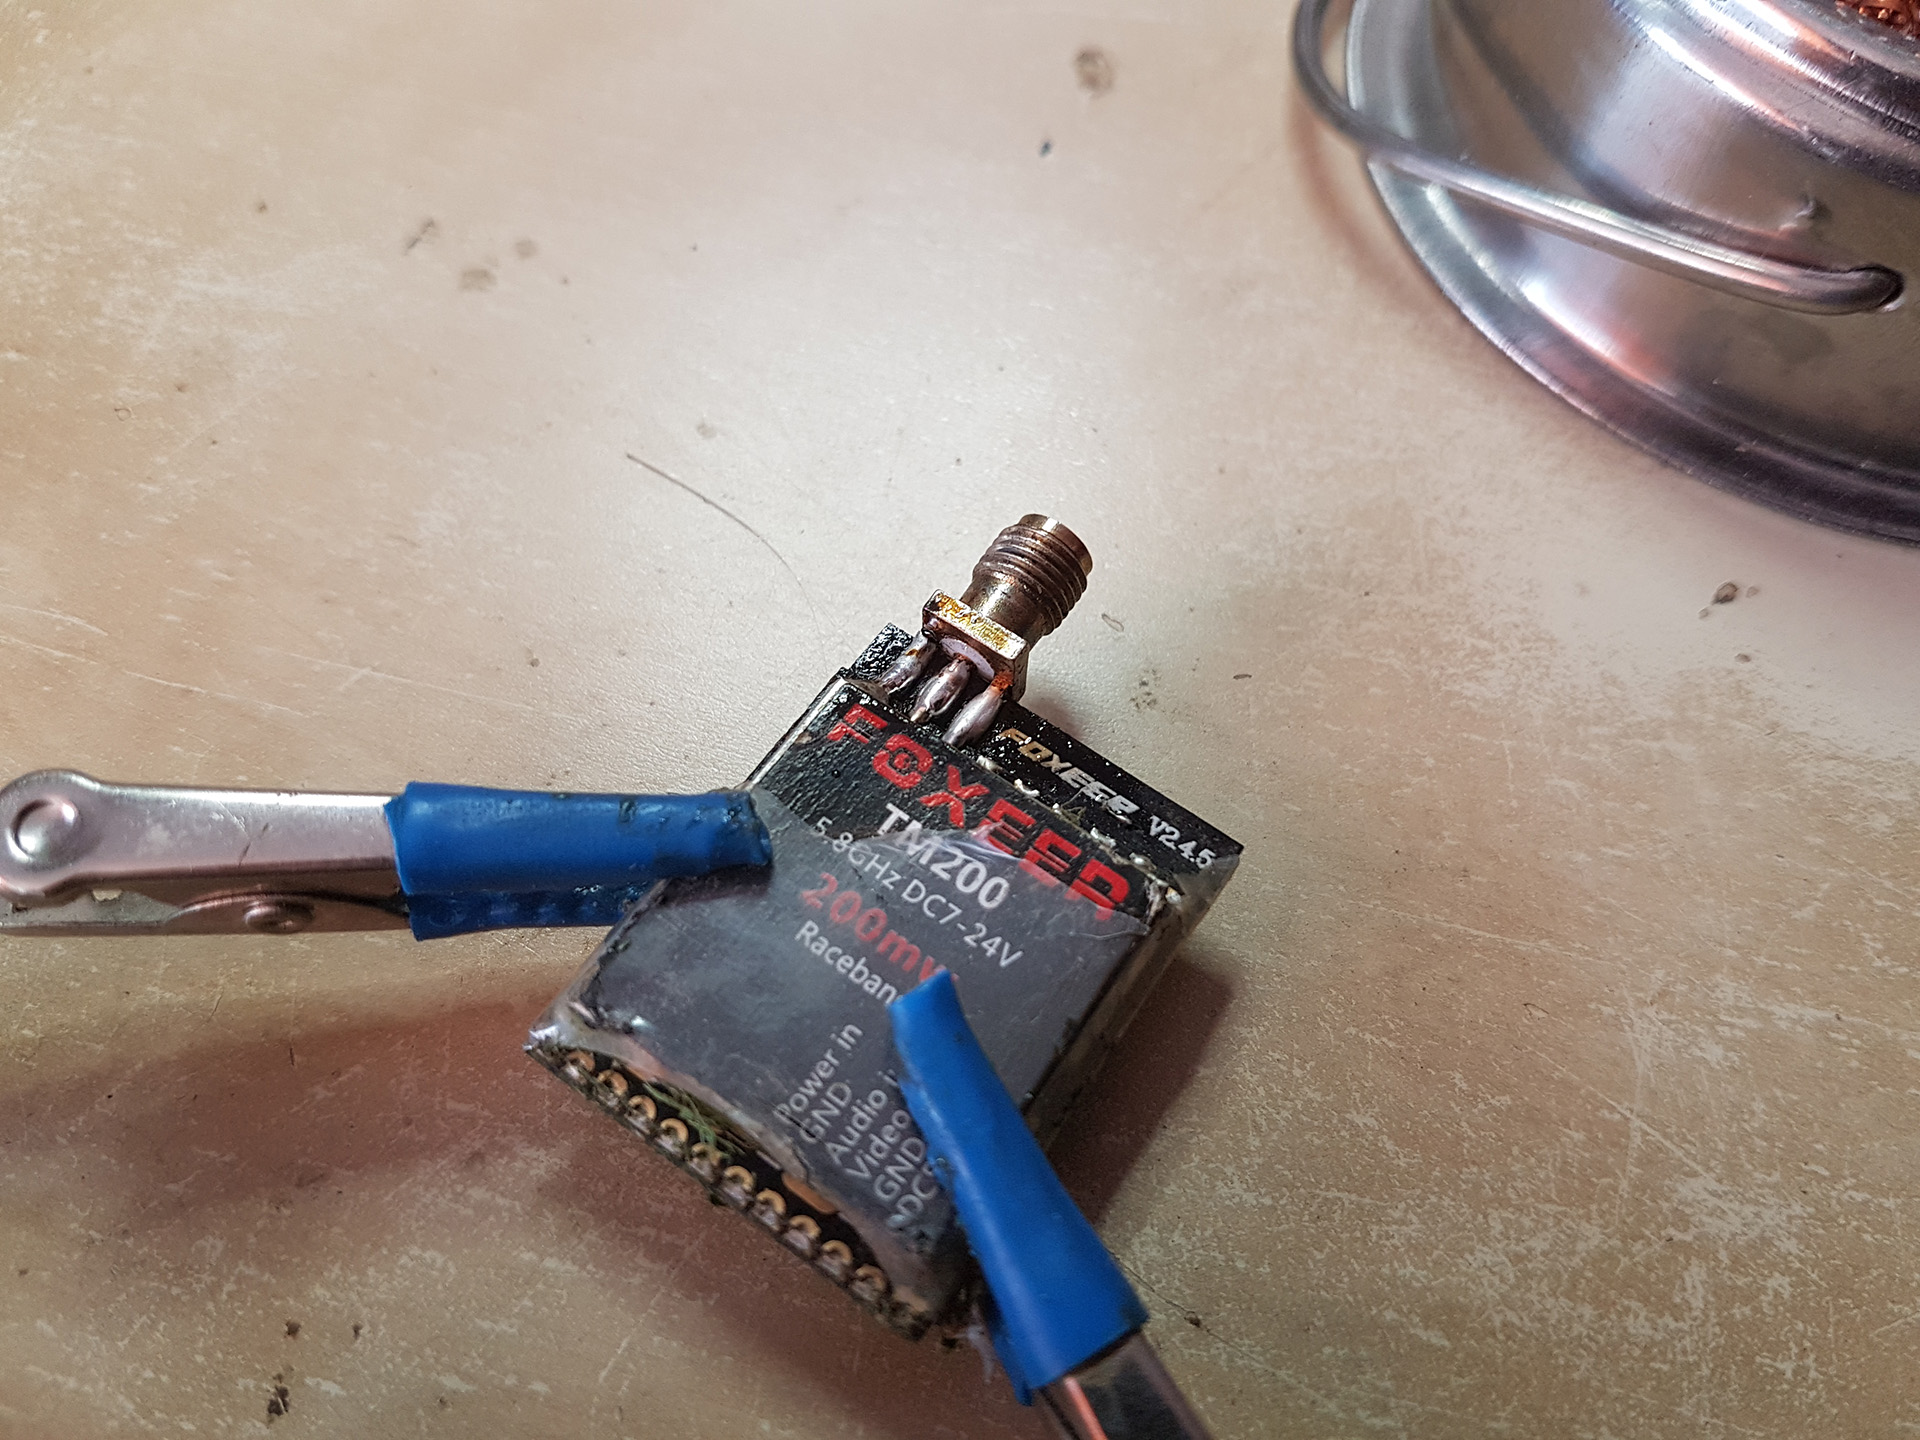
And ready to go again
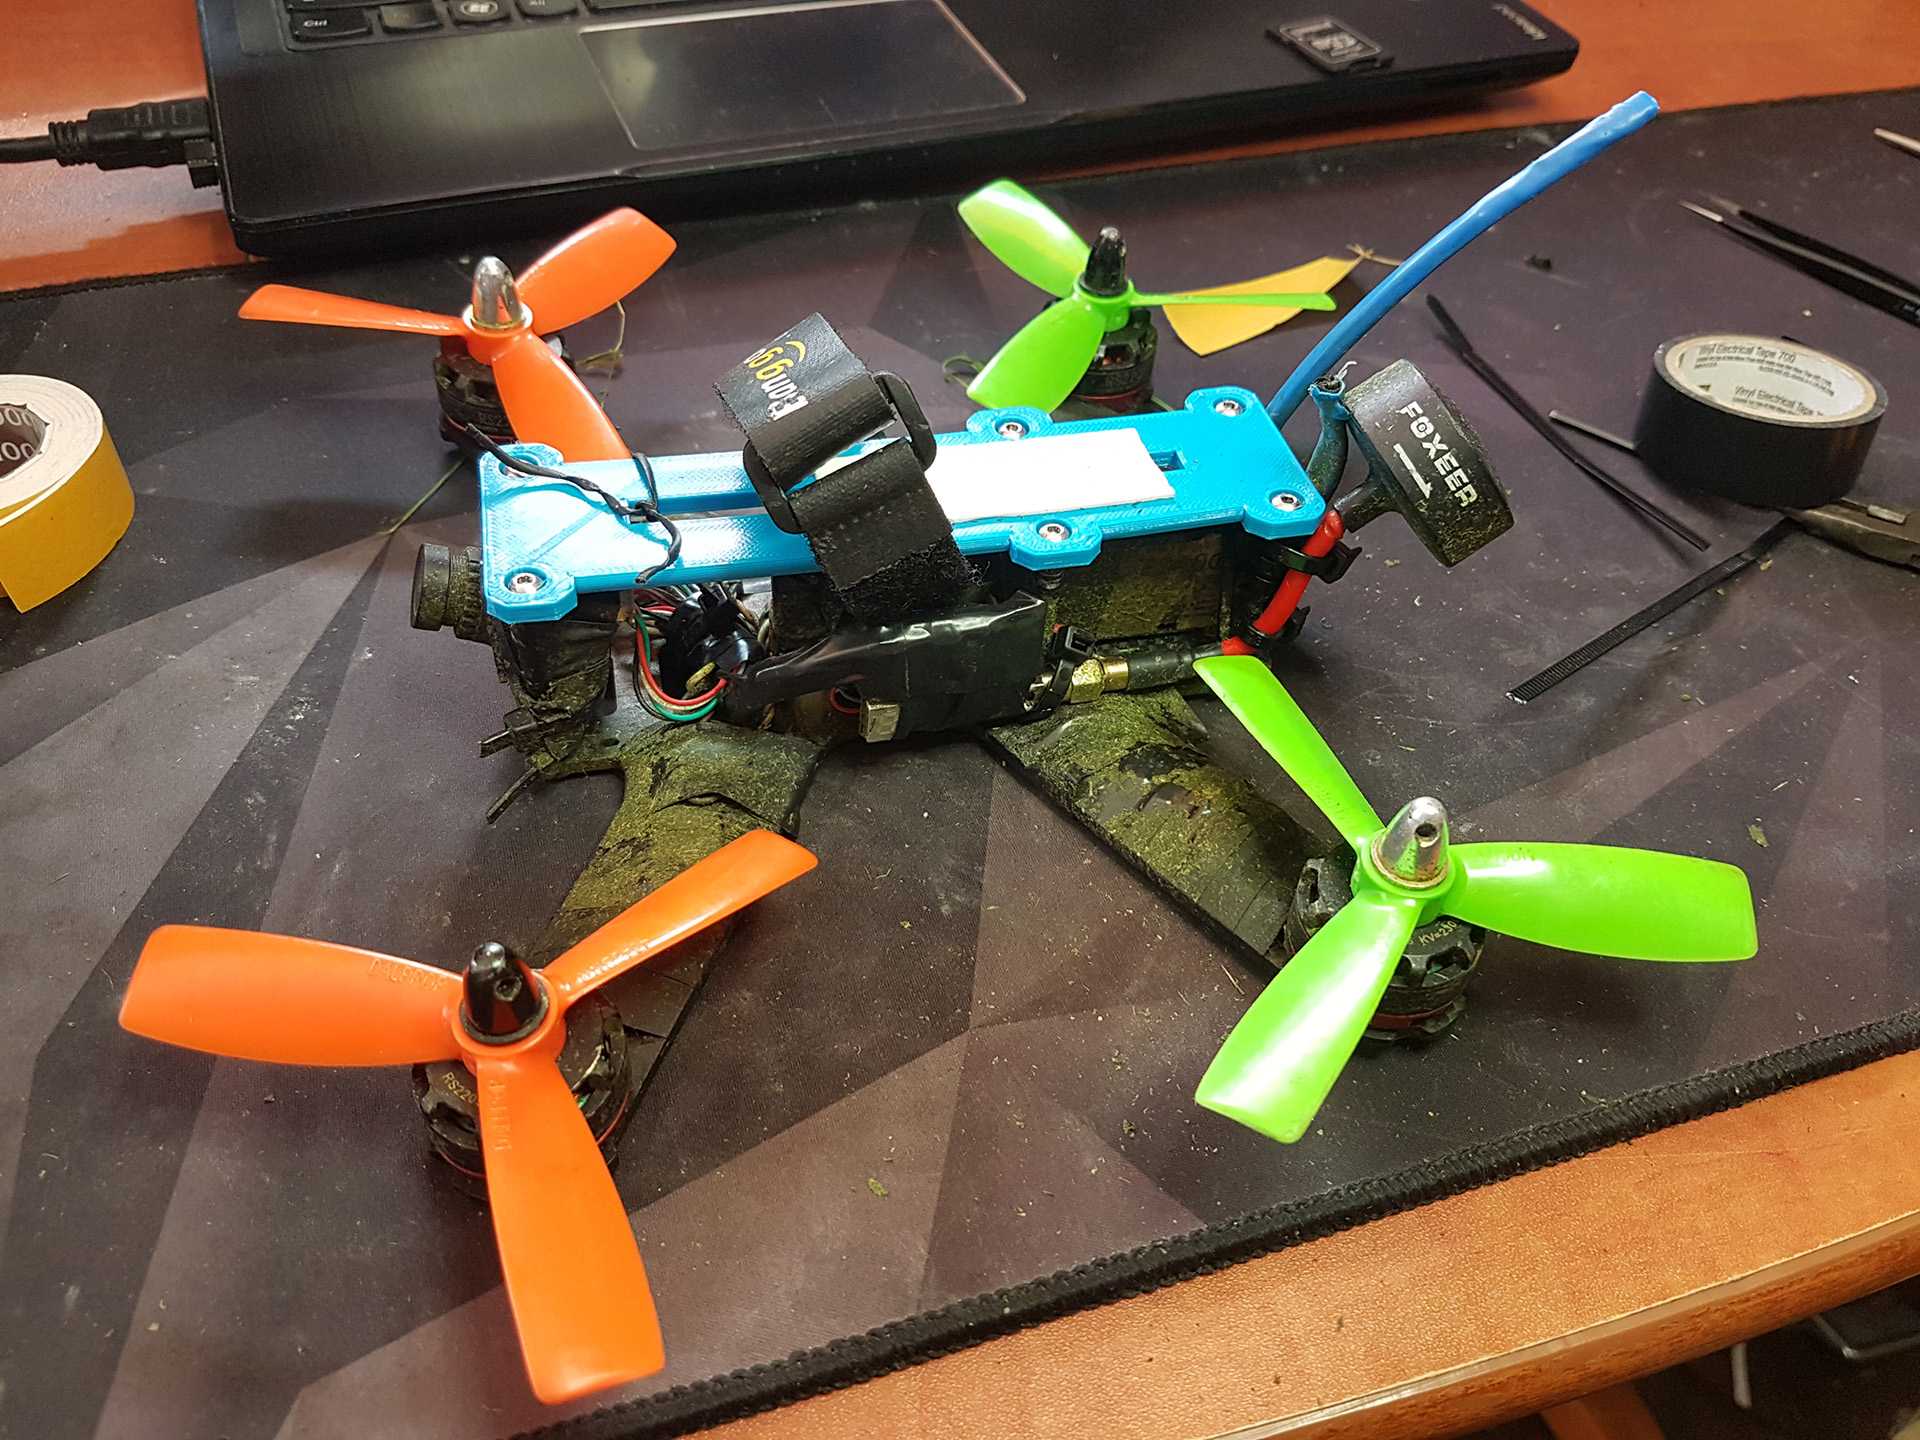
There’s something worth mentioning here: it turns out u can actually fly using a VTX with ripped antenna port ^^, I mean – obviously the range is waay smaller but hey – I’m not going far anyway (yet). It’s also possible to fly with damaged frame. It’s actually quite amazing what a bad condition this thing can be in and still manage to function.
Drone in Water…
It was bound to happen eventually ^^ I couldn’t wait untill everything gets dry, so I went for a flight. I was doing fine and did’t even go straight into the puddle, but found myself in one anyway after a mid-air meeting with a branch 😉 It was not totally submerged, but definitely all the electronics had water on or near it.
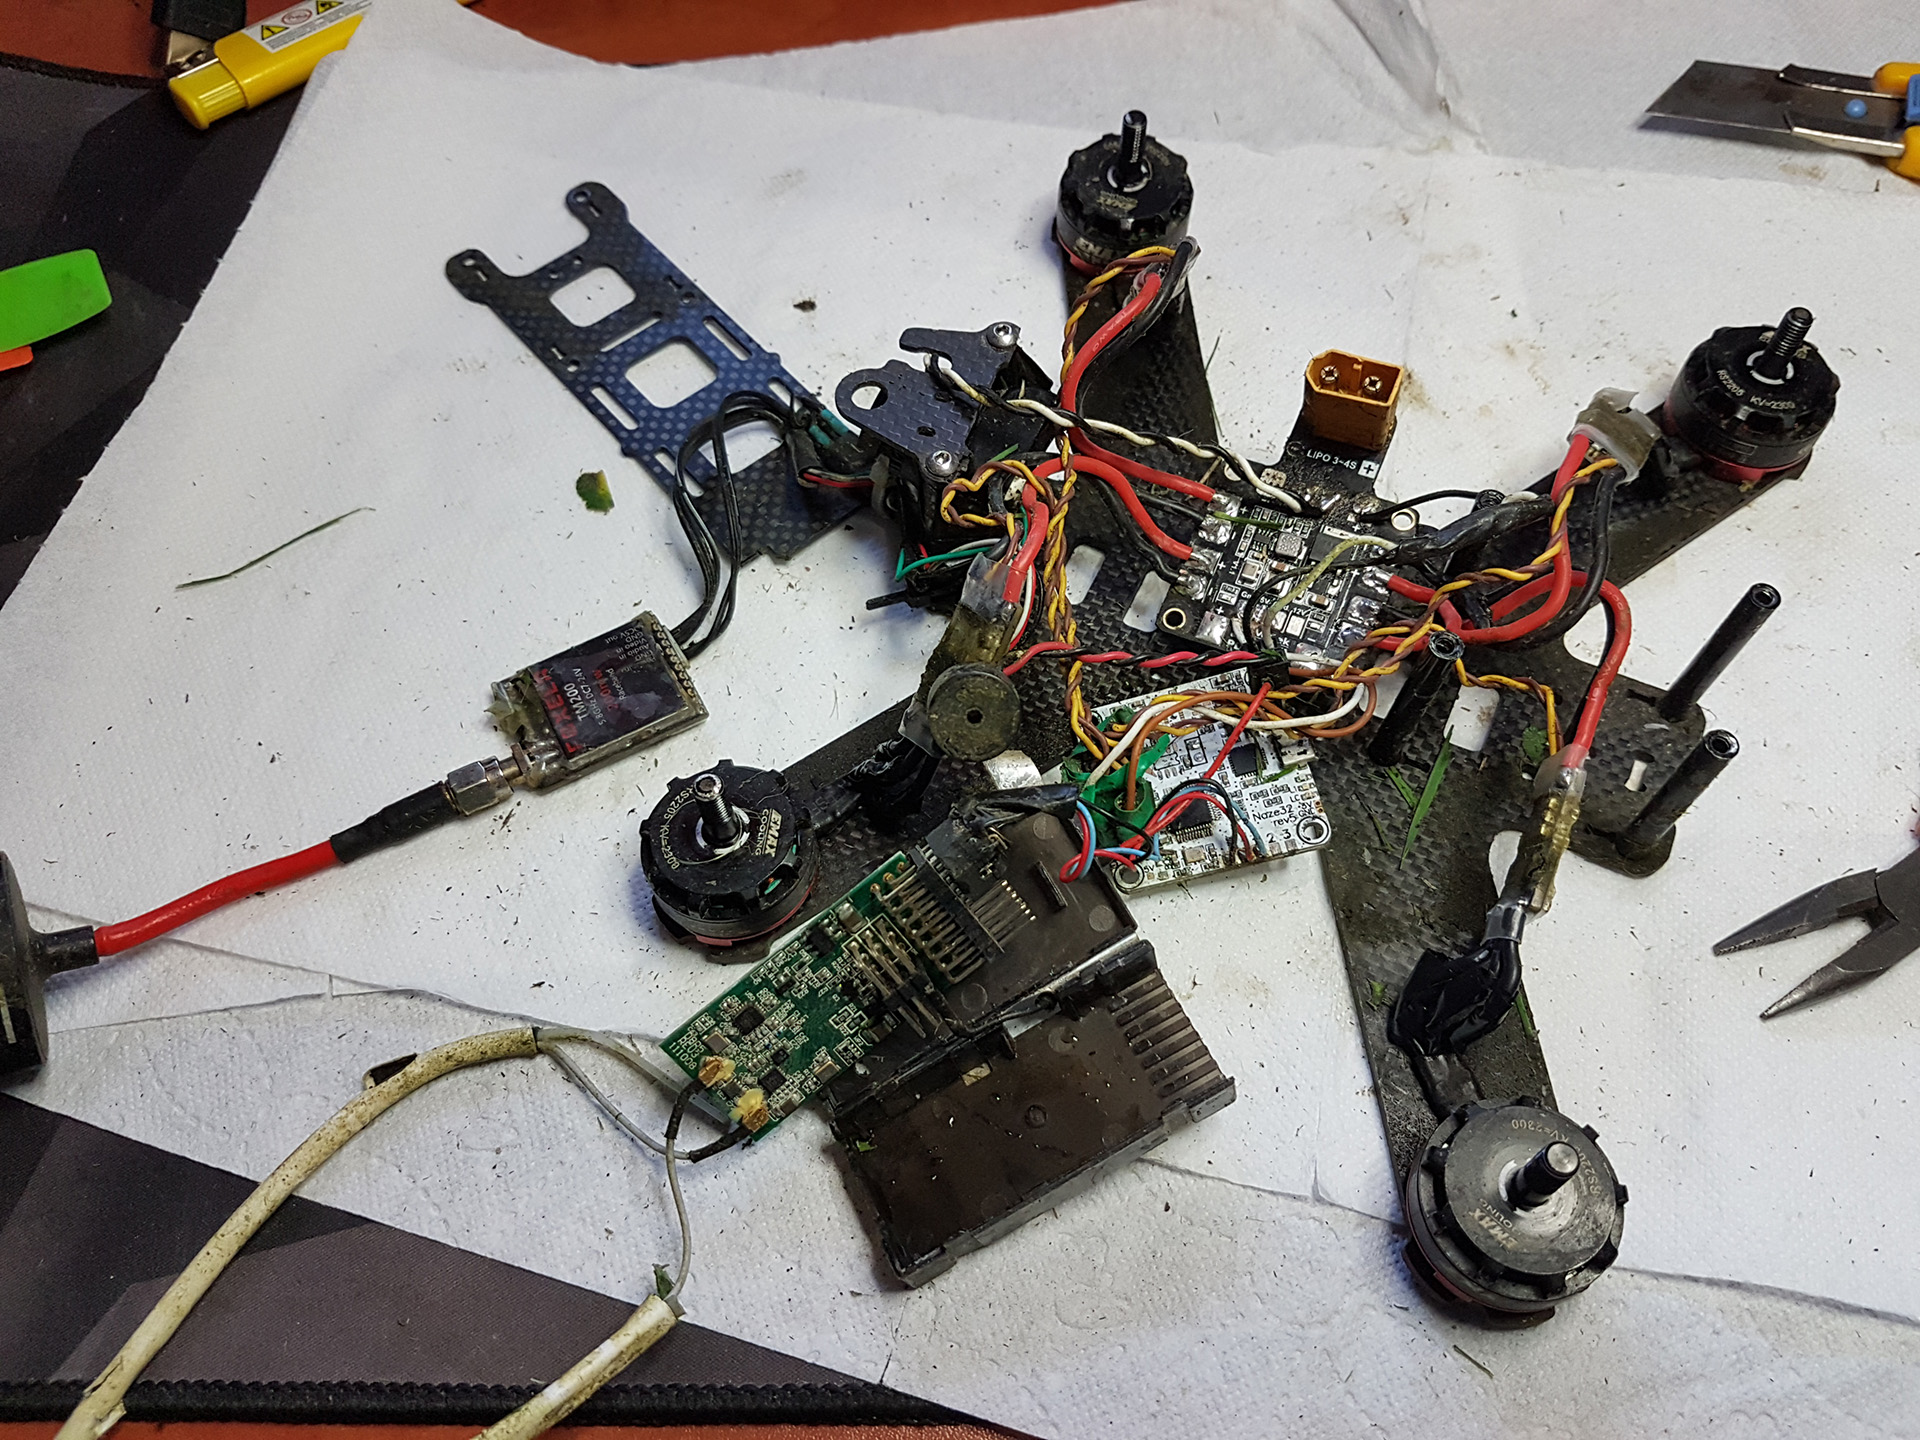
I had seen some videos earlier of drones even flying after they got wet… didn’t count on it but tried it anyway. No luck. Wouldn’t be reliable anyway. So that was it for the day. I went home, disassembled pretty much everything and left it overnight to dry off.
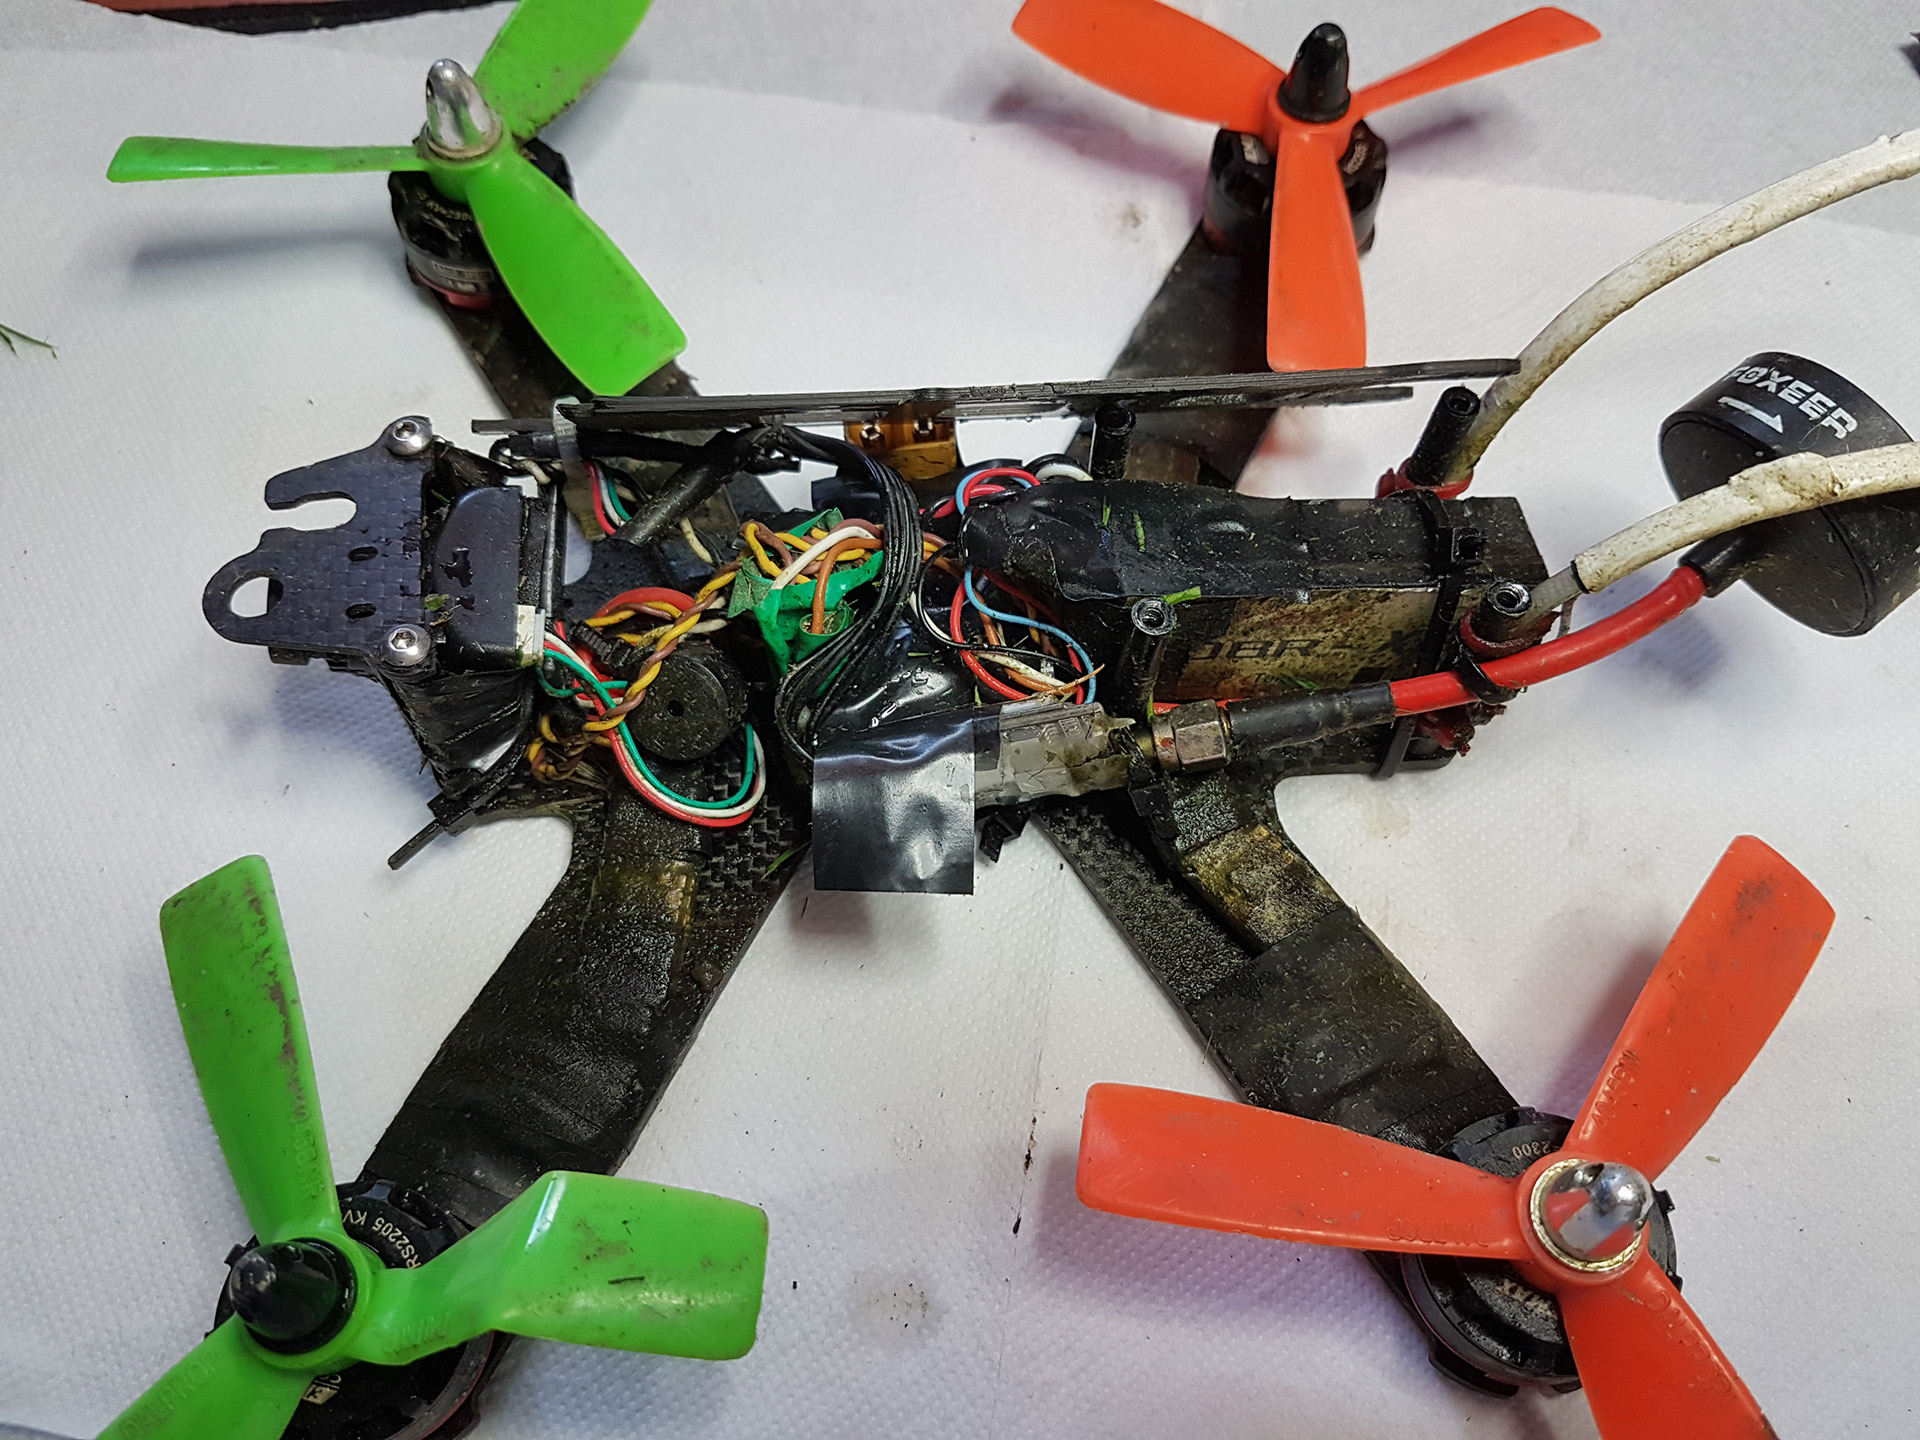
This is nice, if u think about it, how this thing didn’t break completely. It’s also quite scary what could have happened to the LiPo battery xD
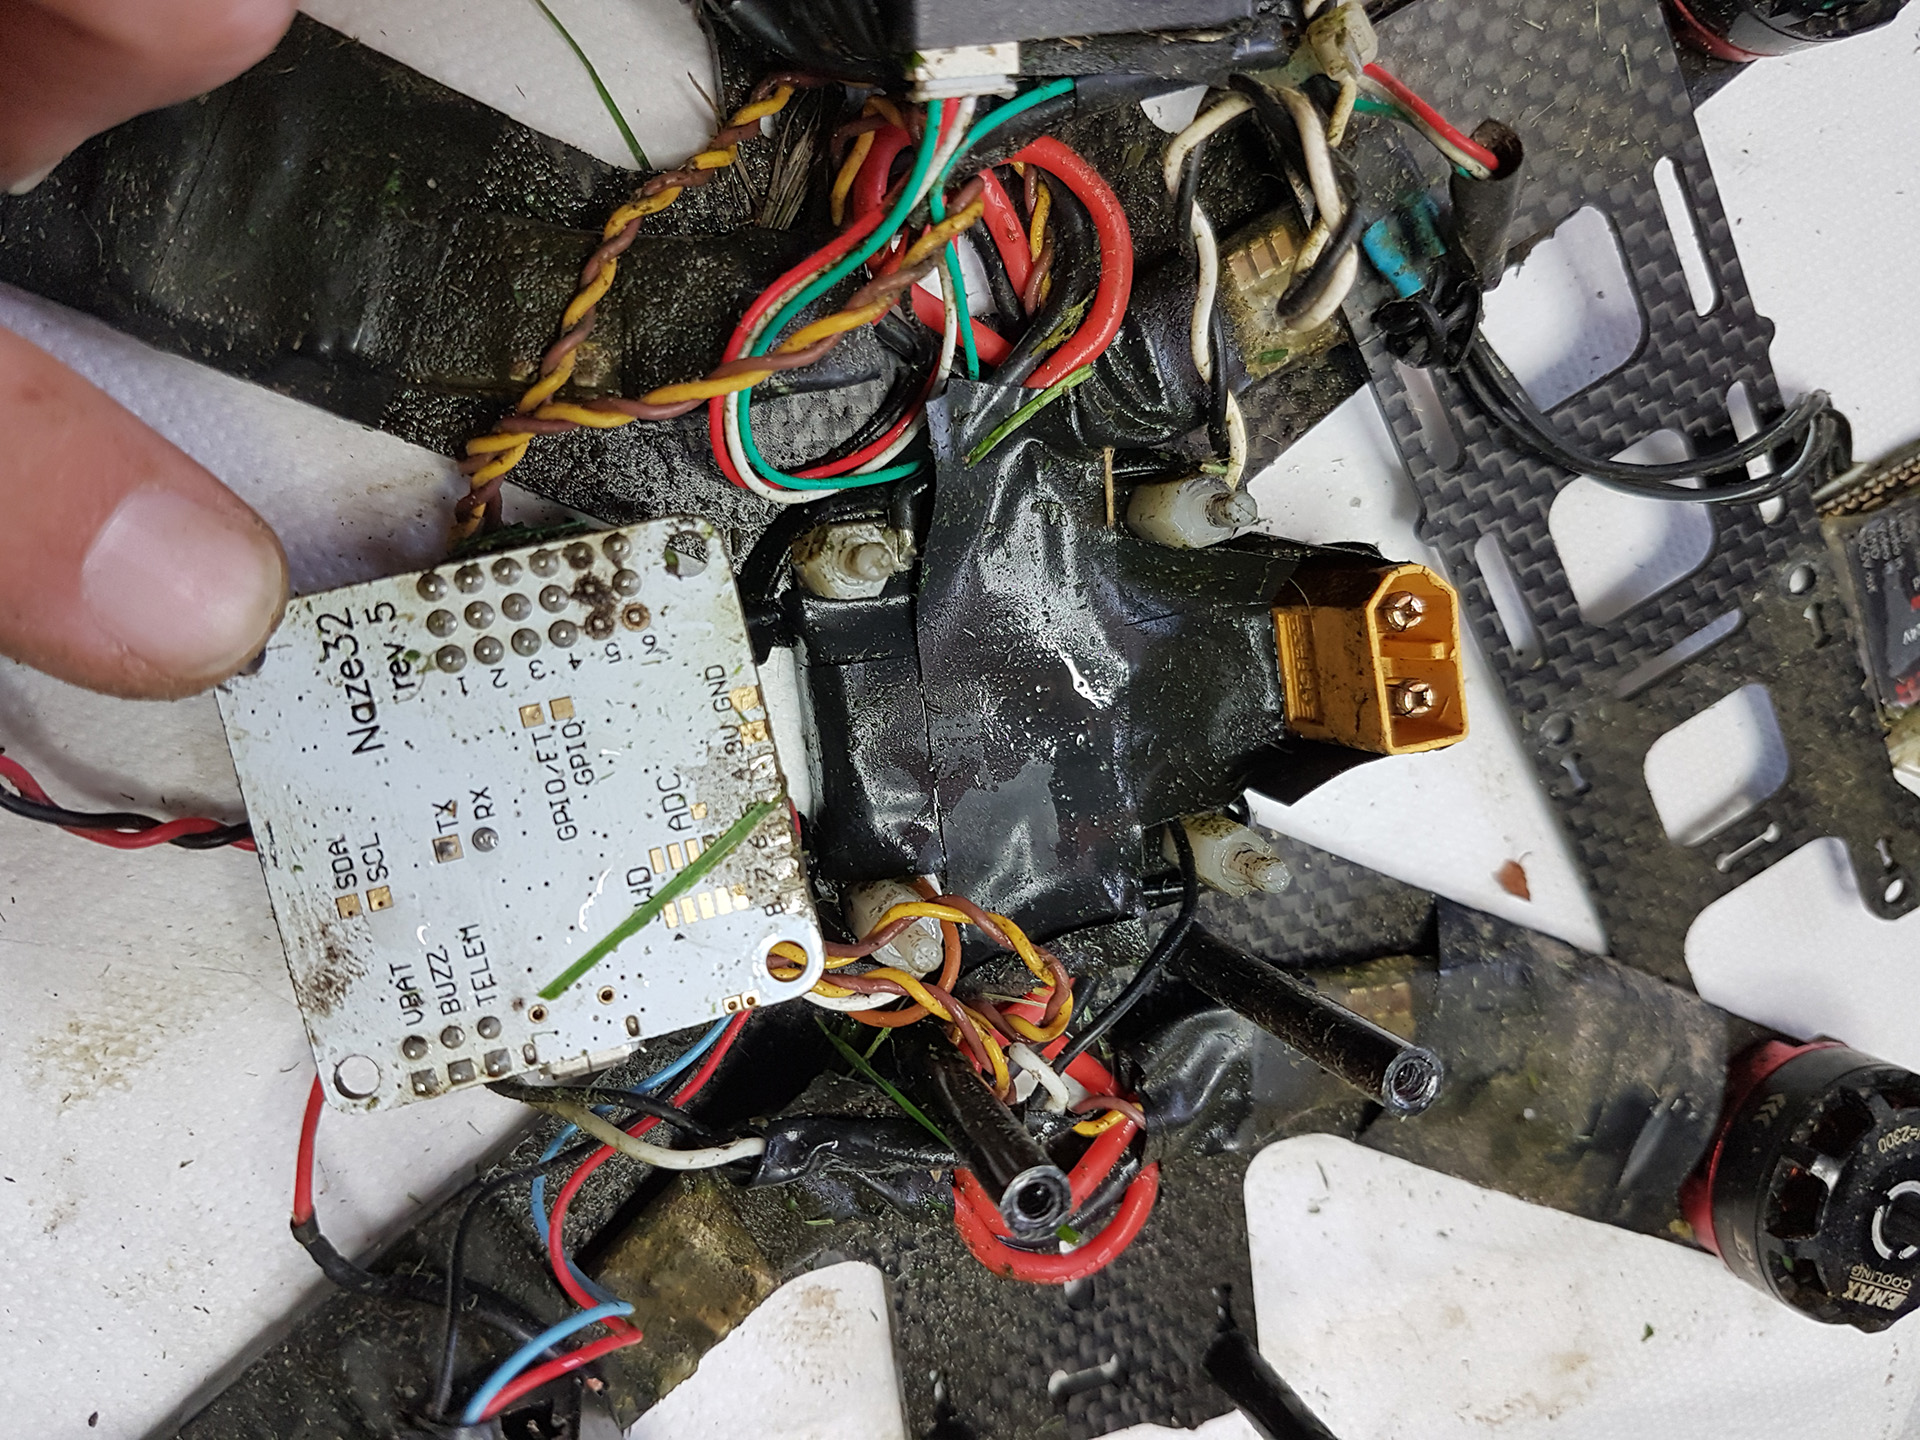
Here you can see pretty much everything that goes into the drone, but with it’s ‘vains’ just spread out:
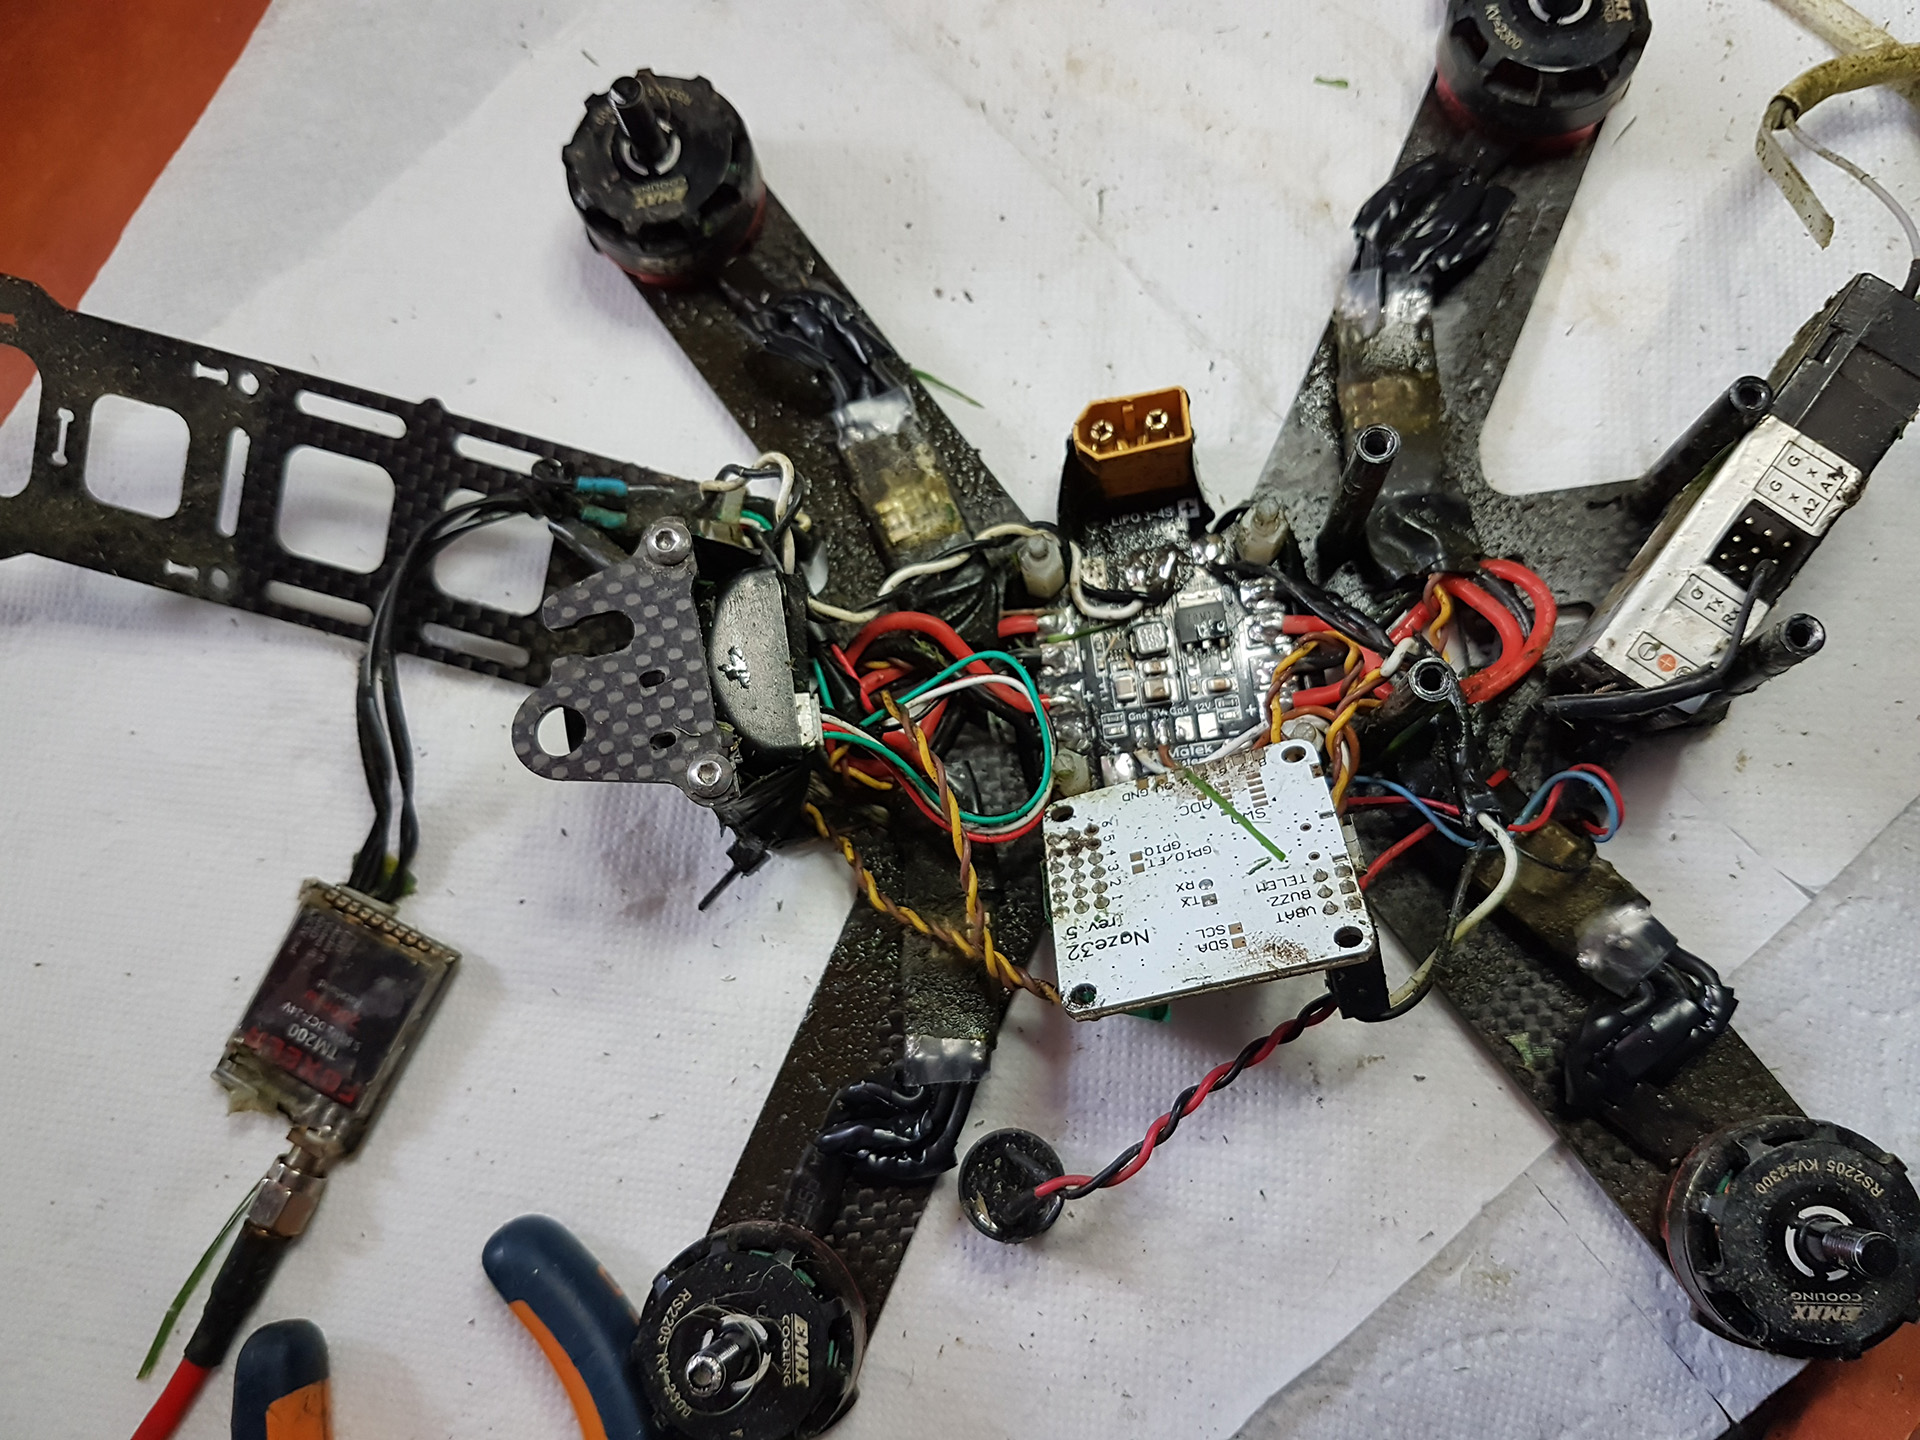
The next day I plugged a battery and hoped for the best… Quite suprisingly all went well and the drone was functinal. I cleaned all parts and put it back together.
So – gathered all the toys, and were back in the game 😉
QuickFix – Laptop Charging Port
A laptop stopped charging and nothing lights up – that’s more or less what I was told. A different charger had been tried, but with no luck. Service shop thinks it might cost 1k (which is high considering the age of this PC).
I thought that maybe just the charging socket is damaged – loose mechanical part, cracked solder joint, etc. After veryfing the power brick (and also trying yet another one) I was pretty much sure that the problem lied on the laptop side. So I took it apart:
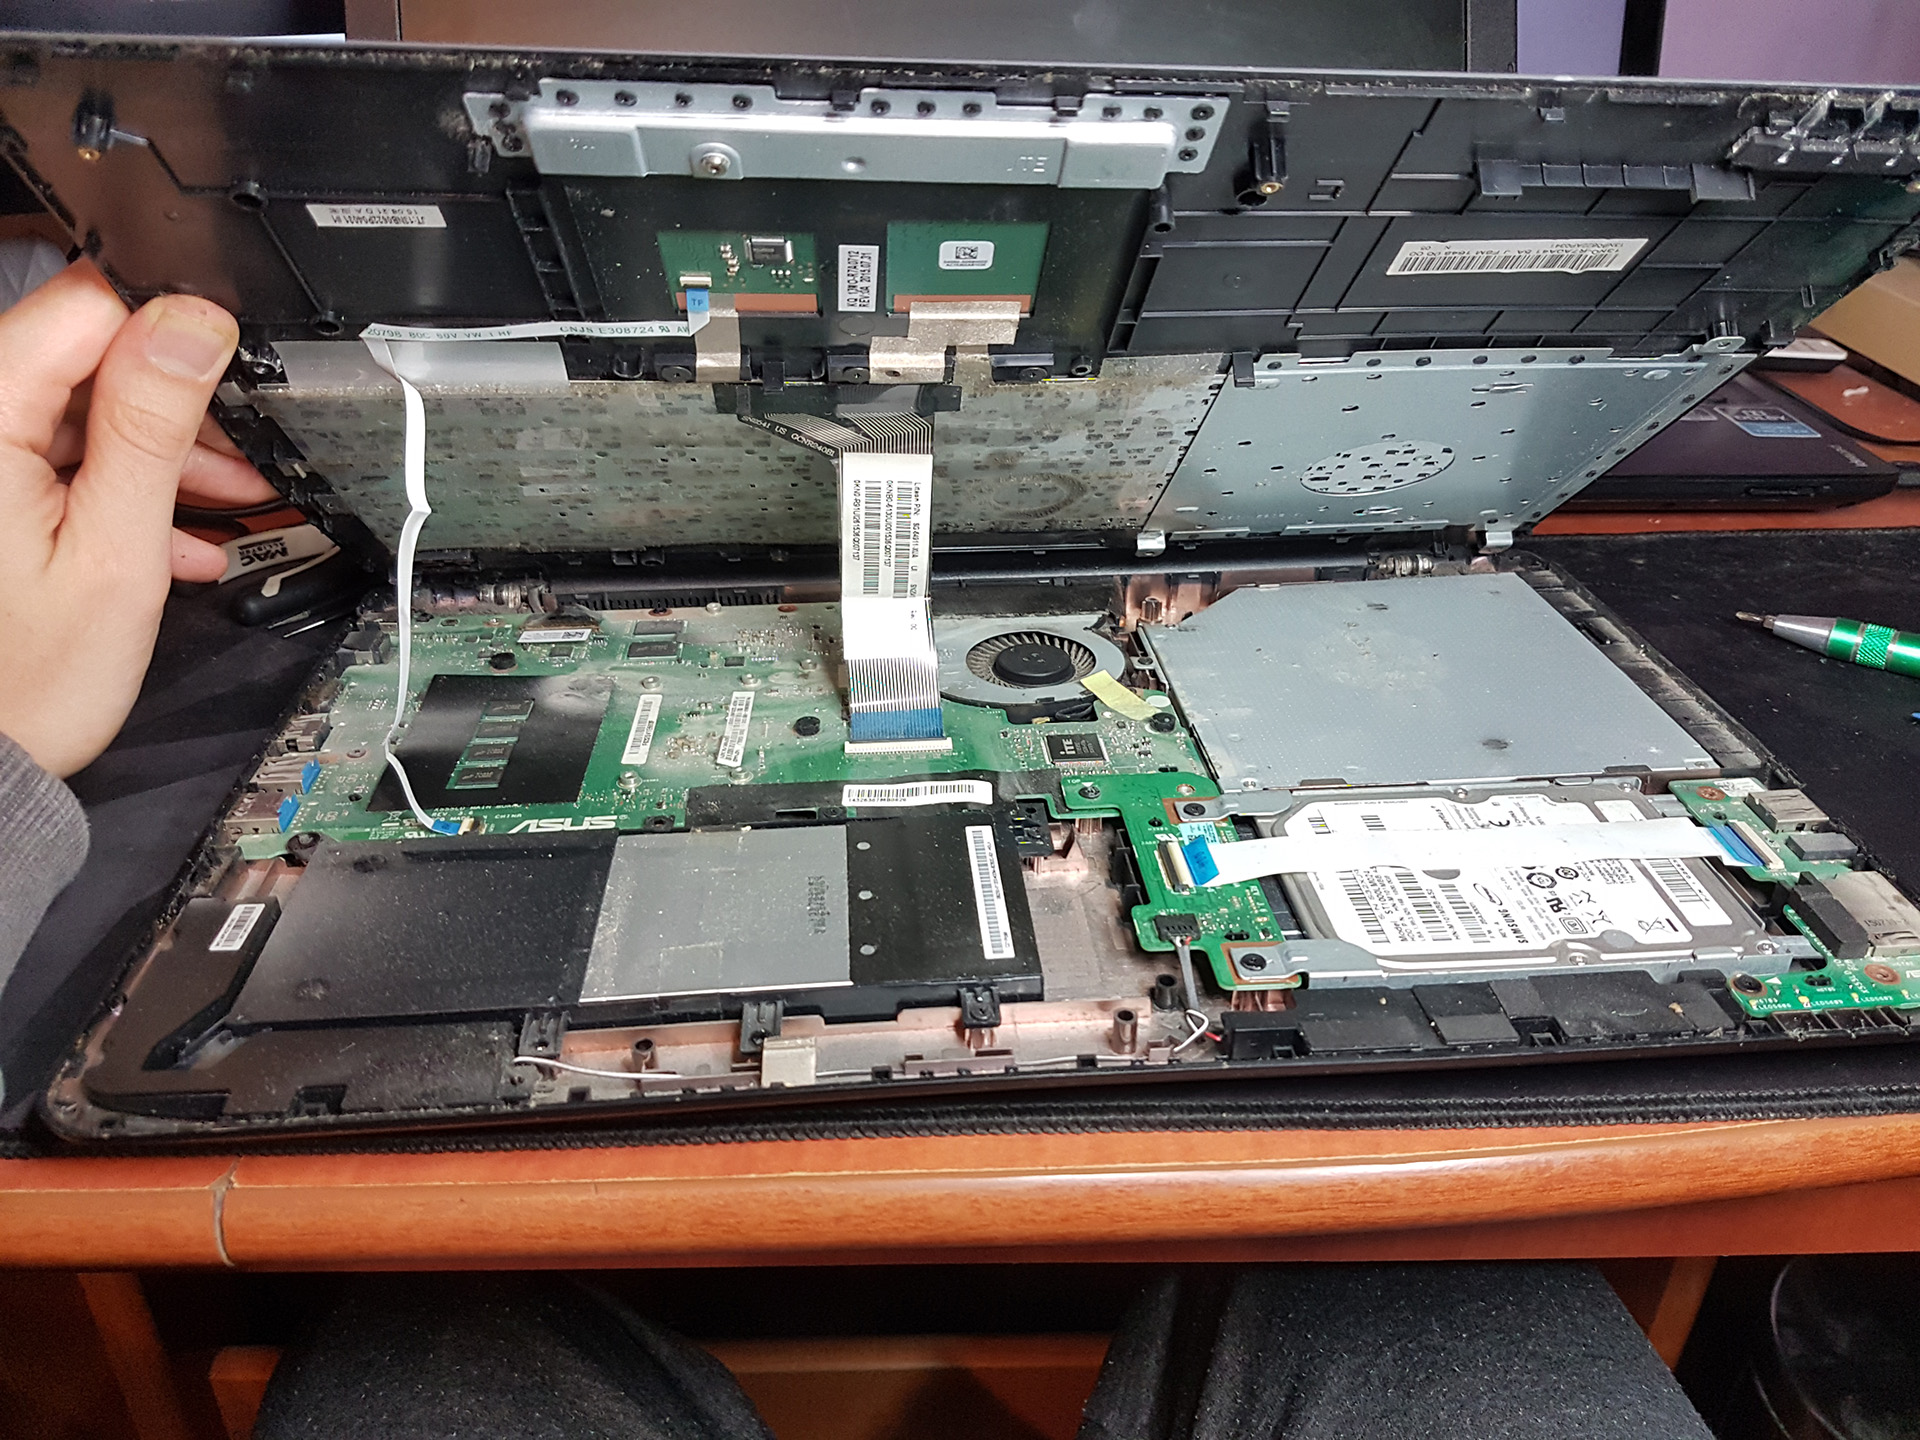
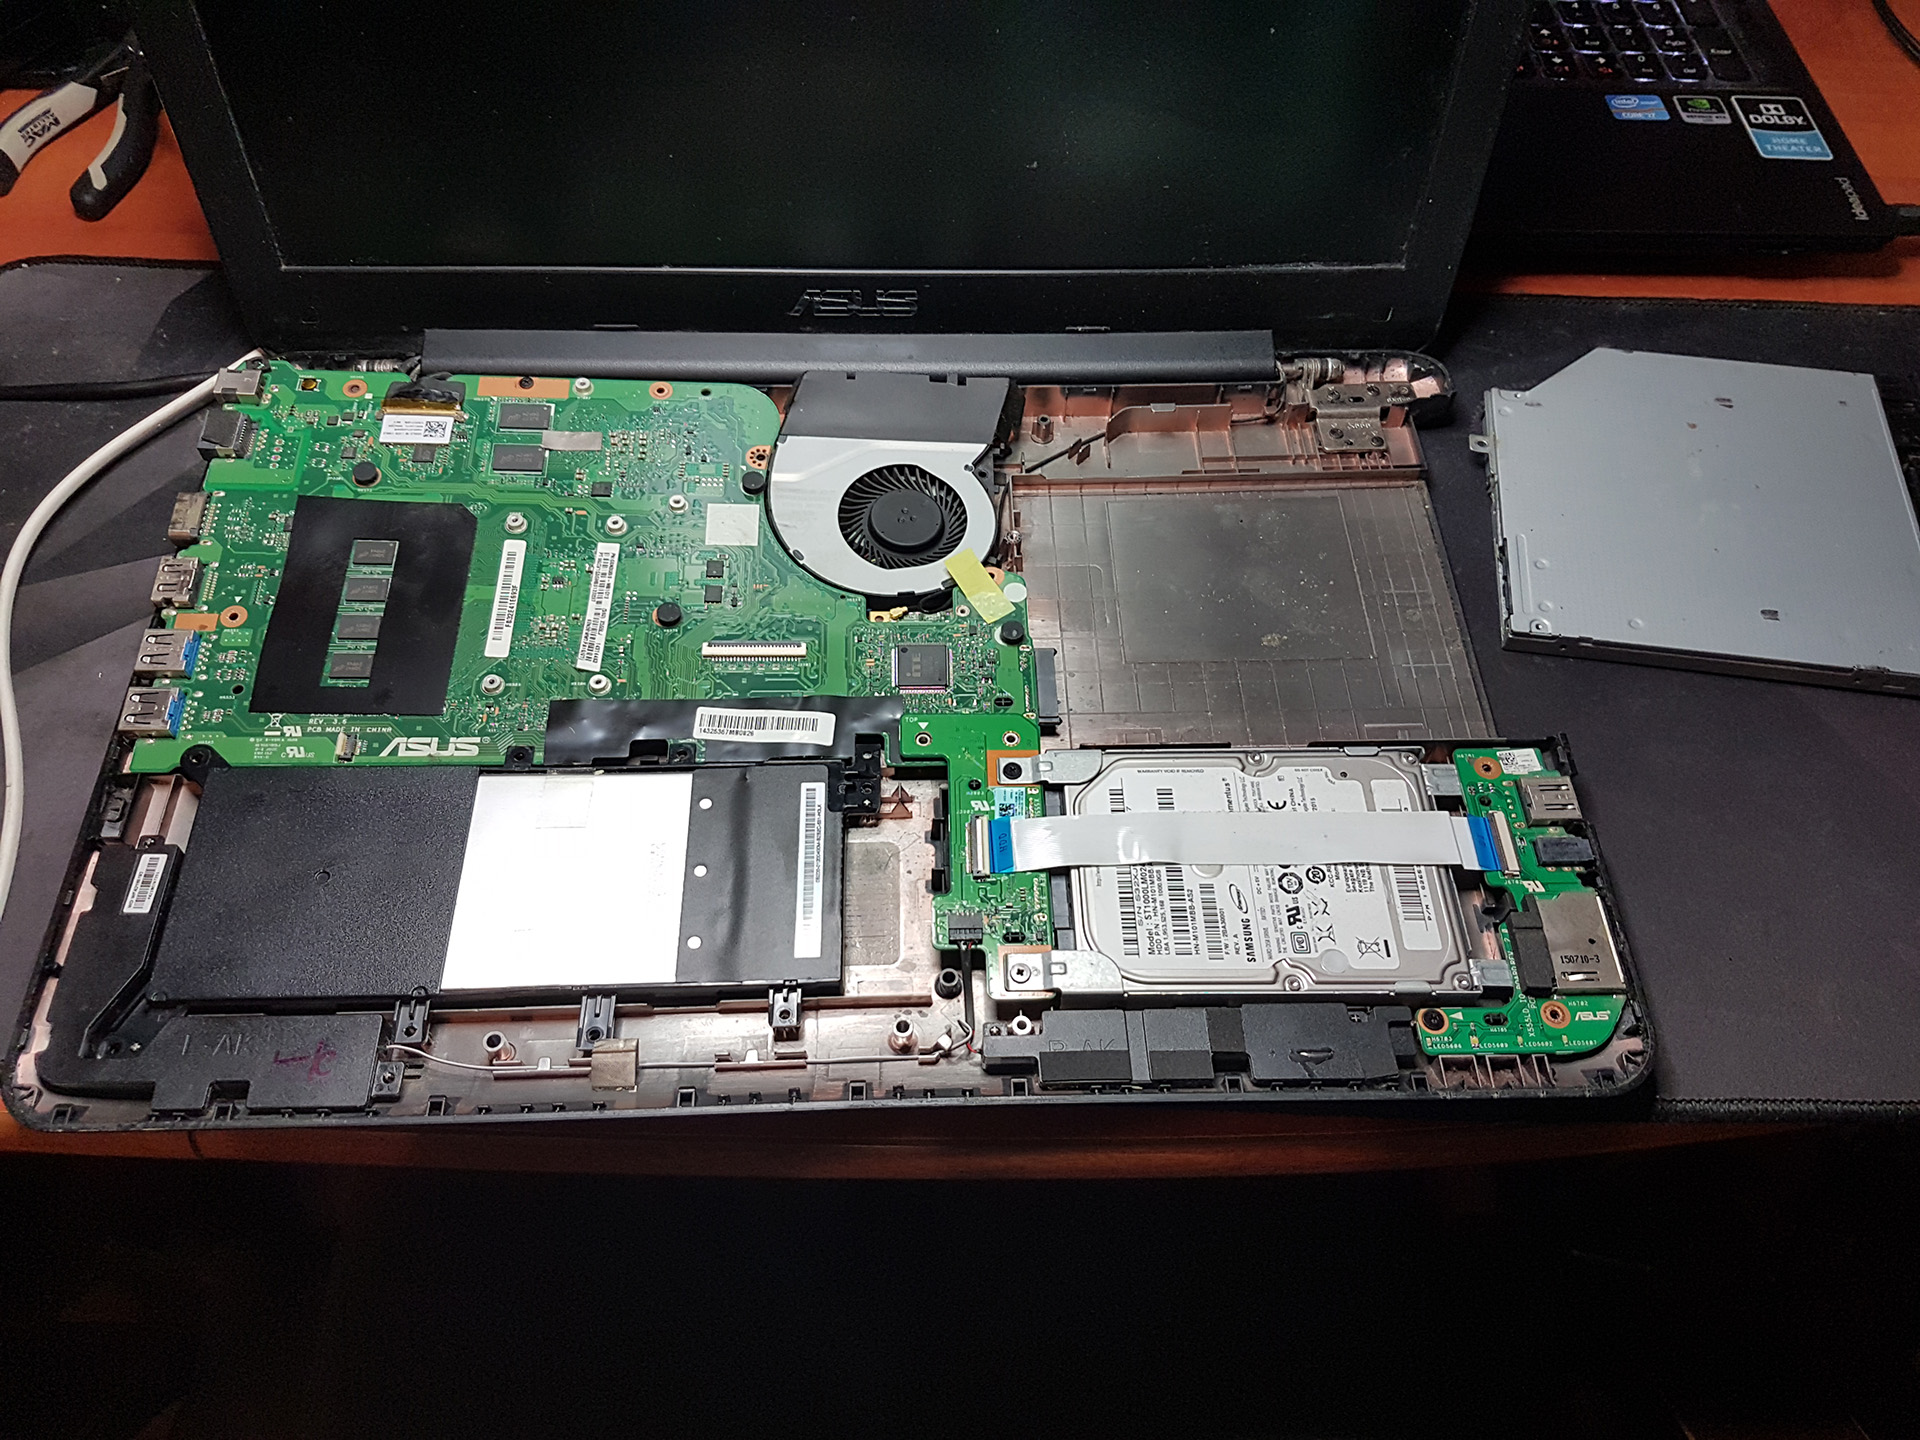
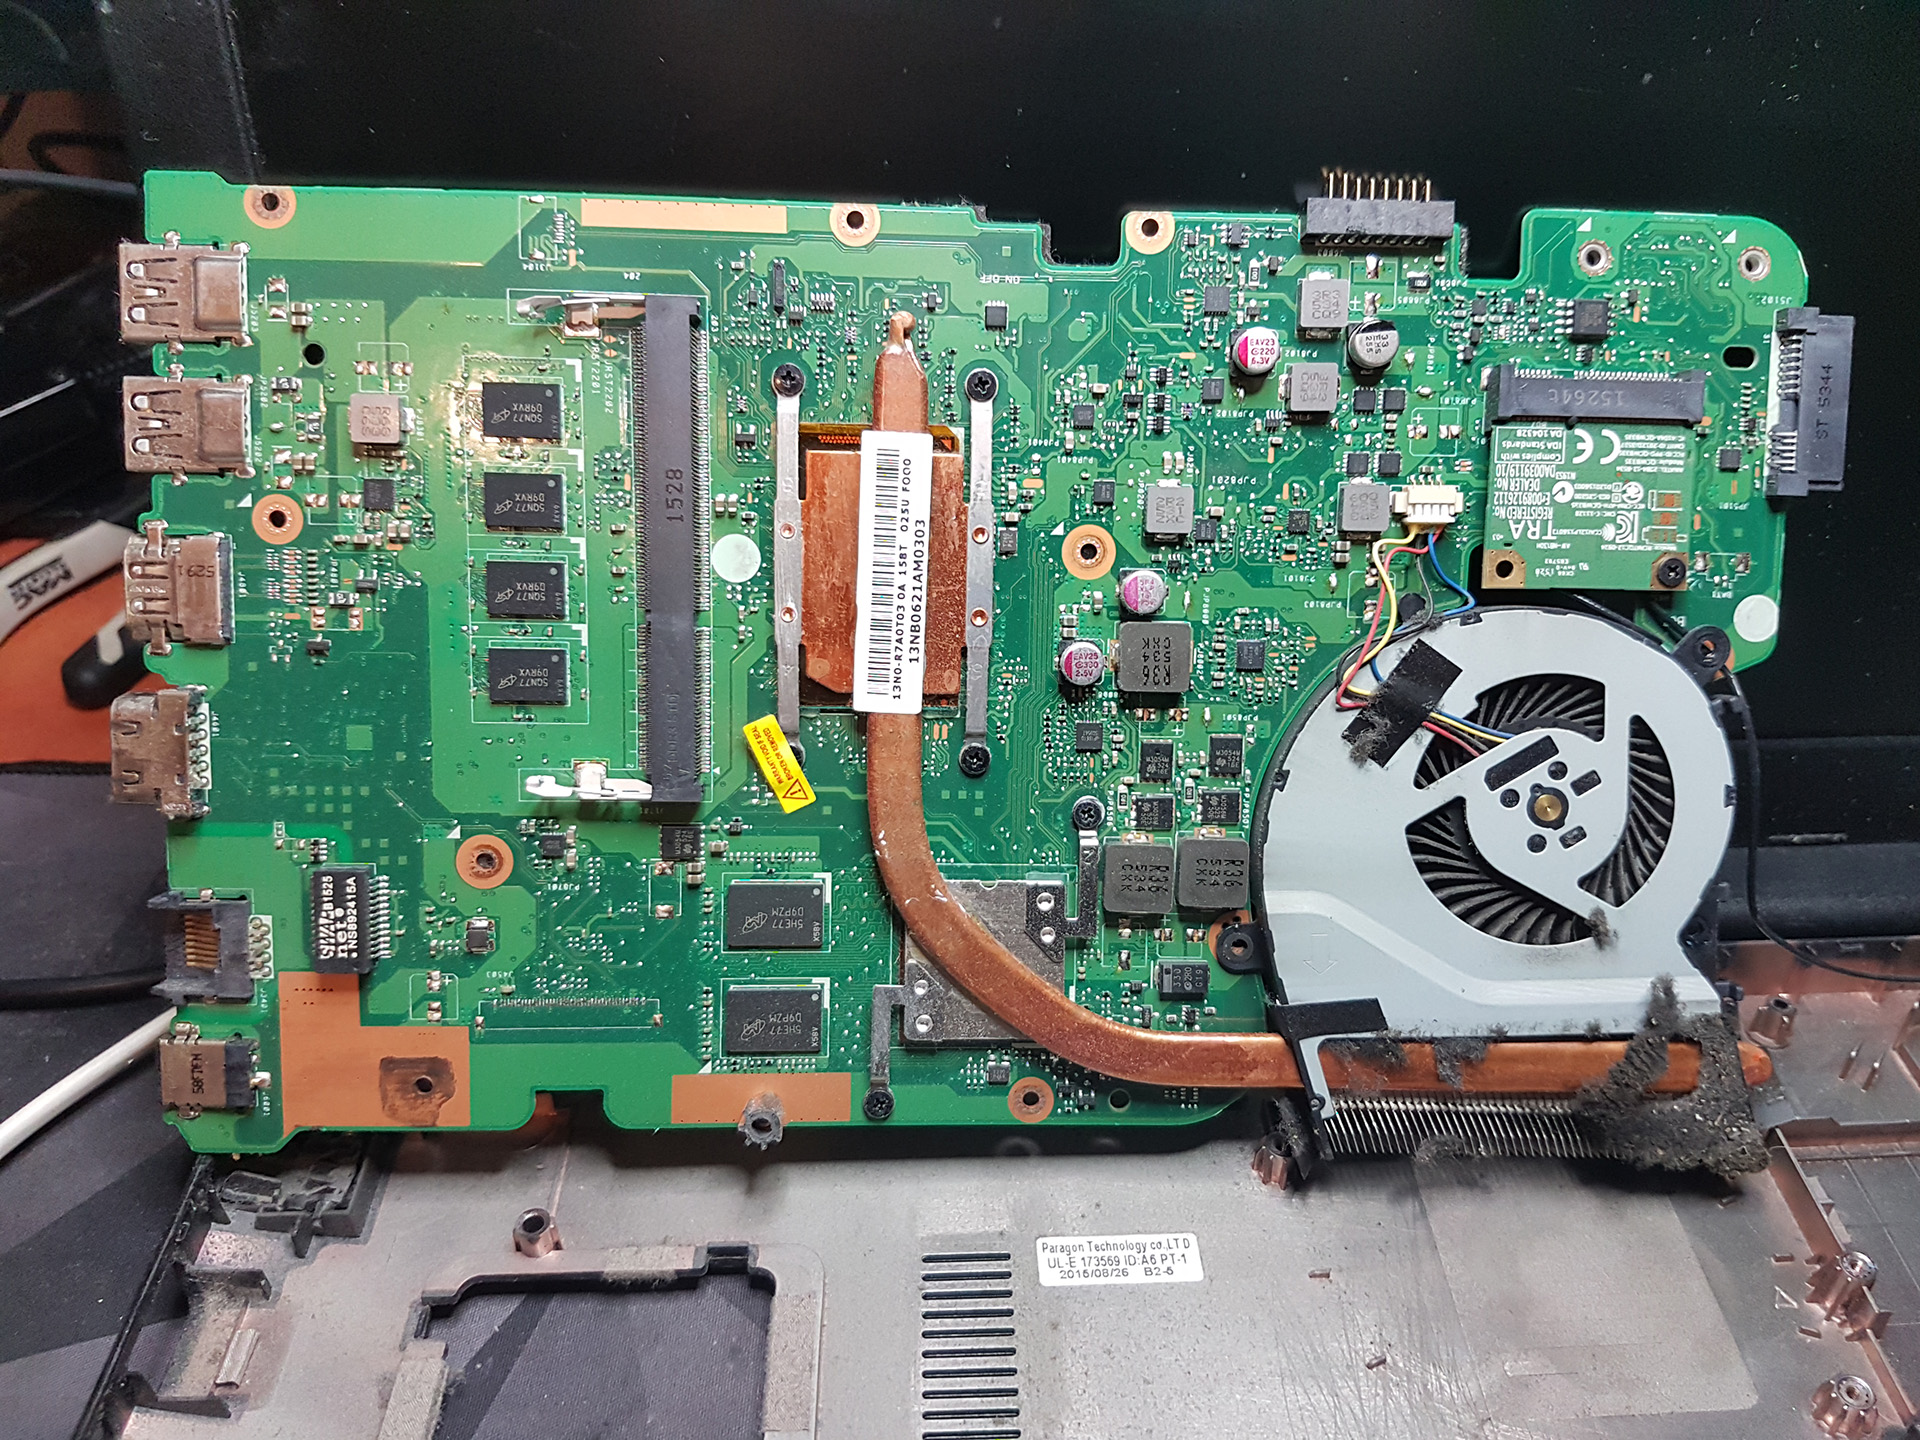
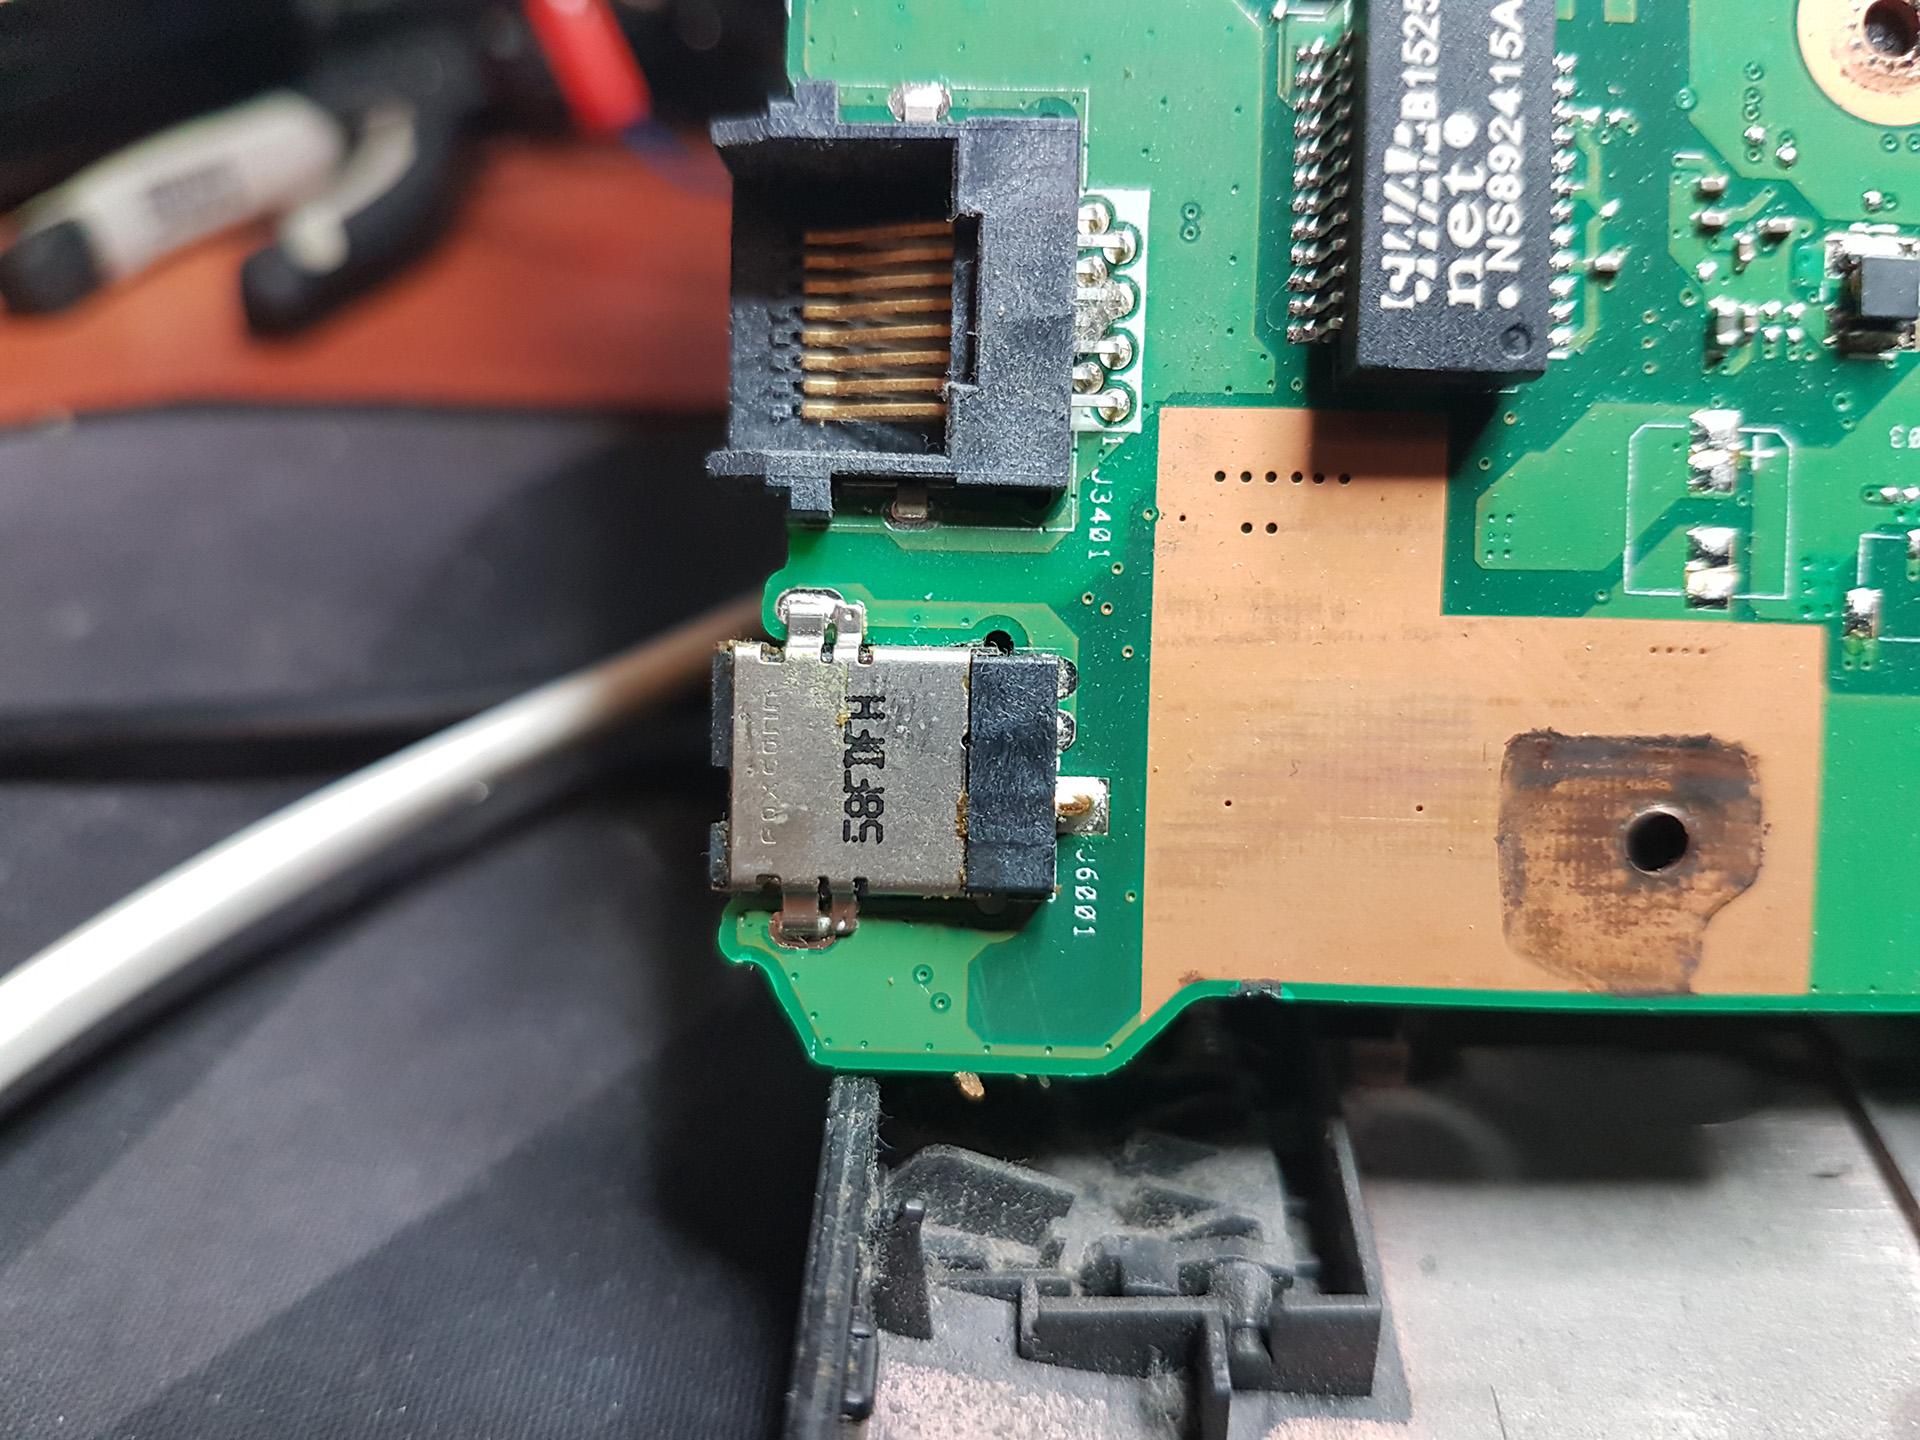
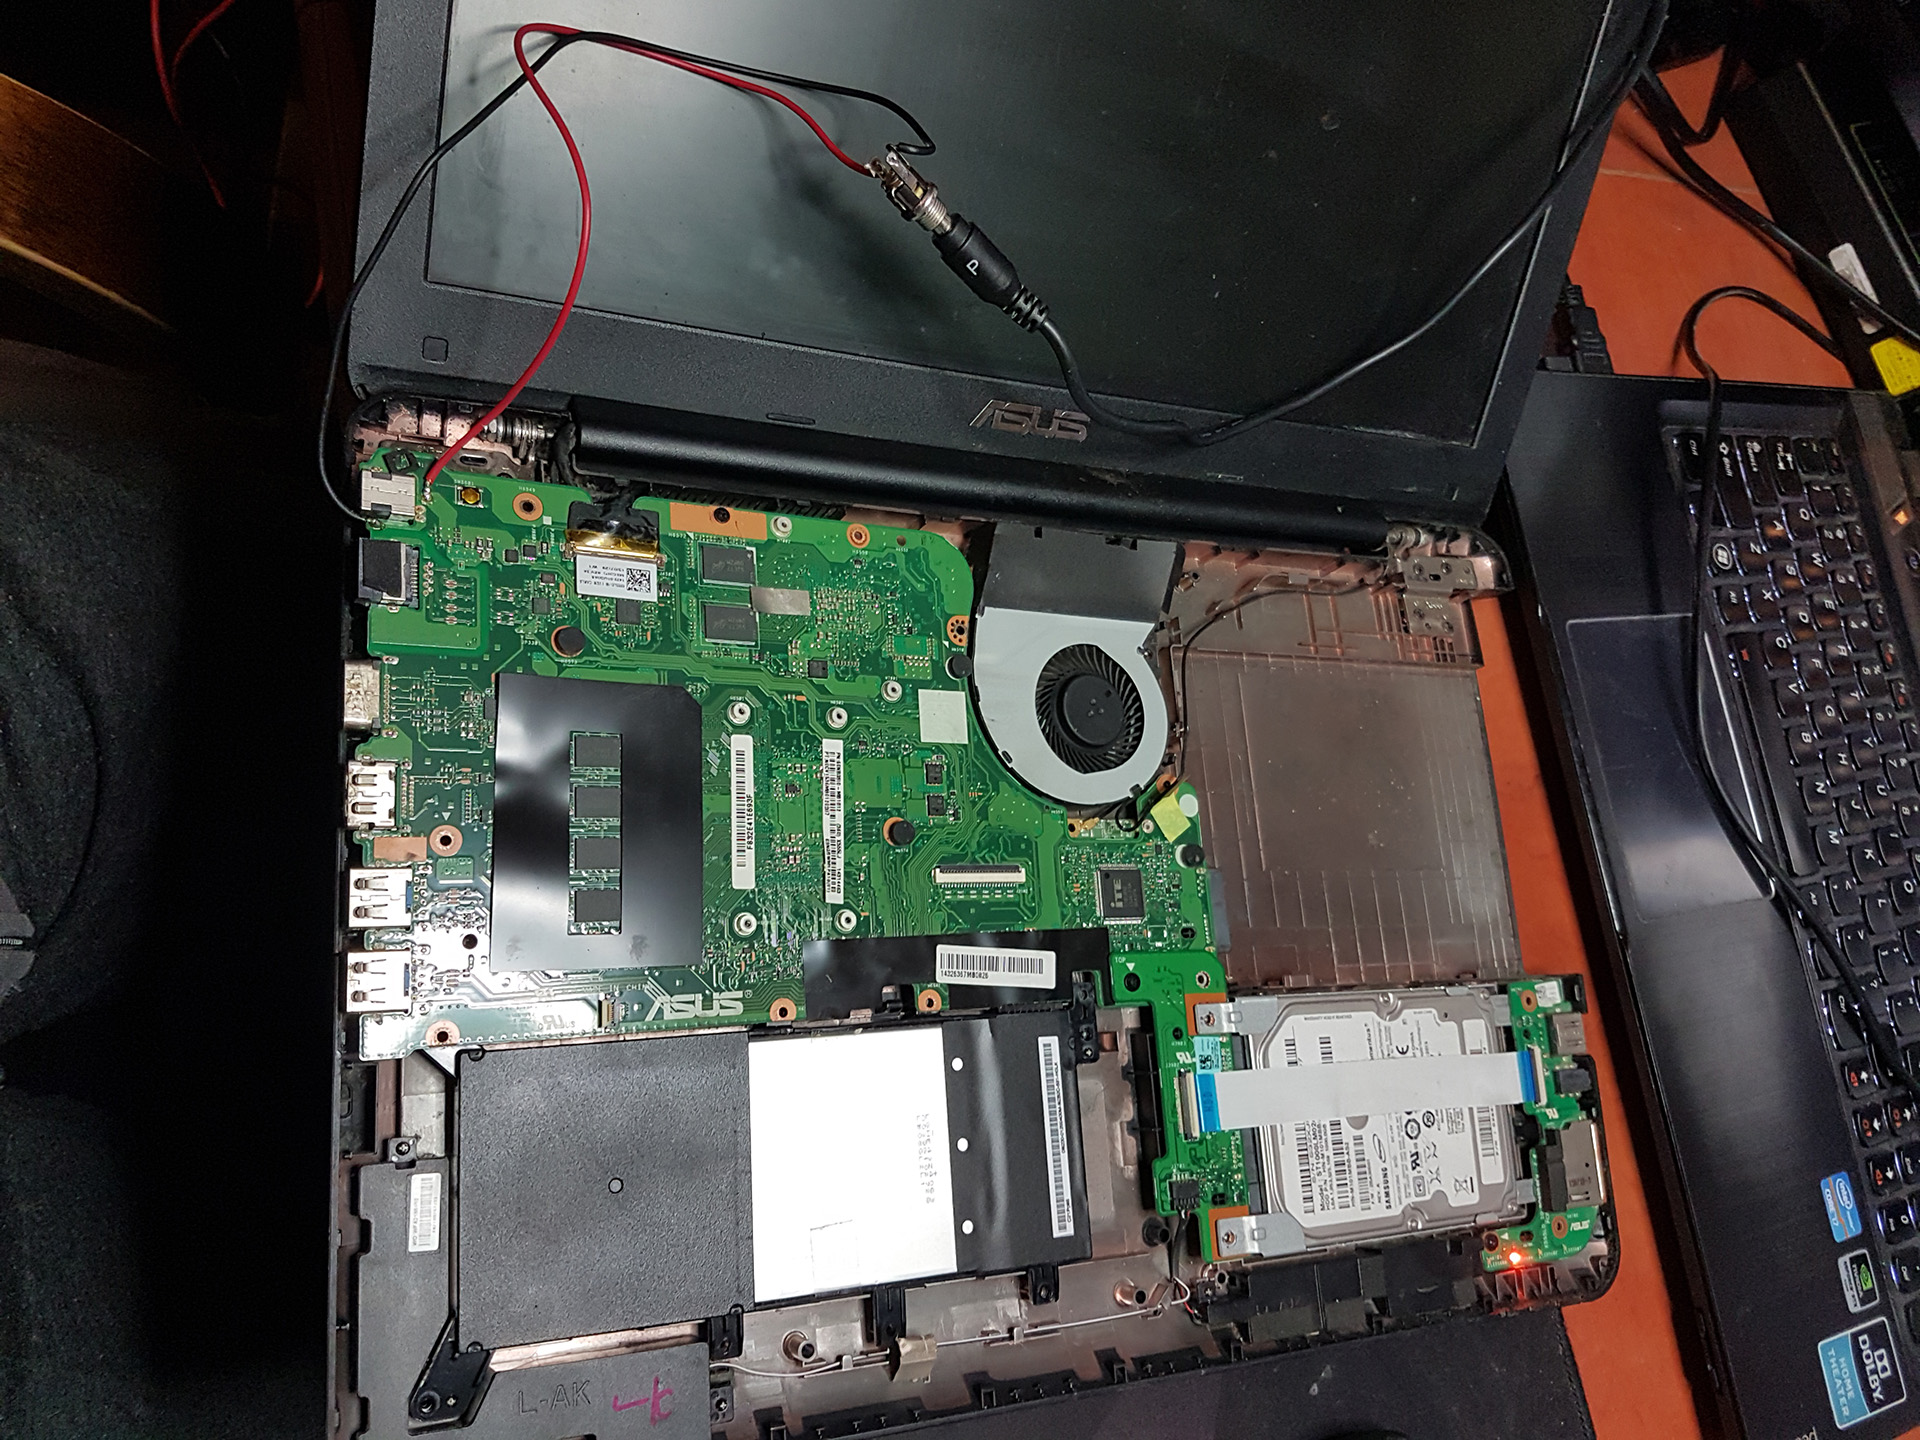
Measuring the connection between the charging port and the PCB revealed that there actually was a continuity break (at the low side). I attached external wires to the solder joints, applied power and luckily got a charging indication (LED on). The laptop booted fine.
Unfortunatelly I couldn’t replace the socket as I didn’t have anyting that would fit there. I knew that the owner of this PC wouldn’t mind hot fixes and improvised solutions, so I just went ahead and used what was available – namely a different DC jack that would accomodate the power brick’s plug. And there it is:
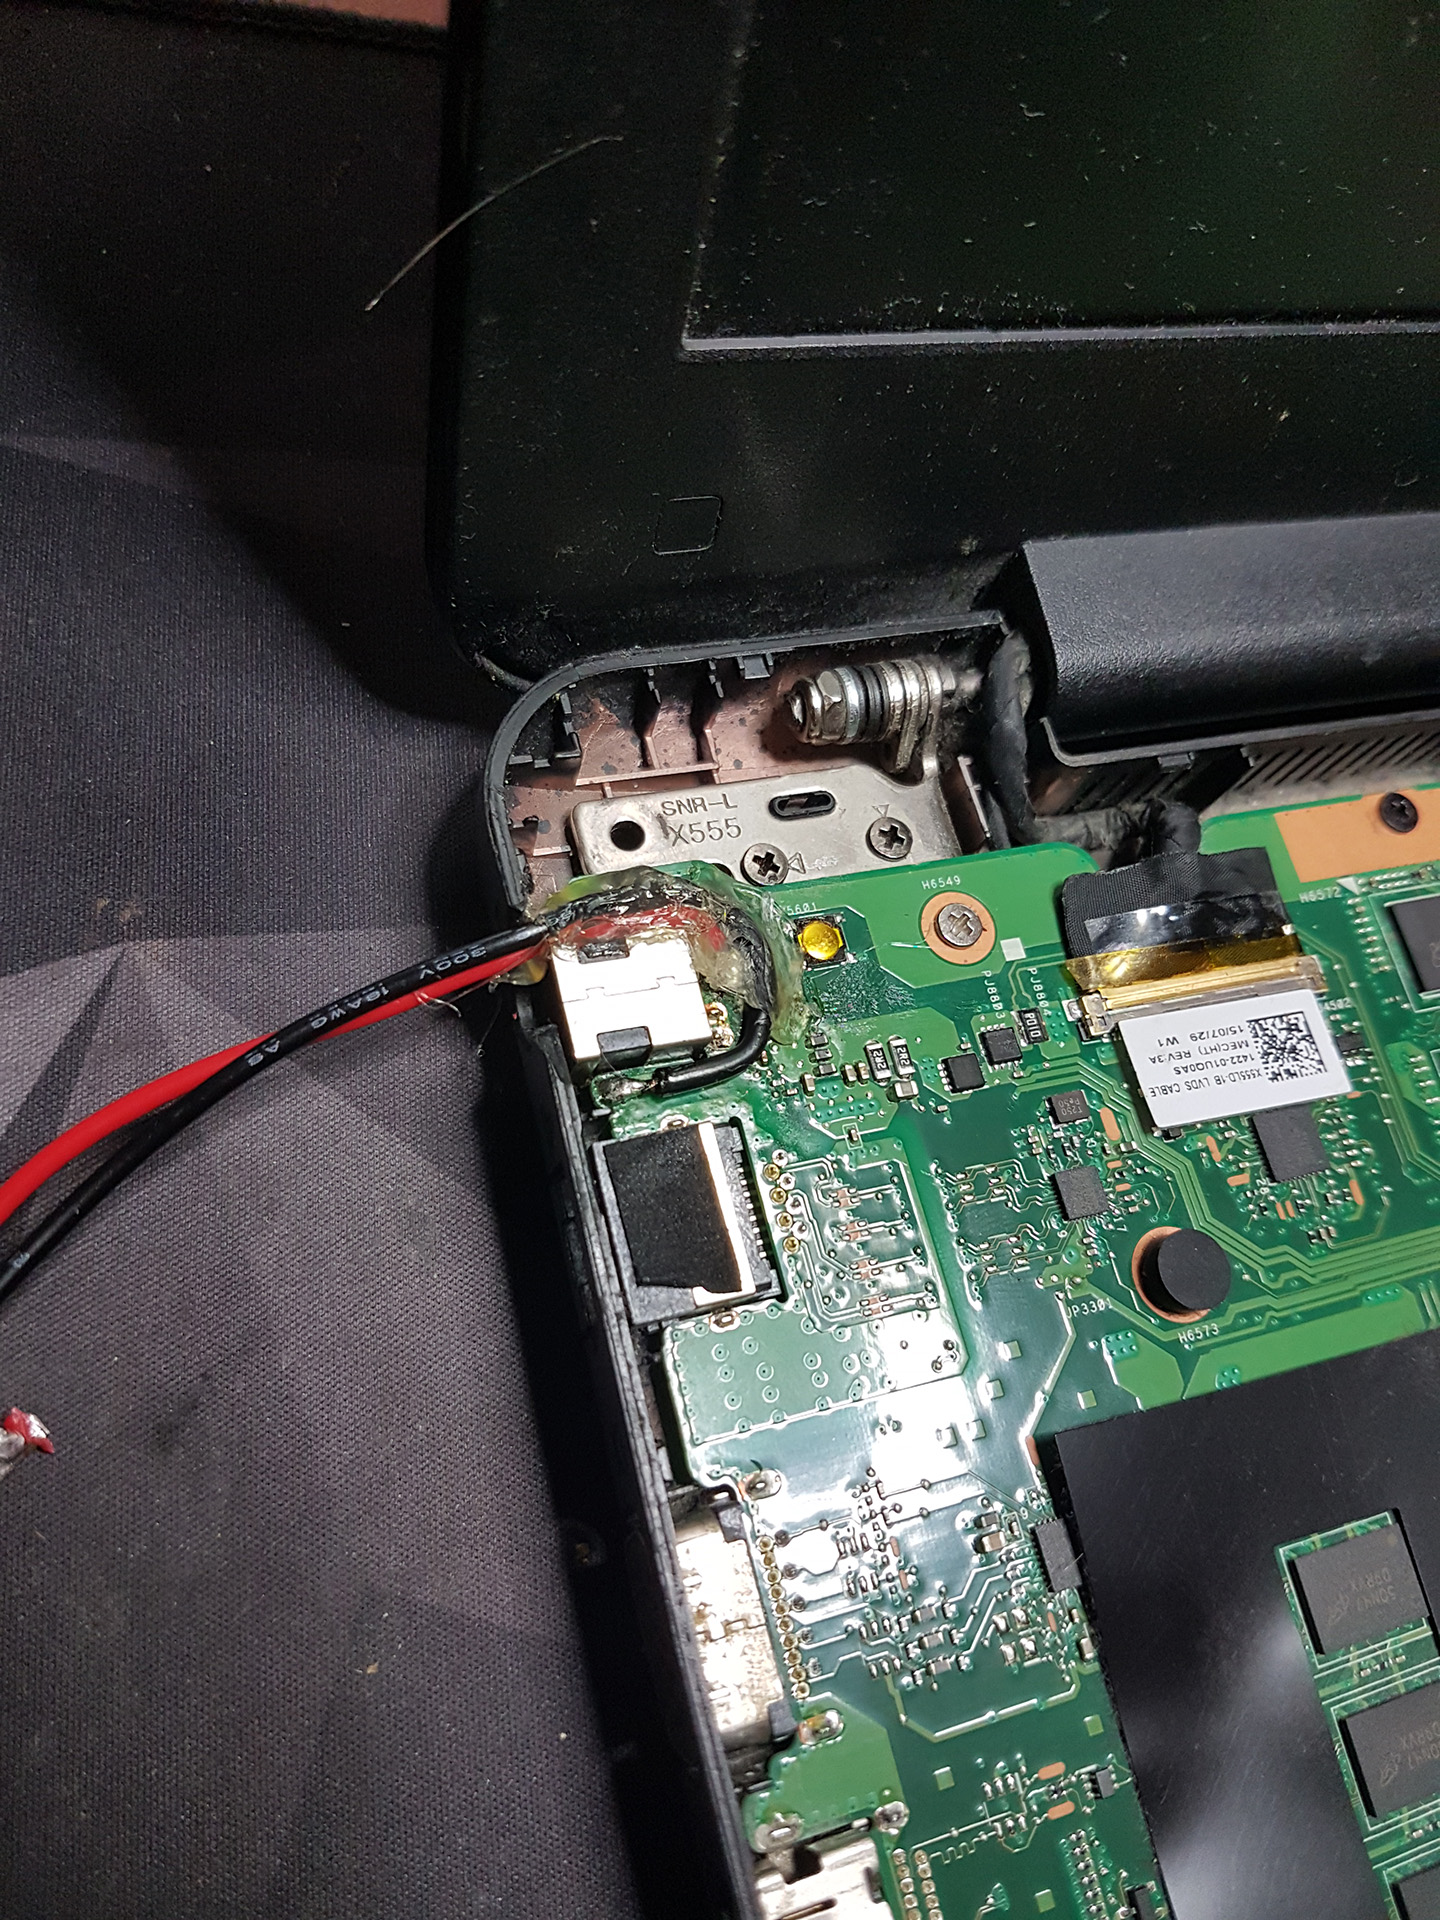
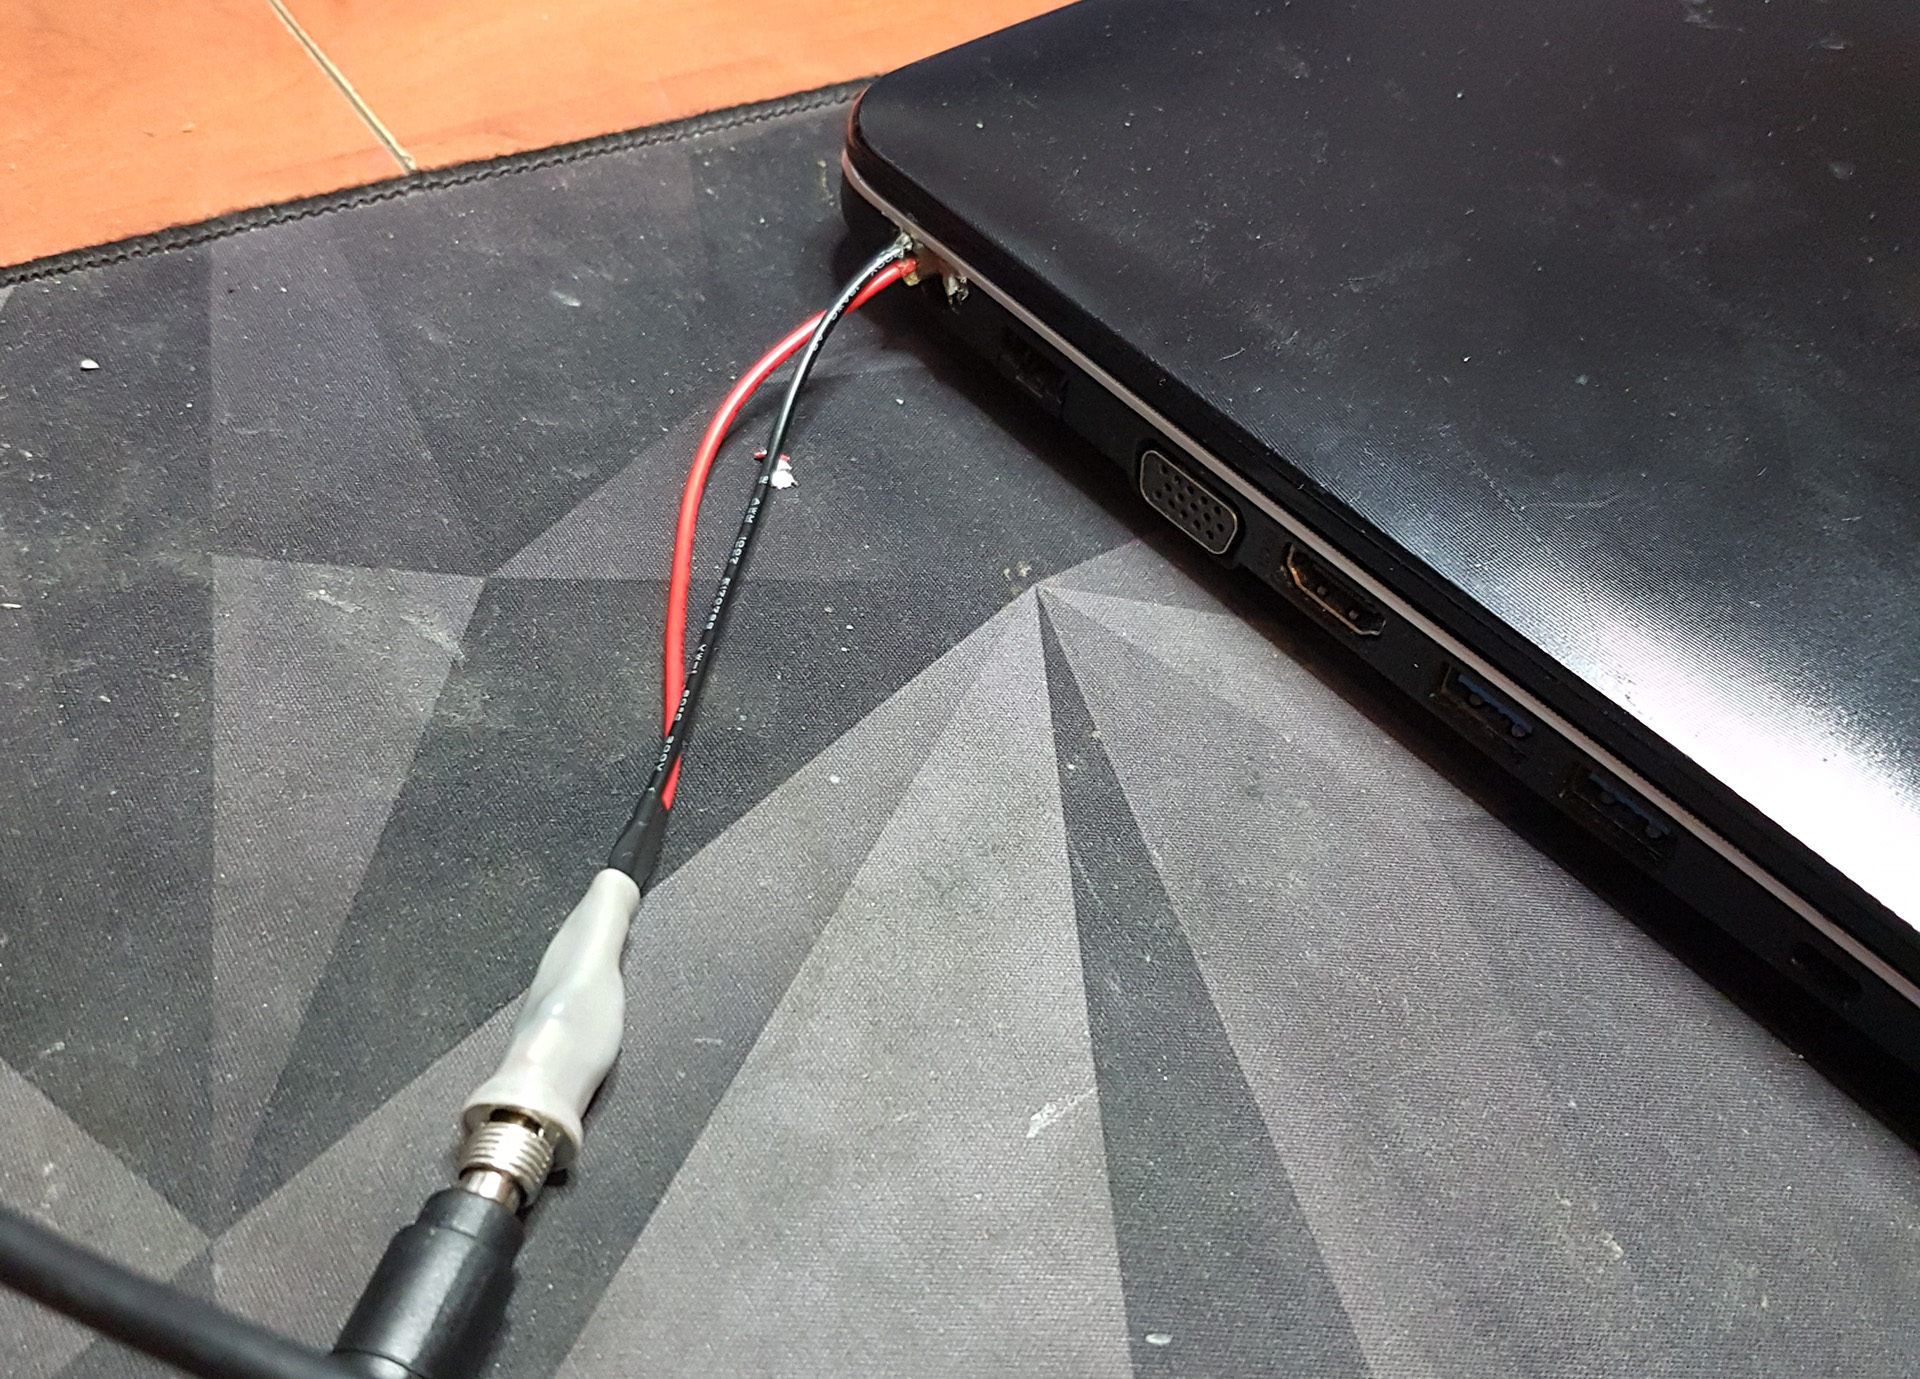
Just used some hot glue to keep the wires in place. That’s what saves the day, right? I mean: hot glue, silver tape and zip-ties ^^, Anyway – this simply resolved the issue and is hardly an inconvenience.
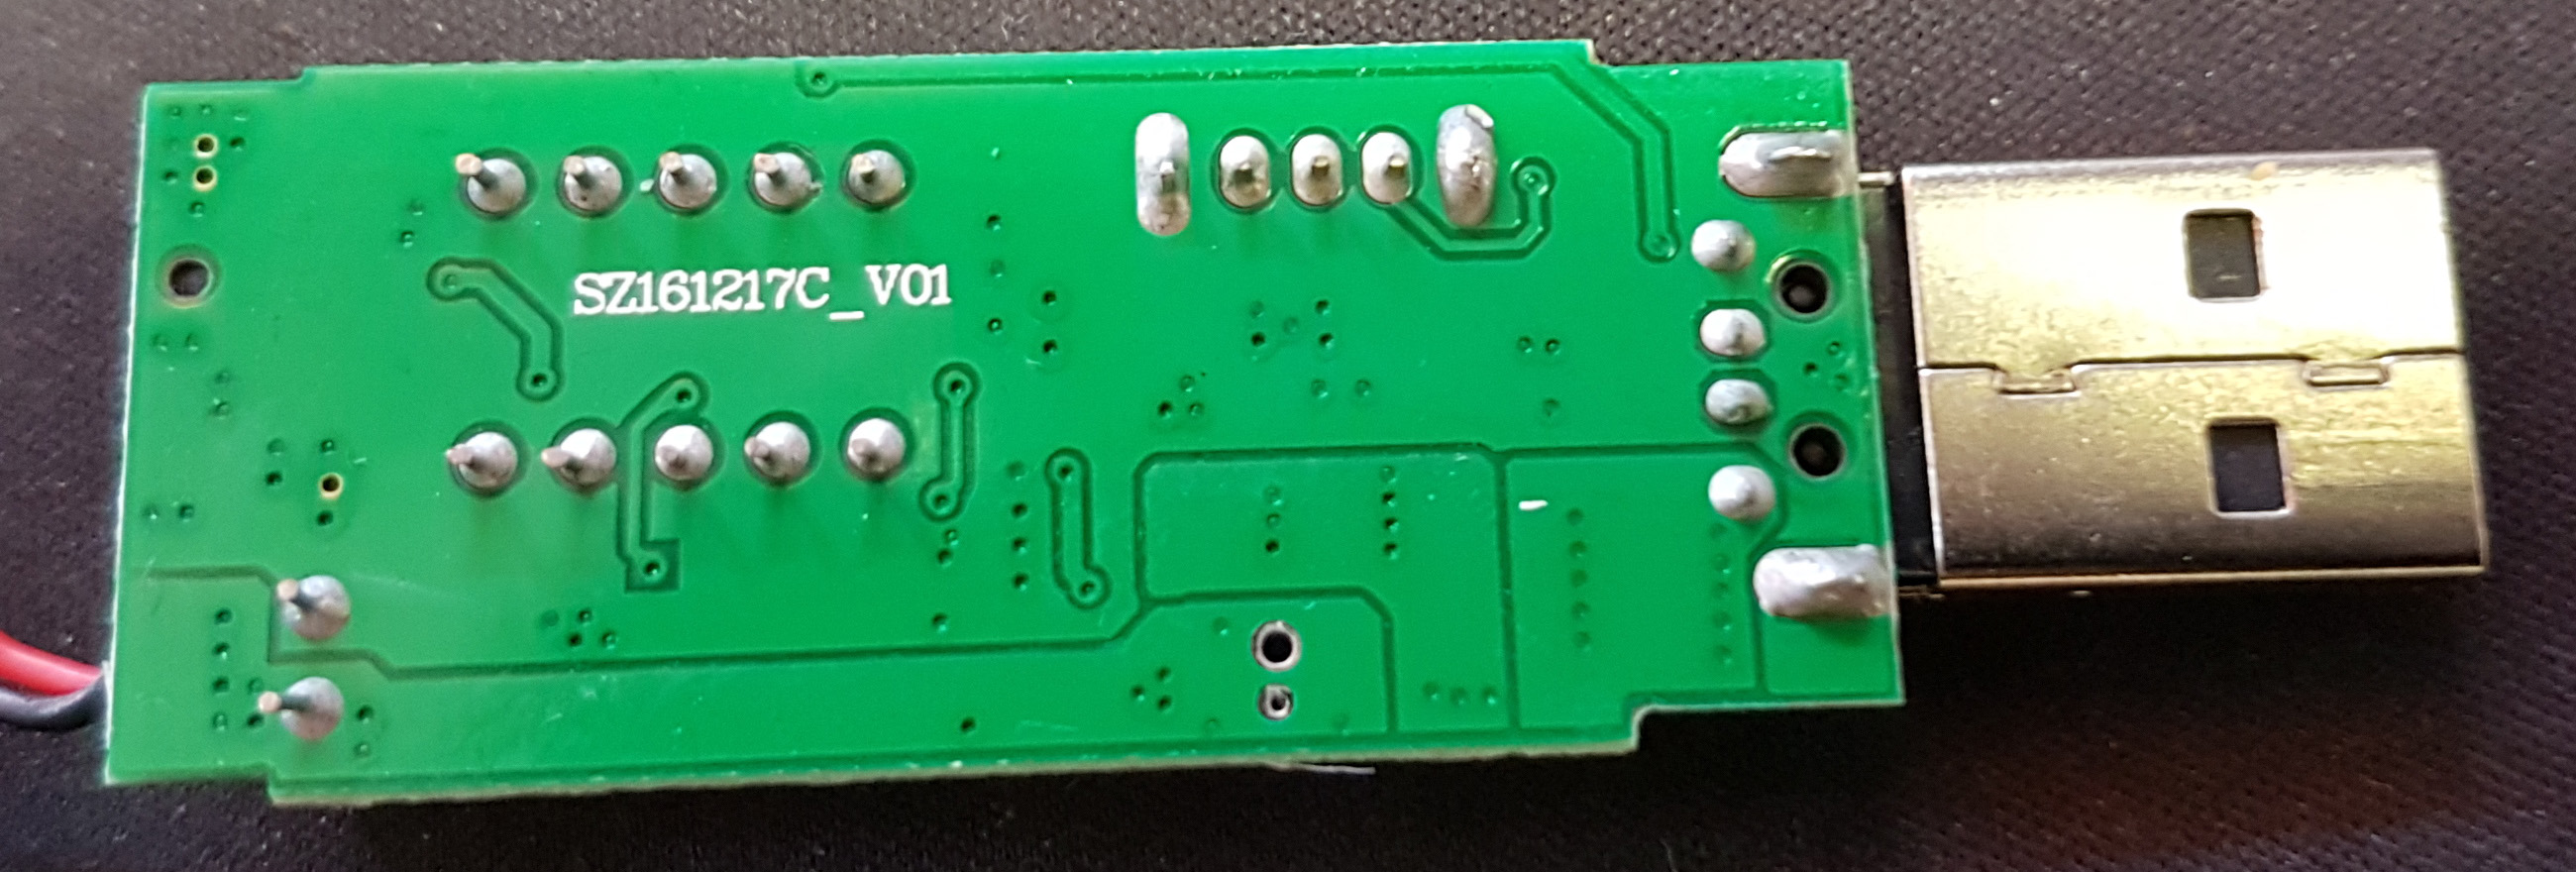
QuickFix – USB 9/12V mini supply
A small USB supply, with a tiny switch a dual 8-segment display landed in my hands. No output voltage, nothing on the display, and PC reports overcurrent on a USB port.
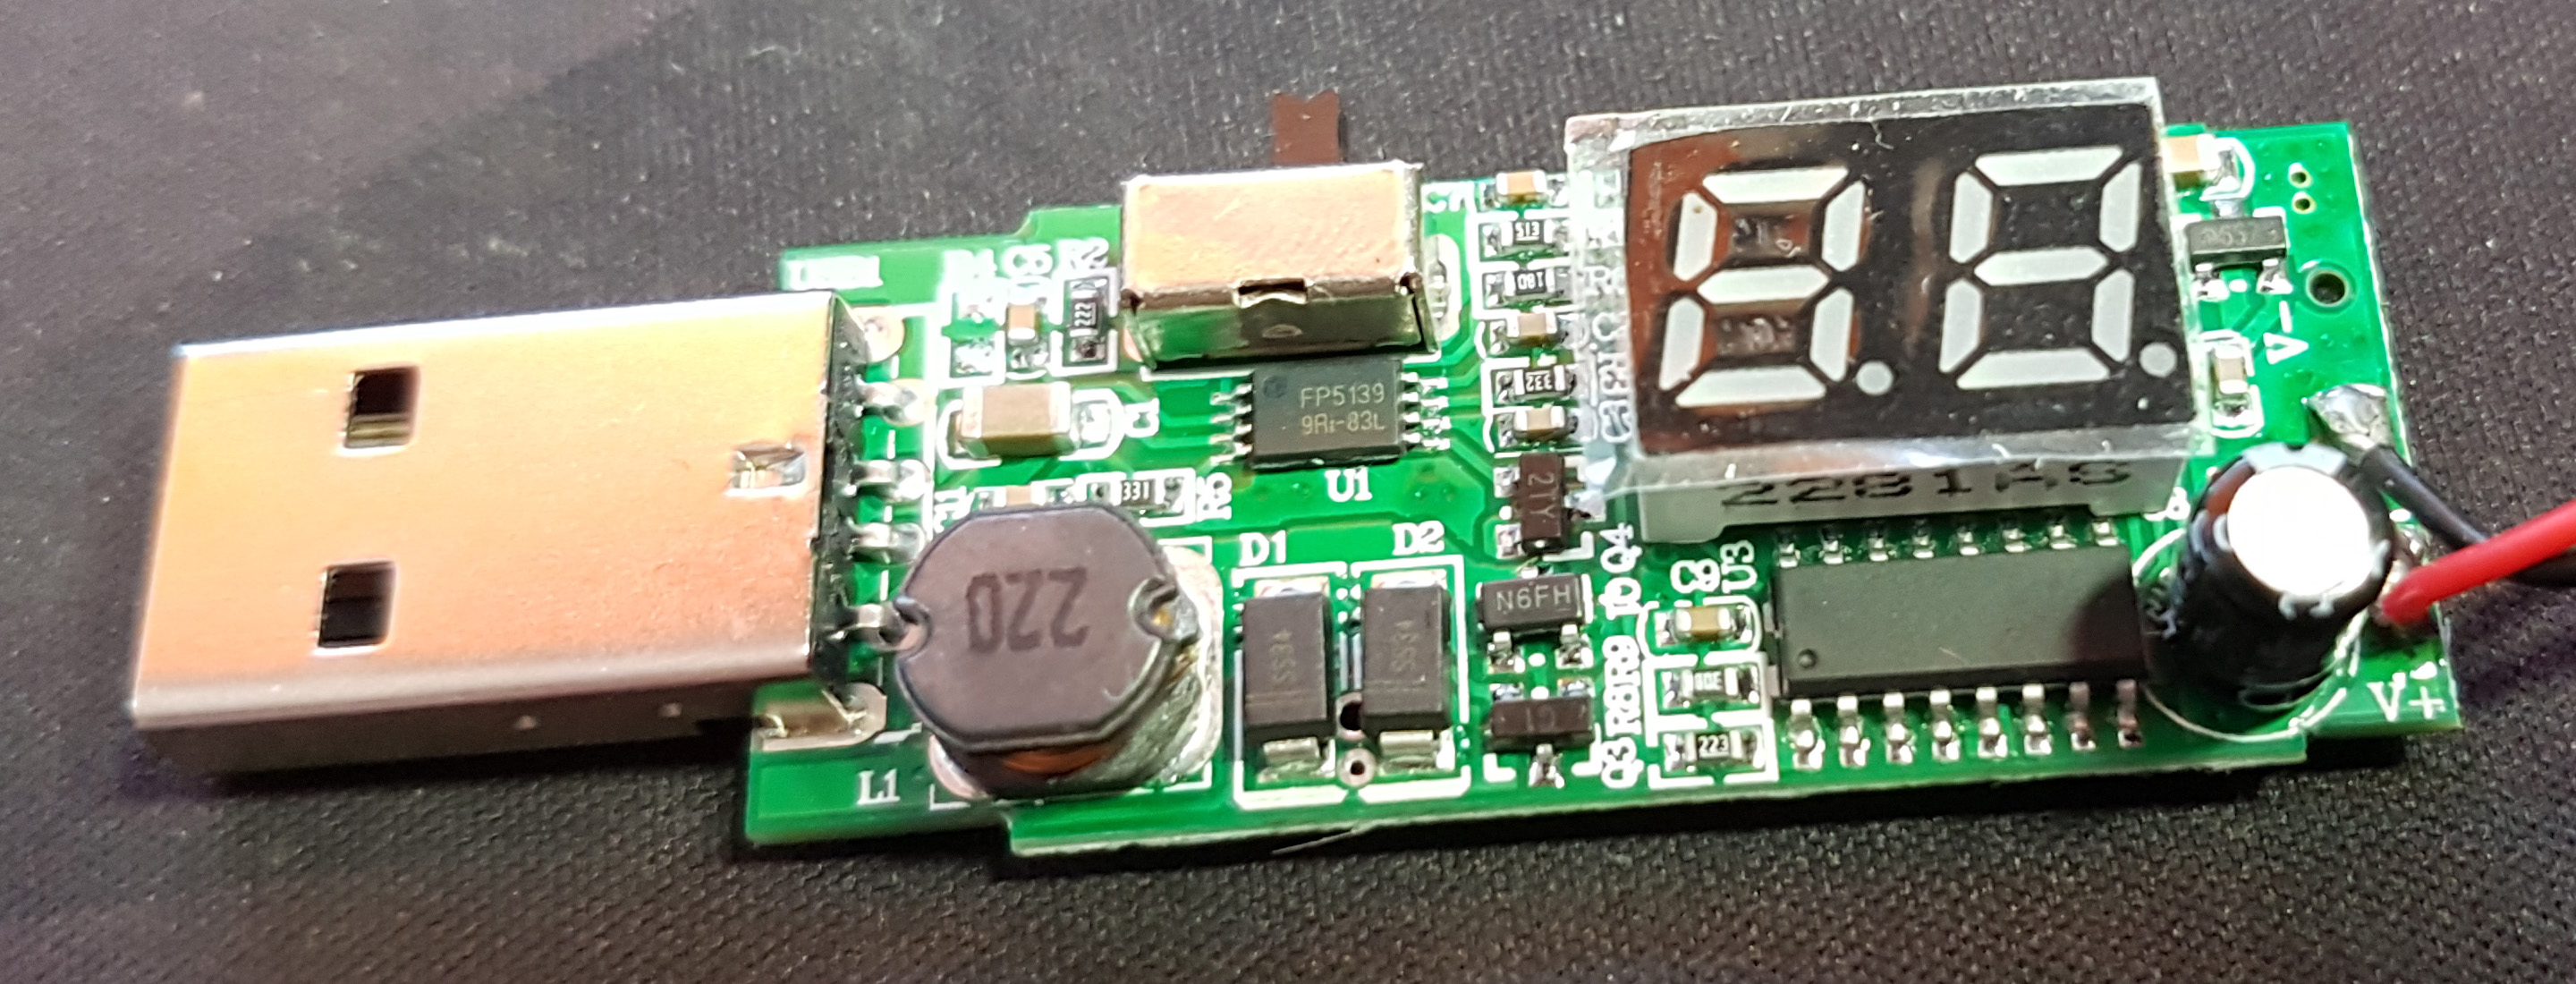
A quick look under a glass reveals a part number for the main IC: FP5139 9Ri-83L (datasheet here) which is a boost converter. It also provides a sample application circuit. This is always useful.
After inspecting the board visually I could find any problems at first. I measured resistance between both input and output rails and found a short on the input side. I thought this could be a broken capacitor. They are quite easy to desolder so I took some of them out one by one (the ones that had a short in-circuit). It turned out they were all fine.
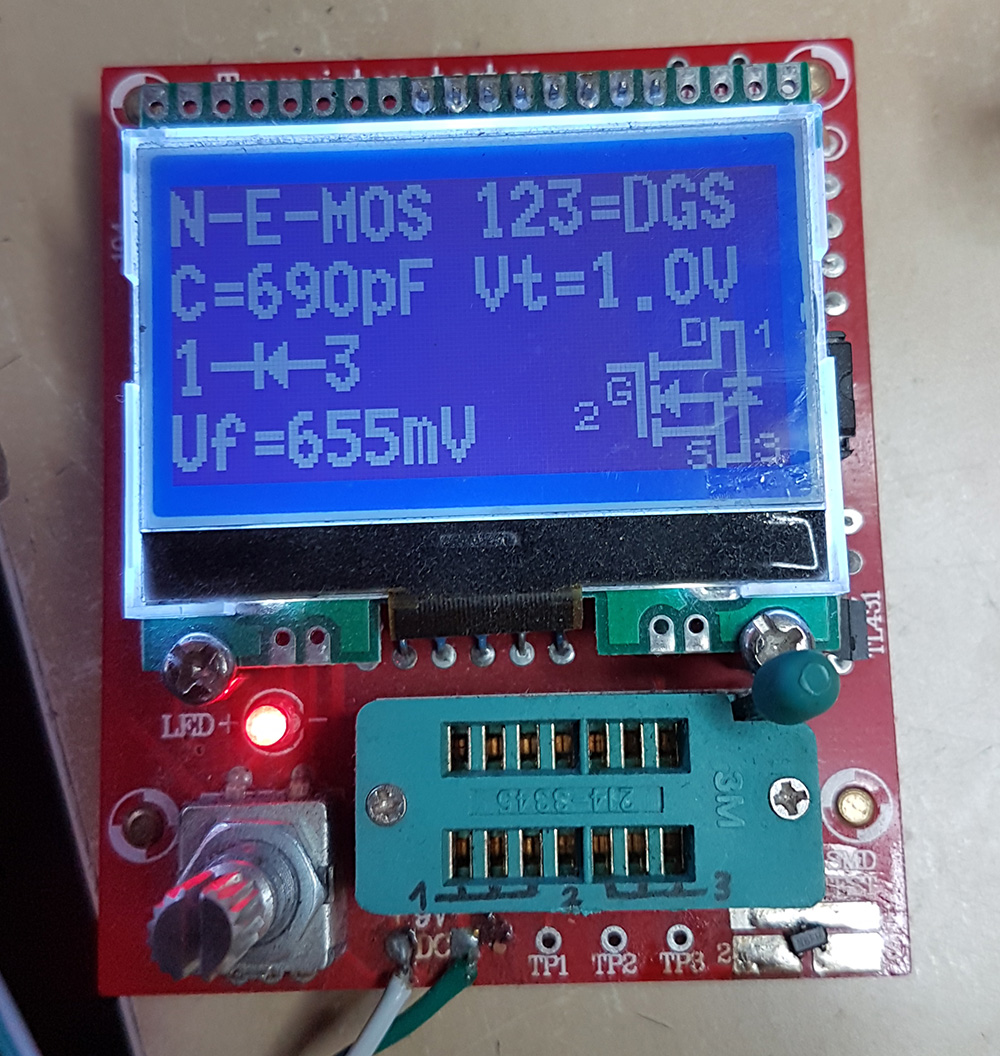
After that came the time for transistors. Quite tricky to get off the board with a soldering iron, so I used a hot air with a small nozzle. I started with the one signed Q1, and quite luckily a hit. A simple component tester revelas the damage:
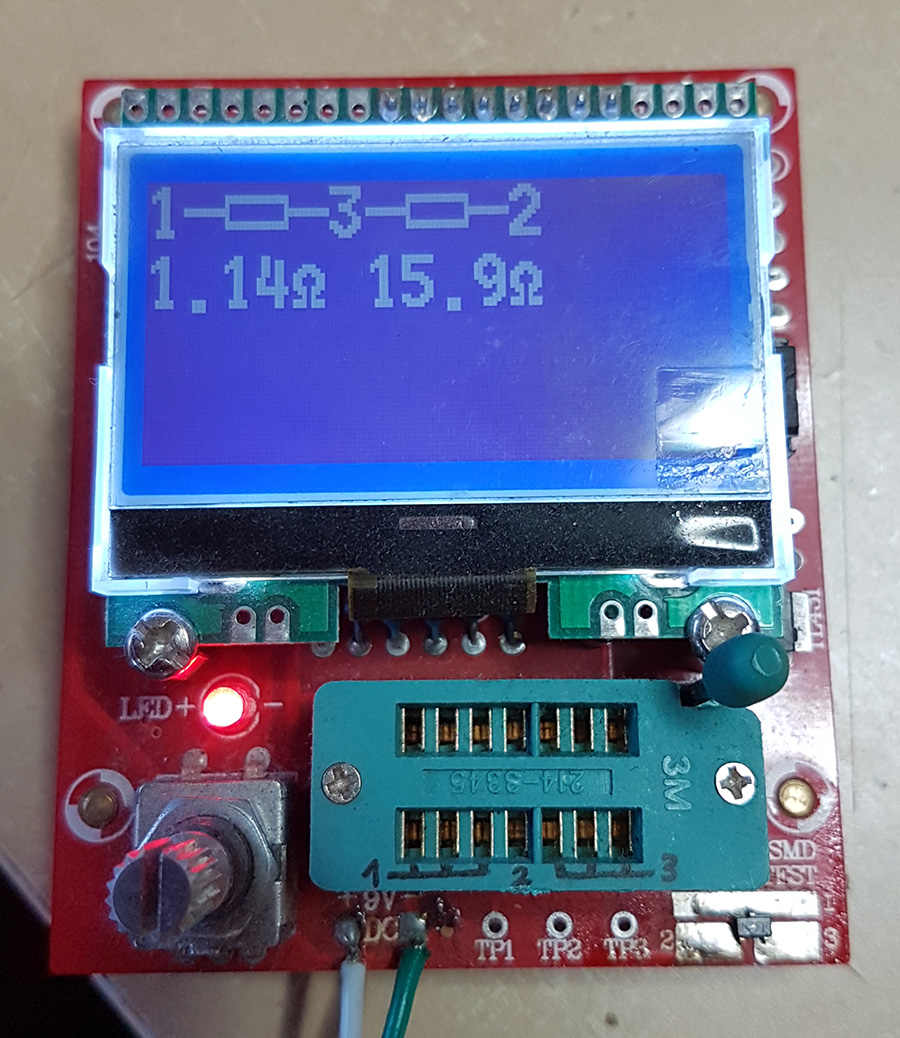
So the transistor has turned into a resistor 😉 This cannot be. The sad thing now is, that you can barely squeeze any markings on a packege this small (looks like SOT23 package type) so the “N6FH” did not help me with identifing the part. Lukckily (and this is a small twist) I actually got a second converter as well (and the second one works) so I simply verified what this part was. Again, using the component tester I got the result:
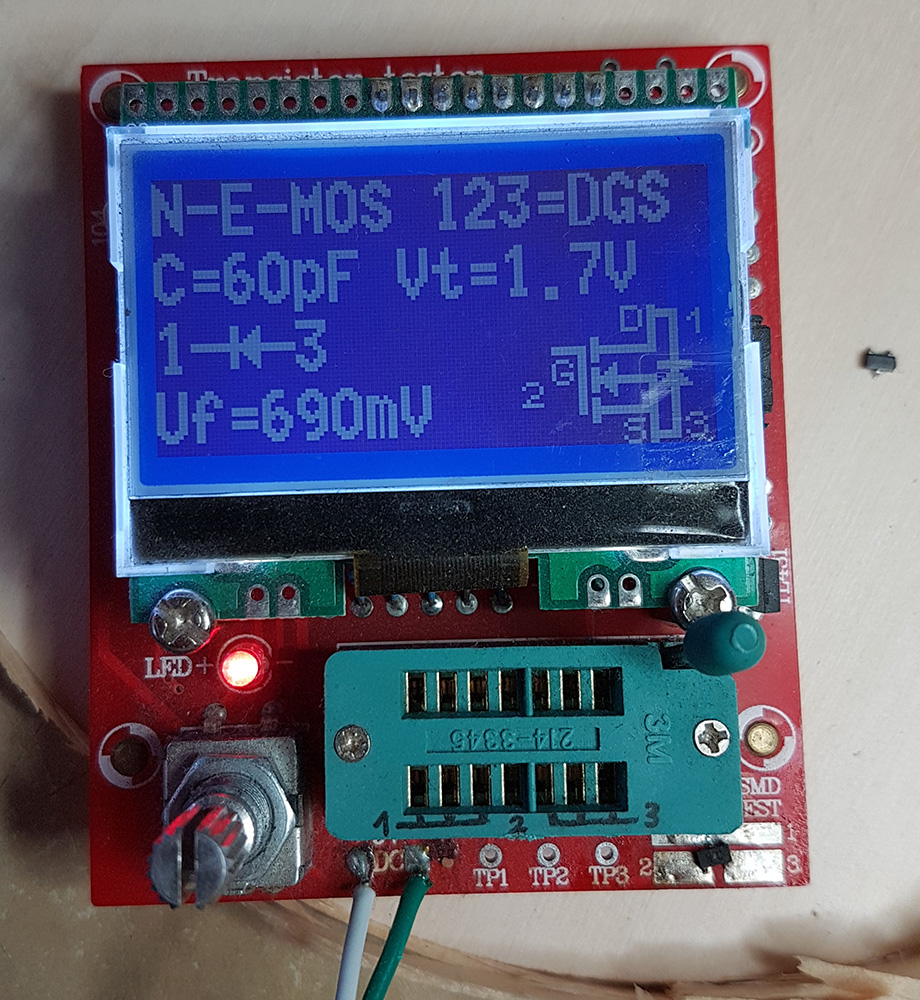
Nice – a MOSFET with N channel in Enhancement mode (‘normally open’) – should be relatively easy to find attached to something in the parts bin… and a few minutes later I salvaged a similar part frome an old motherboard. There it is:
I know – it ain’t perfect but lets just shove it in and see what happens. In the meantime take a look at the broken transistor. What u can see here is what i failed to notice at the beginning:
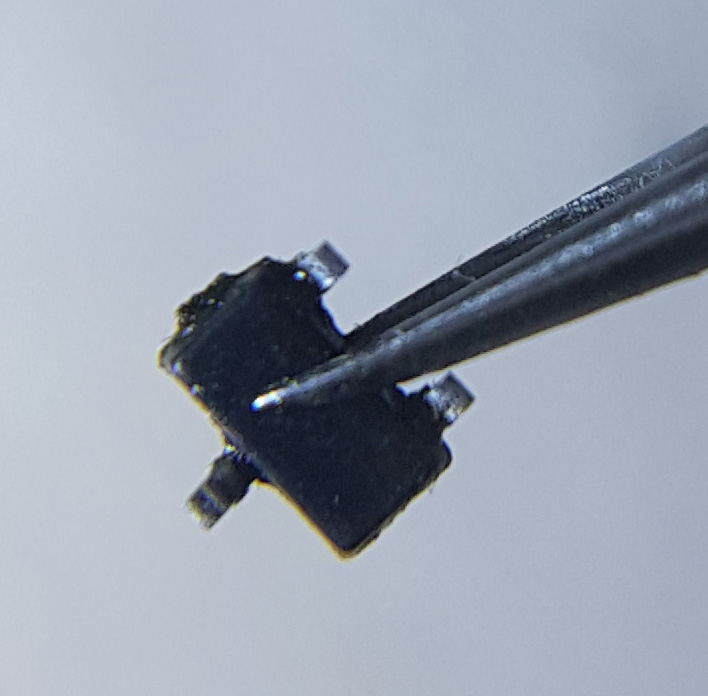
So this ‘huge crater’ on the side… it must be like 0,5mm.
After soldering the new-old transistor the converter started functioning. I plugged it into a USB port and the display came to life. Output voltages switchable and present.
This was a successful little adventure. I know the replacement part is not a perfect match, but it will do in this case – quick fix of a small, cheap USB converter module.
CONCLUSIONS?
- Do a visual inspections with more attention to details.
- Get a proper third-hand or a ‘holder’ of some sort so u can be precise and not melt the display casing xD
Reviving a Quadcopter
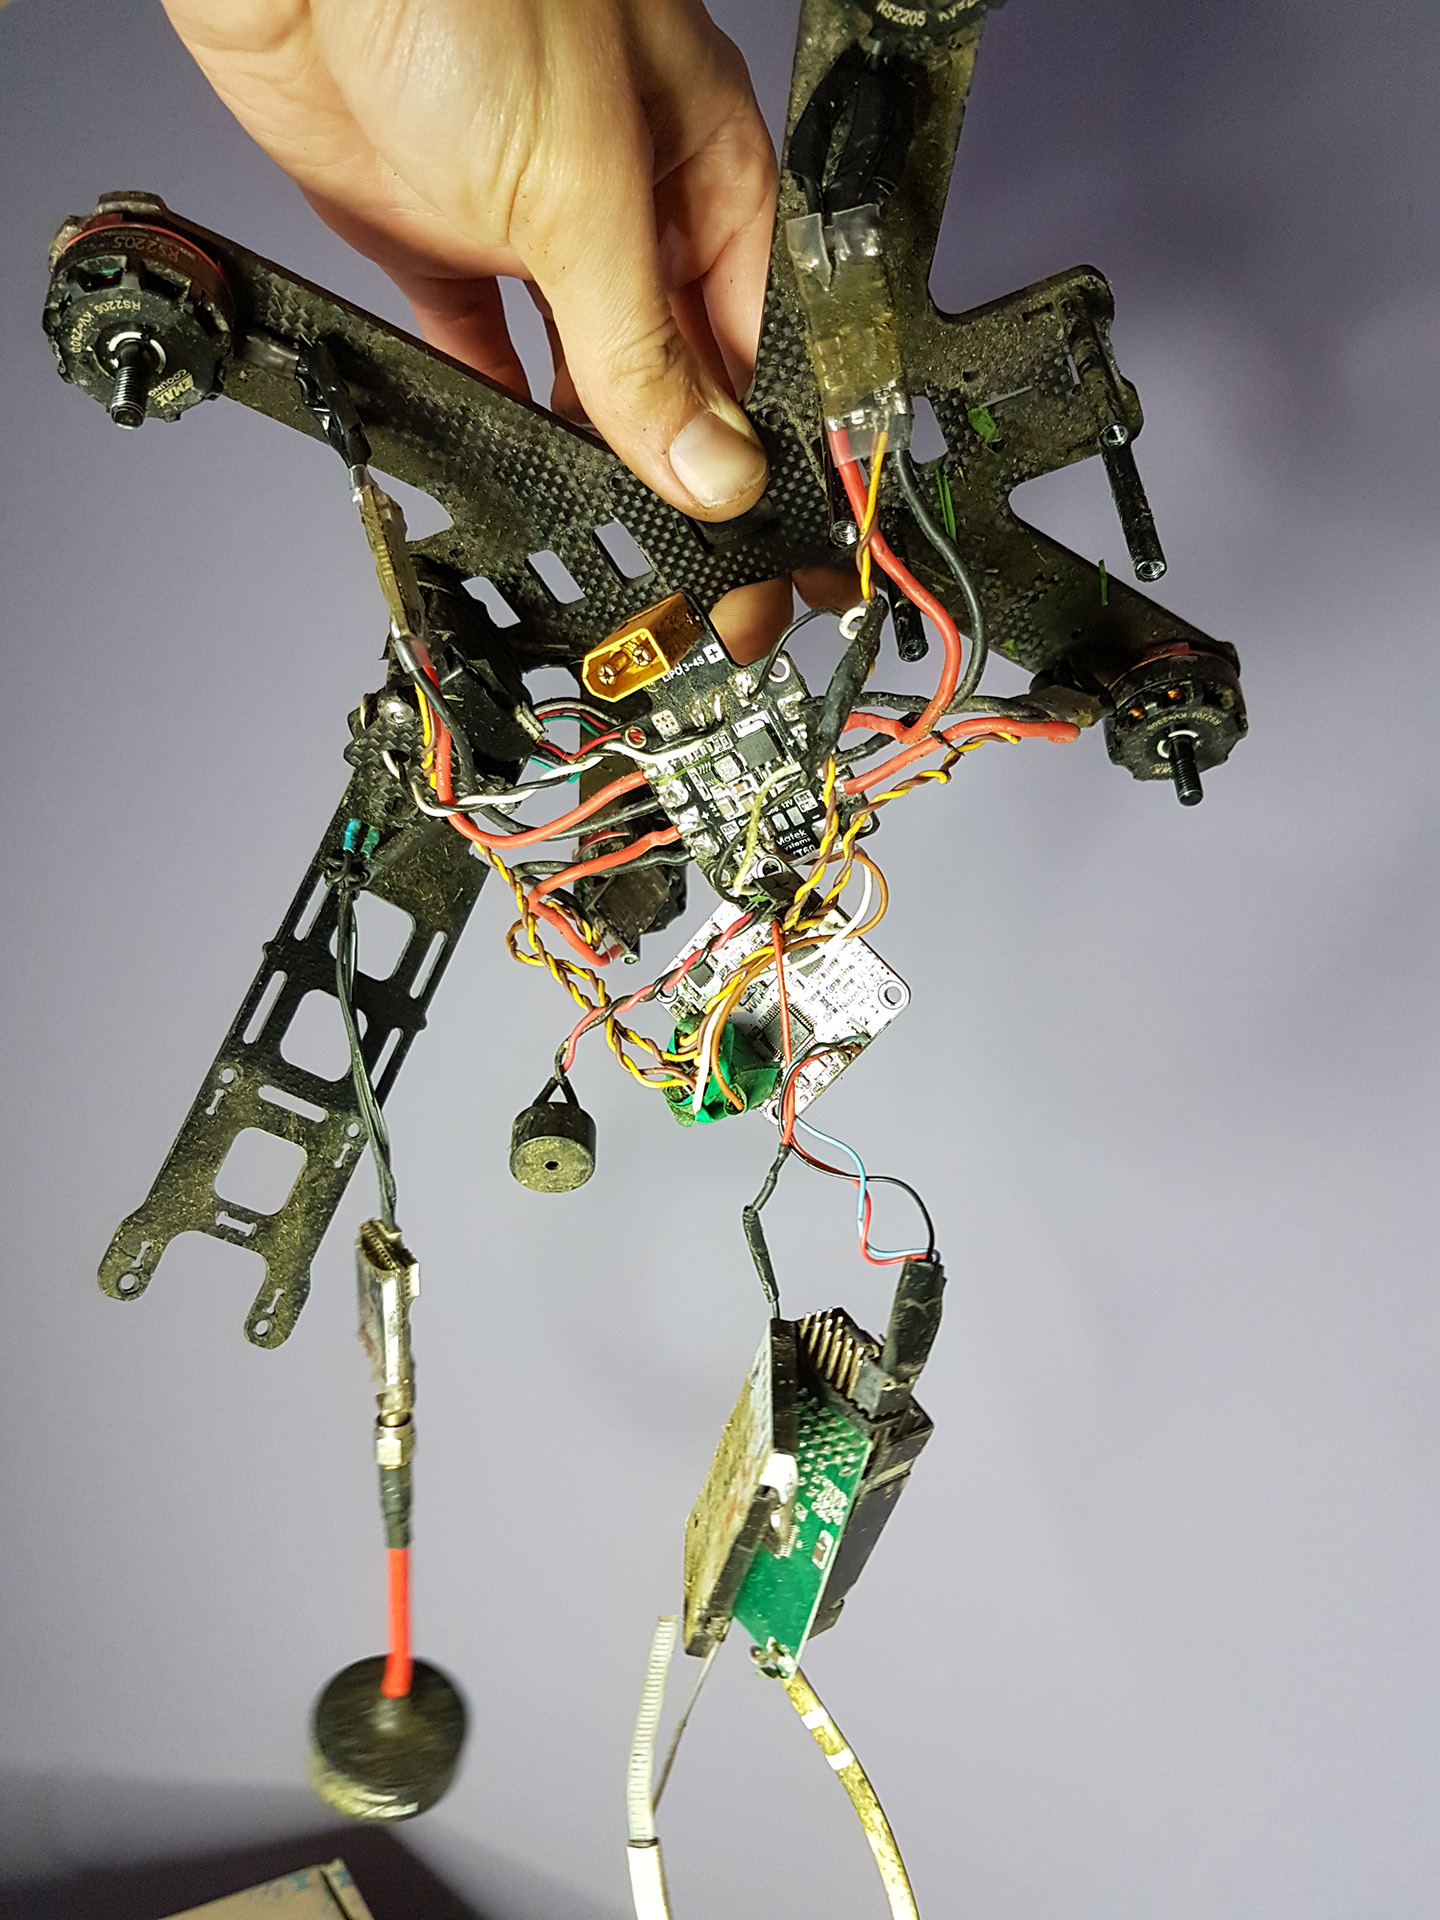
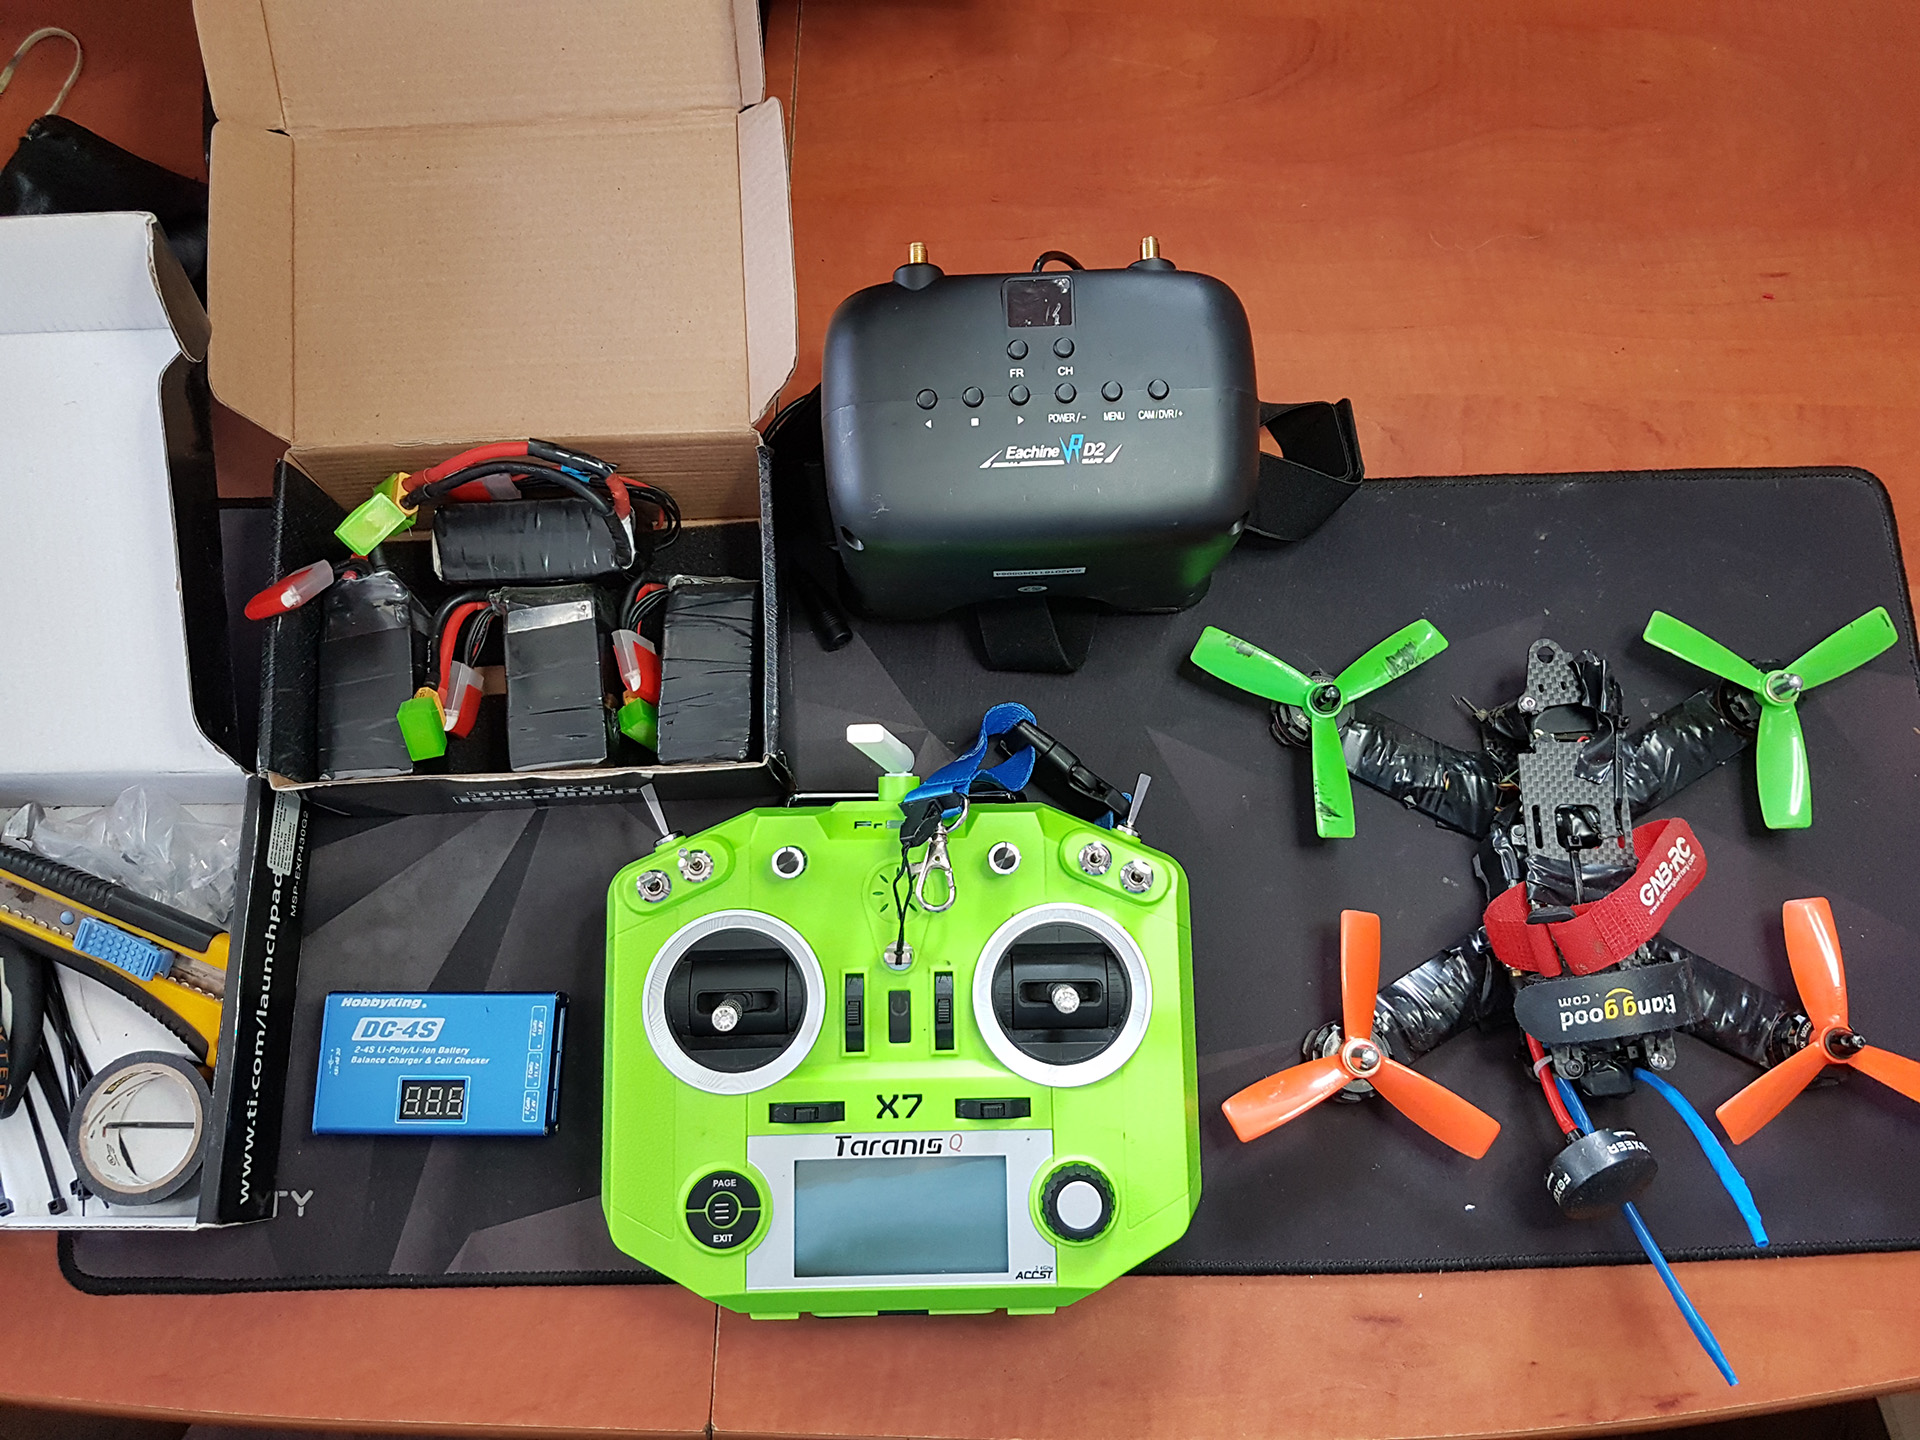
Recently I was lucky enough to be given a box of parts. The box included mainly a half-alive quadcopter that I was told I could try to reassemble and fly if possible. This is a perfect opportunity to get ot know the area and finally fly some FPV, which I’ve been aching to do for quite a while. FPV stand for “First Person View” and is probably the most exciting way to experience flying a drone.
I took it apart, reassembled, configured, connected with a radio and googles and started learning to fly it. There is so much to learn not only about quadcopters themselves, but the whole spectrum of solutions used to enable them: be it radio communication, video transmission, control systems, batteries, motors, etc.
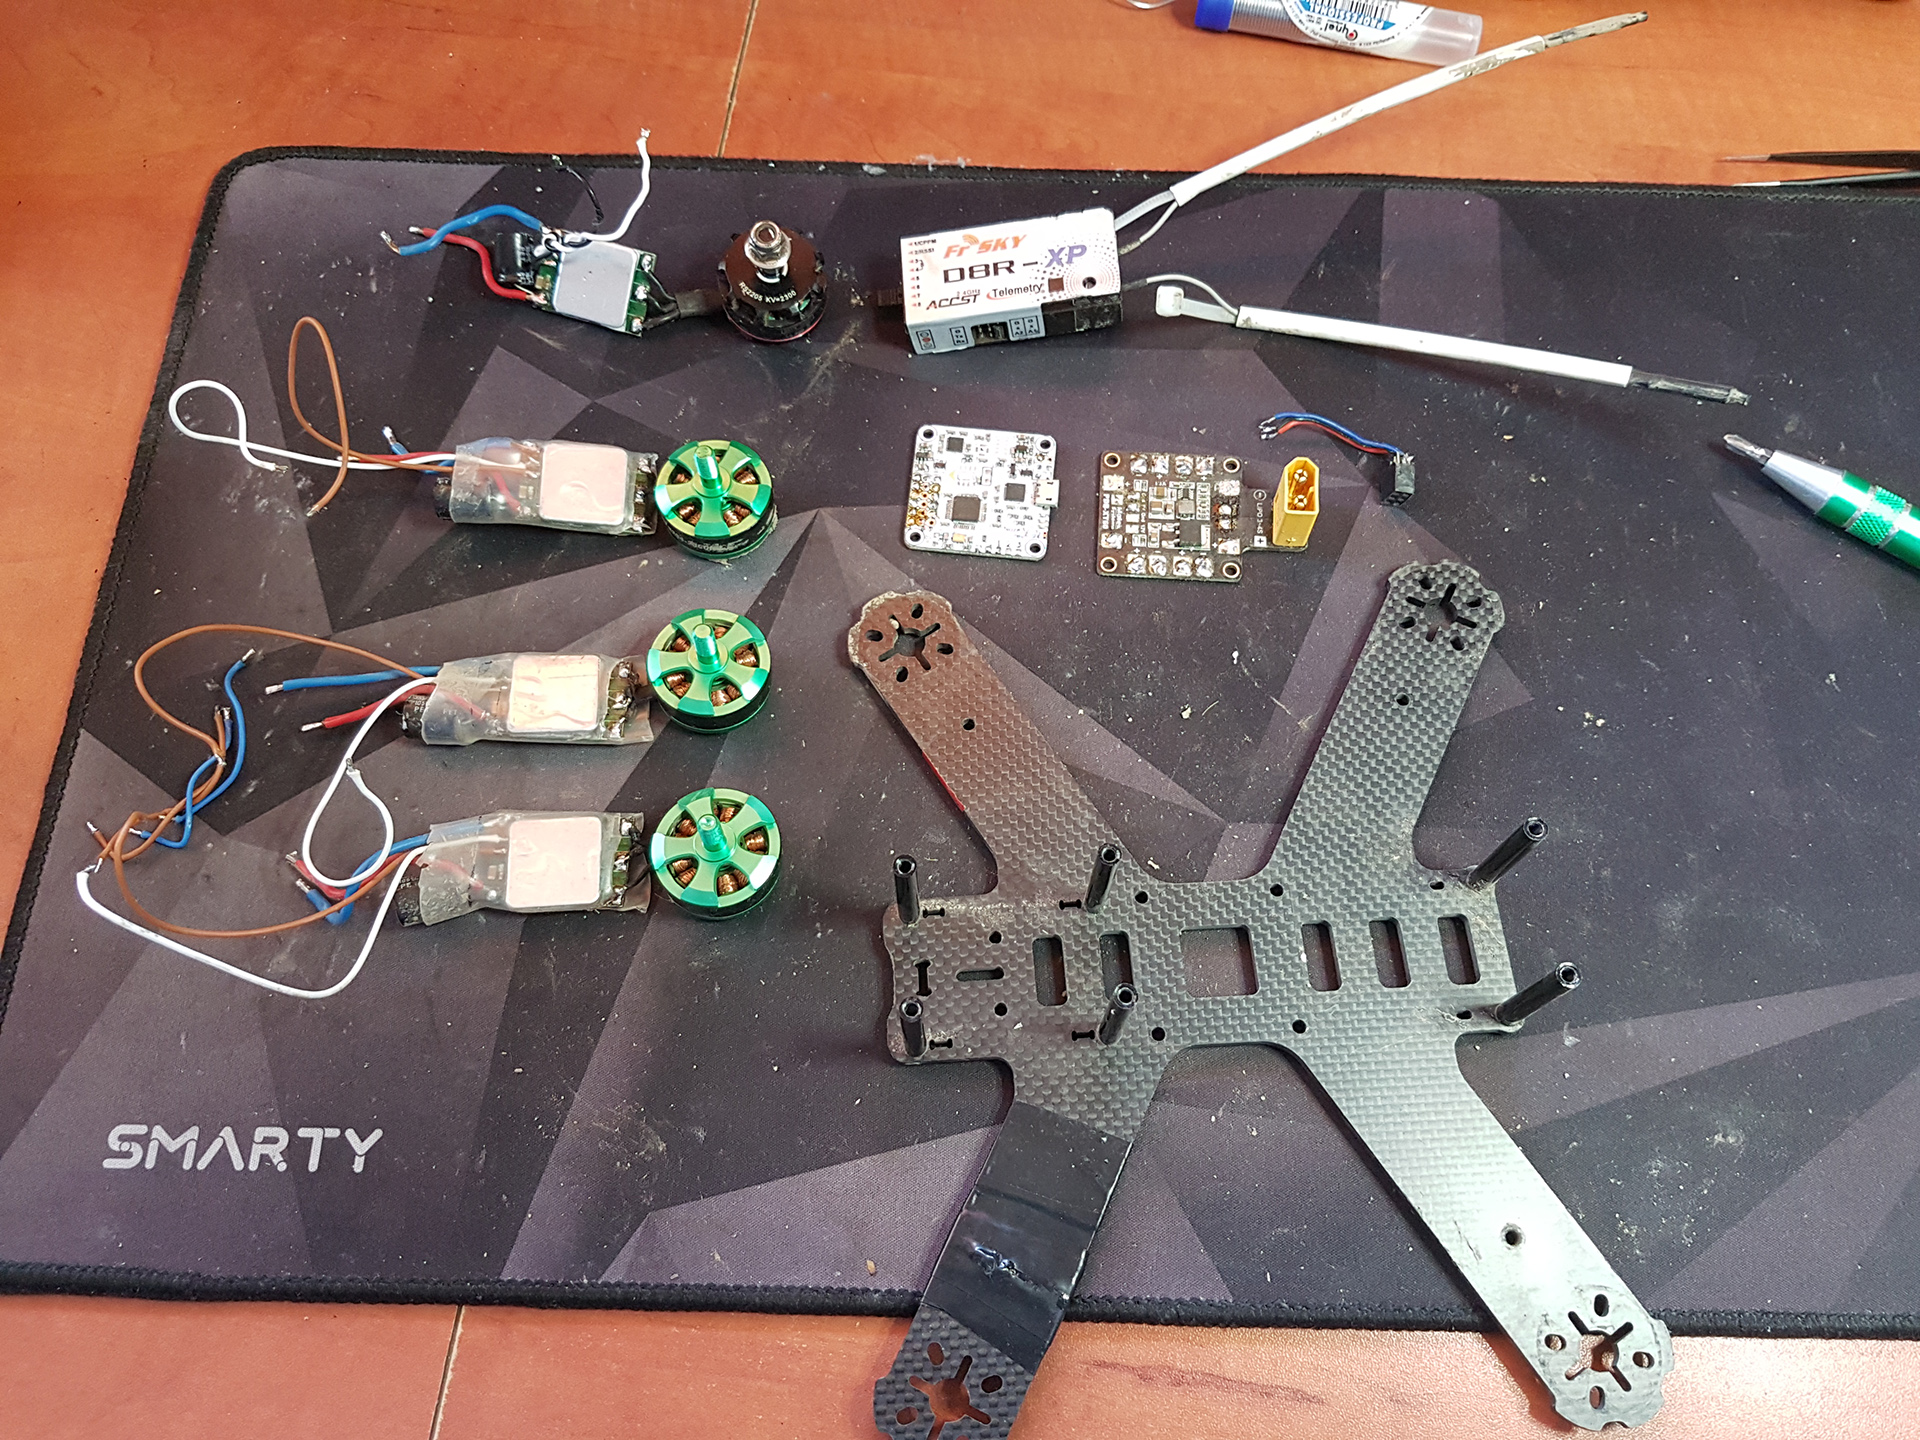
Ok, let’s dig in first and we’ll see what’s what. In the package the main pieces were:
- 5-inch carbon frame
- brushless motors
- broshless motors’ drivers
- ‘power distribution board’
- ‘flight controller board’
- radio receiver
- video transmitter
- camera module
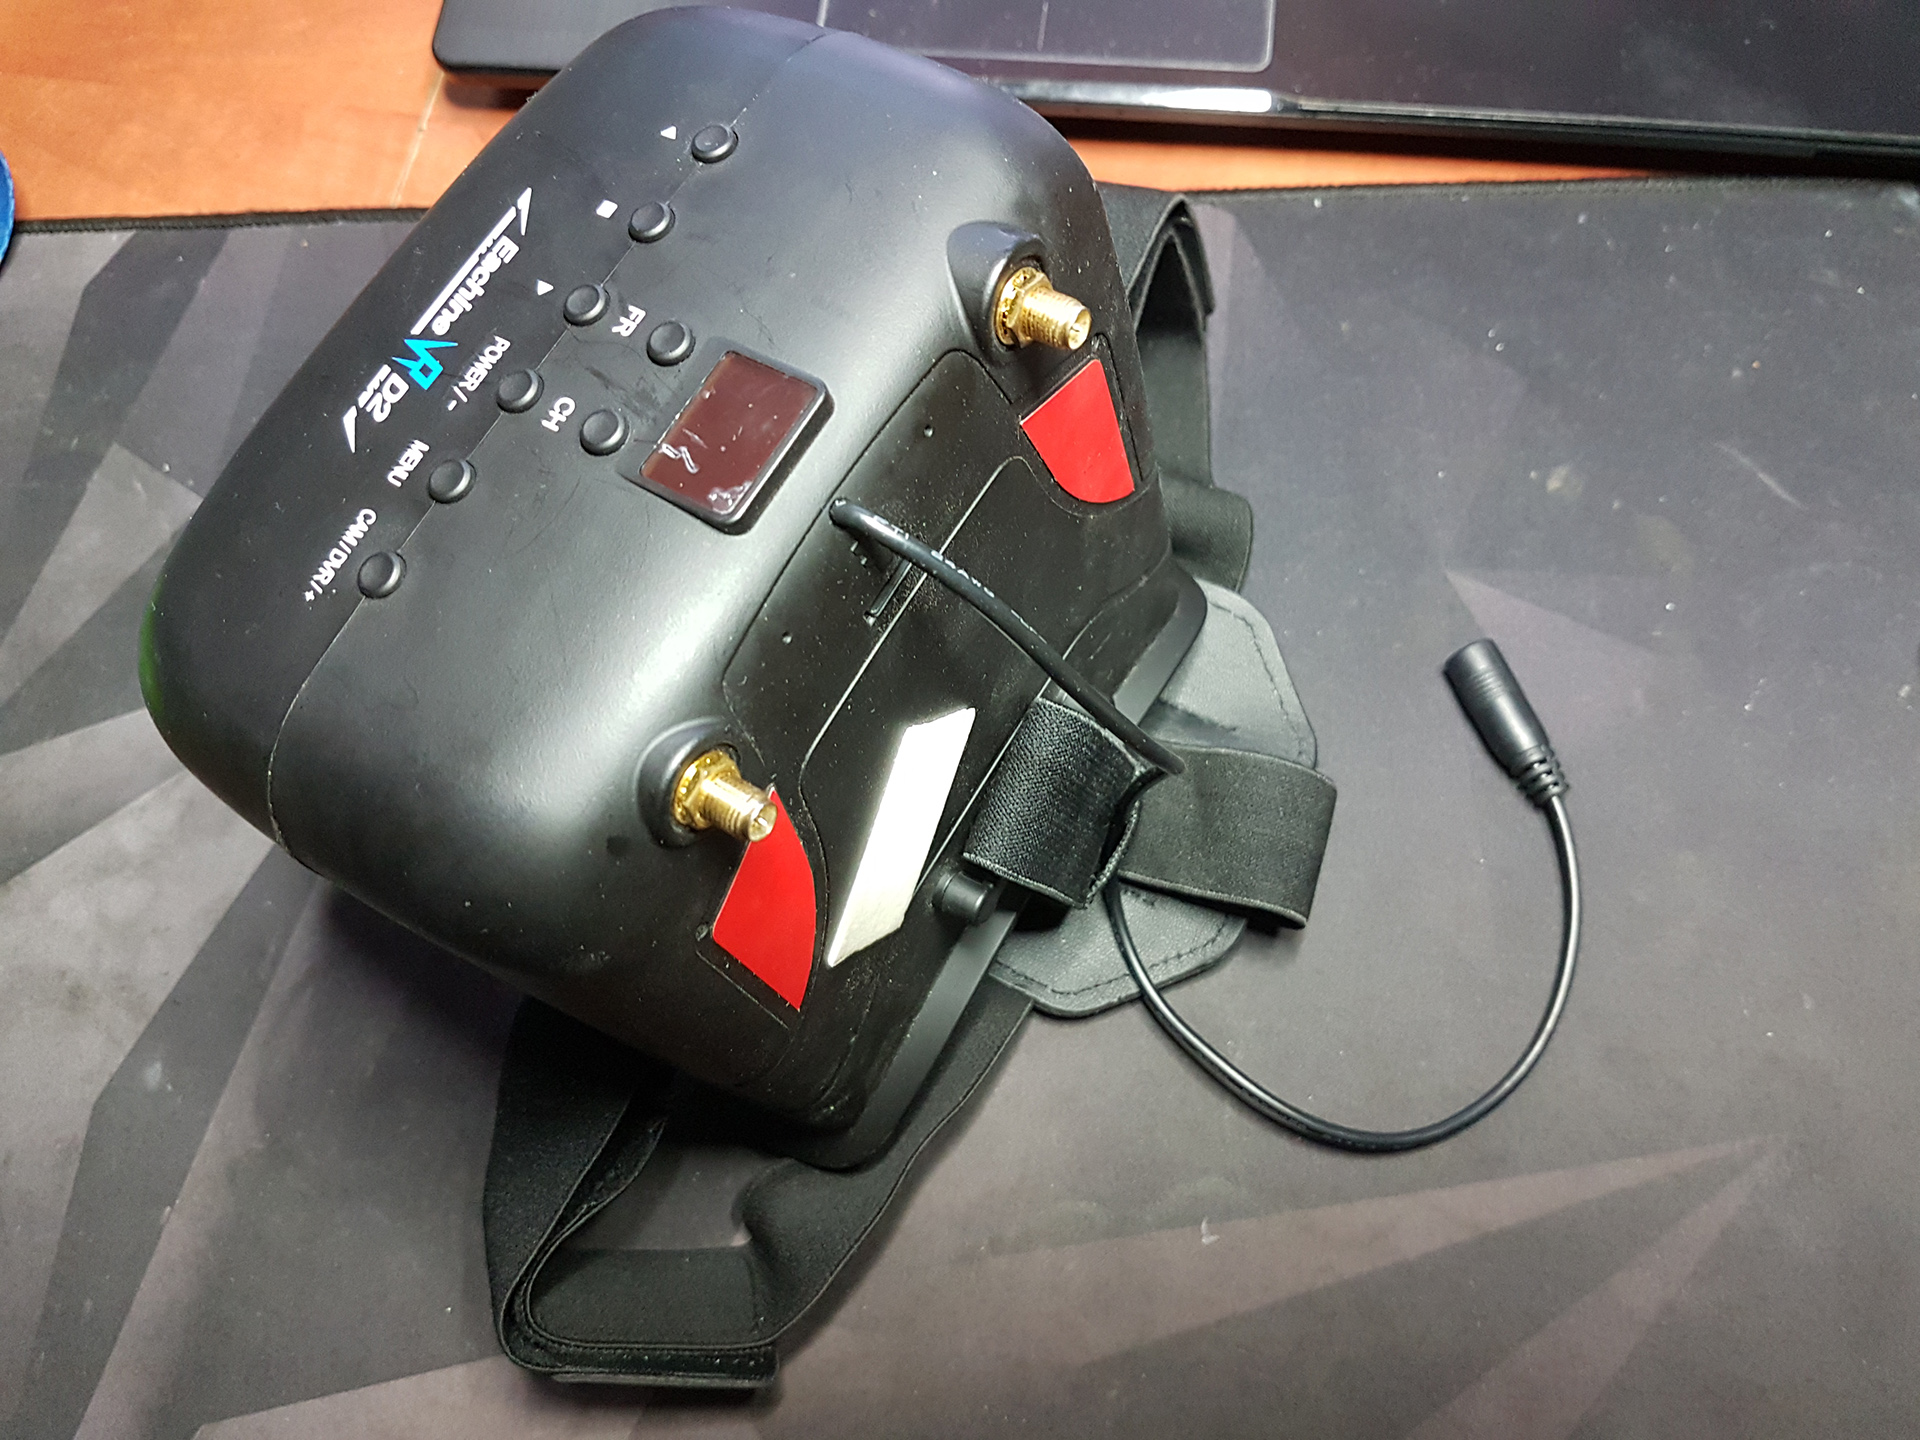
I also got a Radio Controller and FPV Goggles.
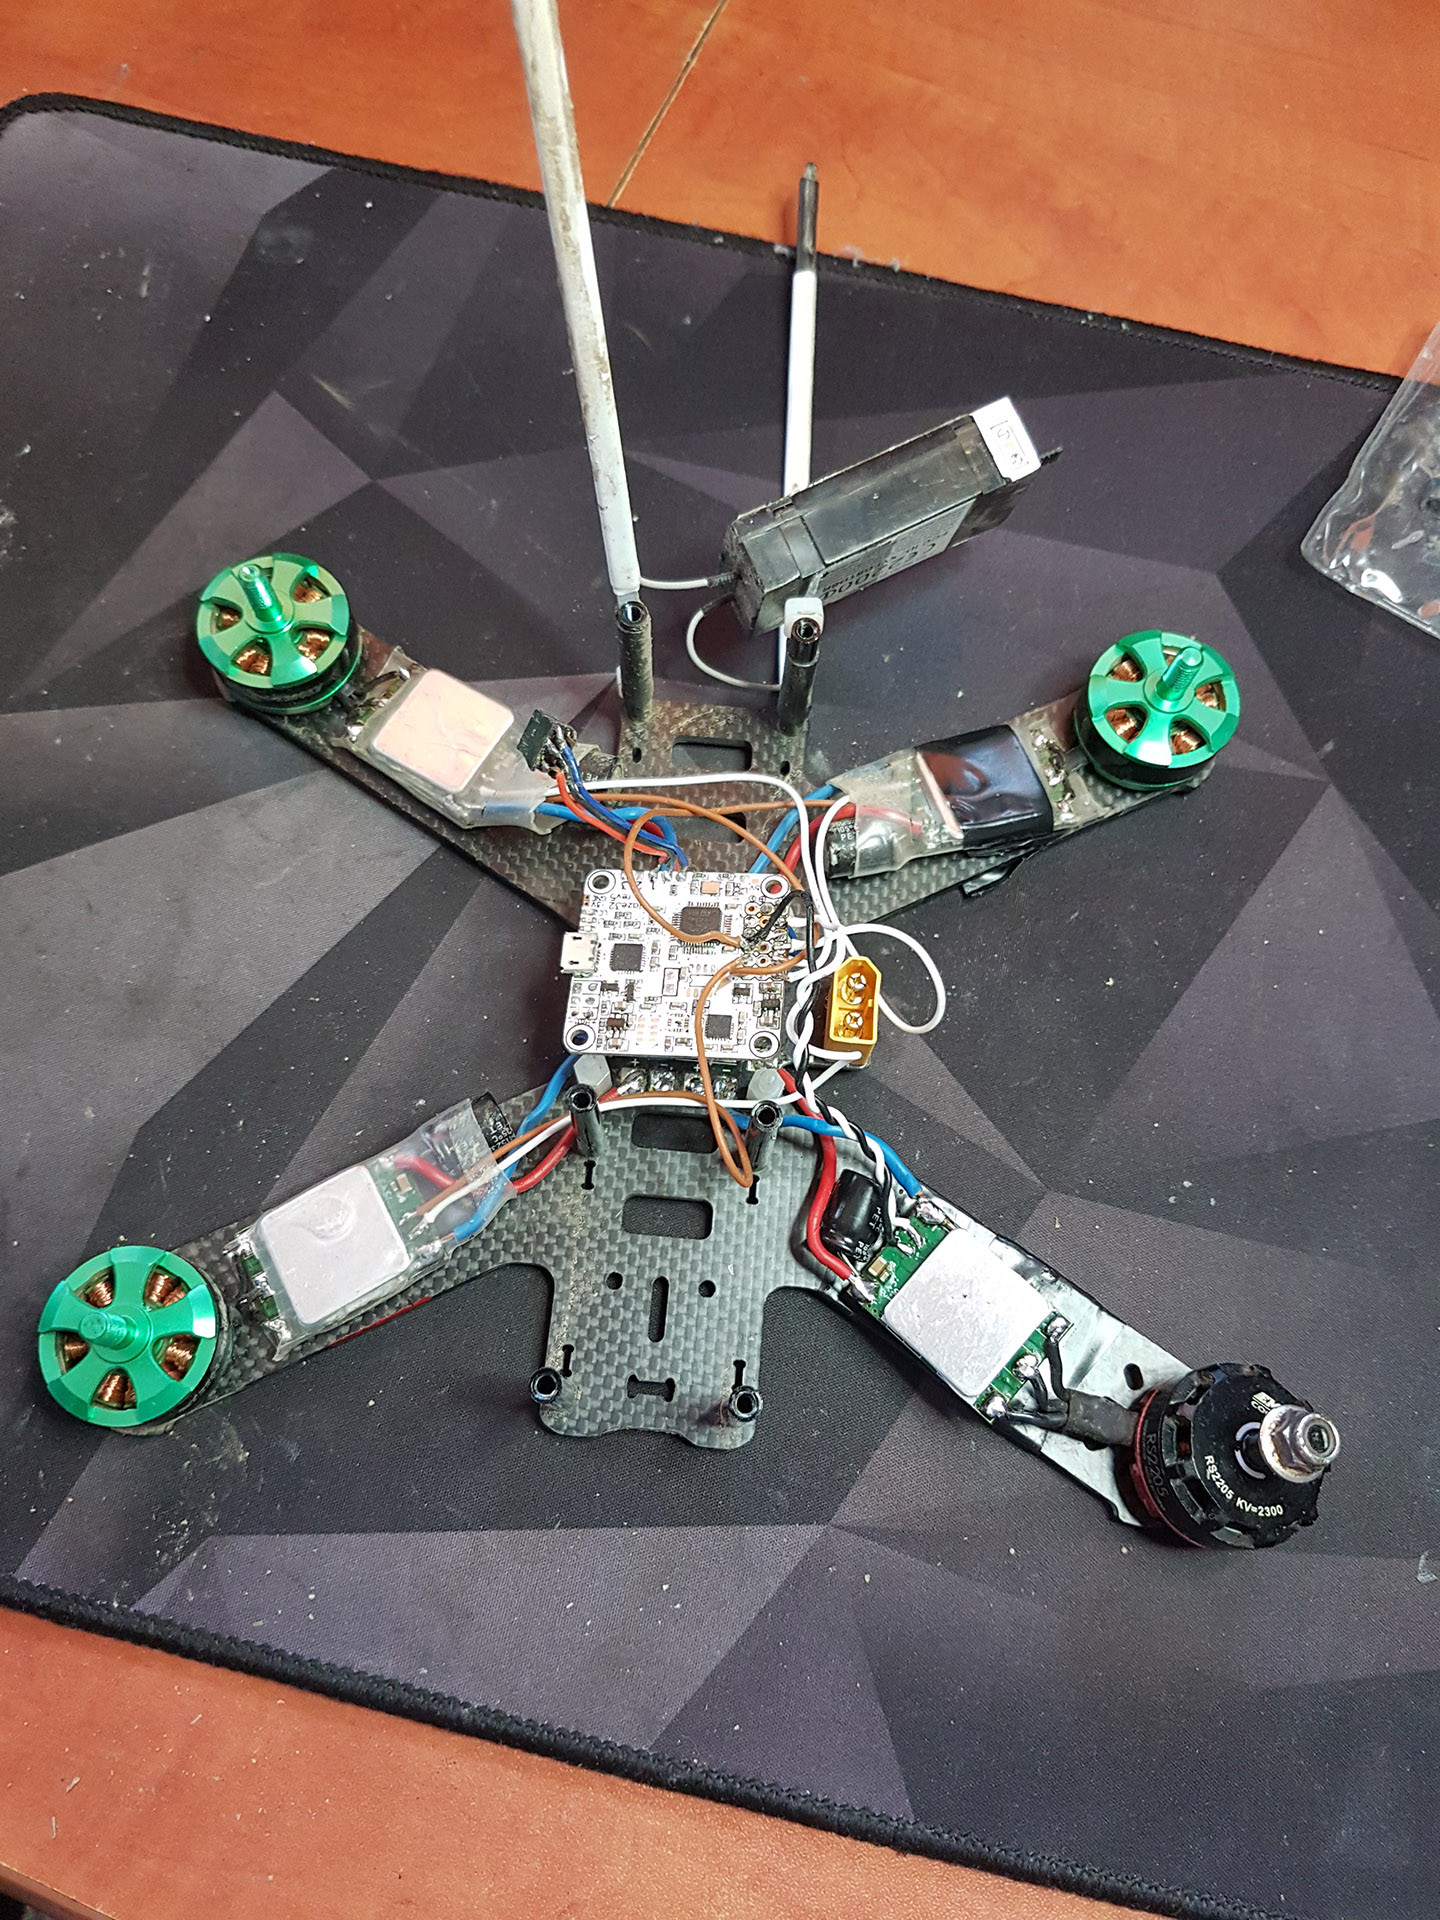
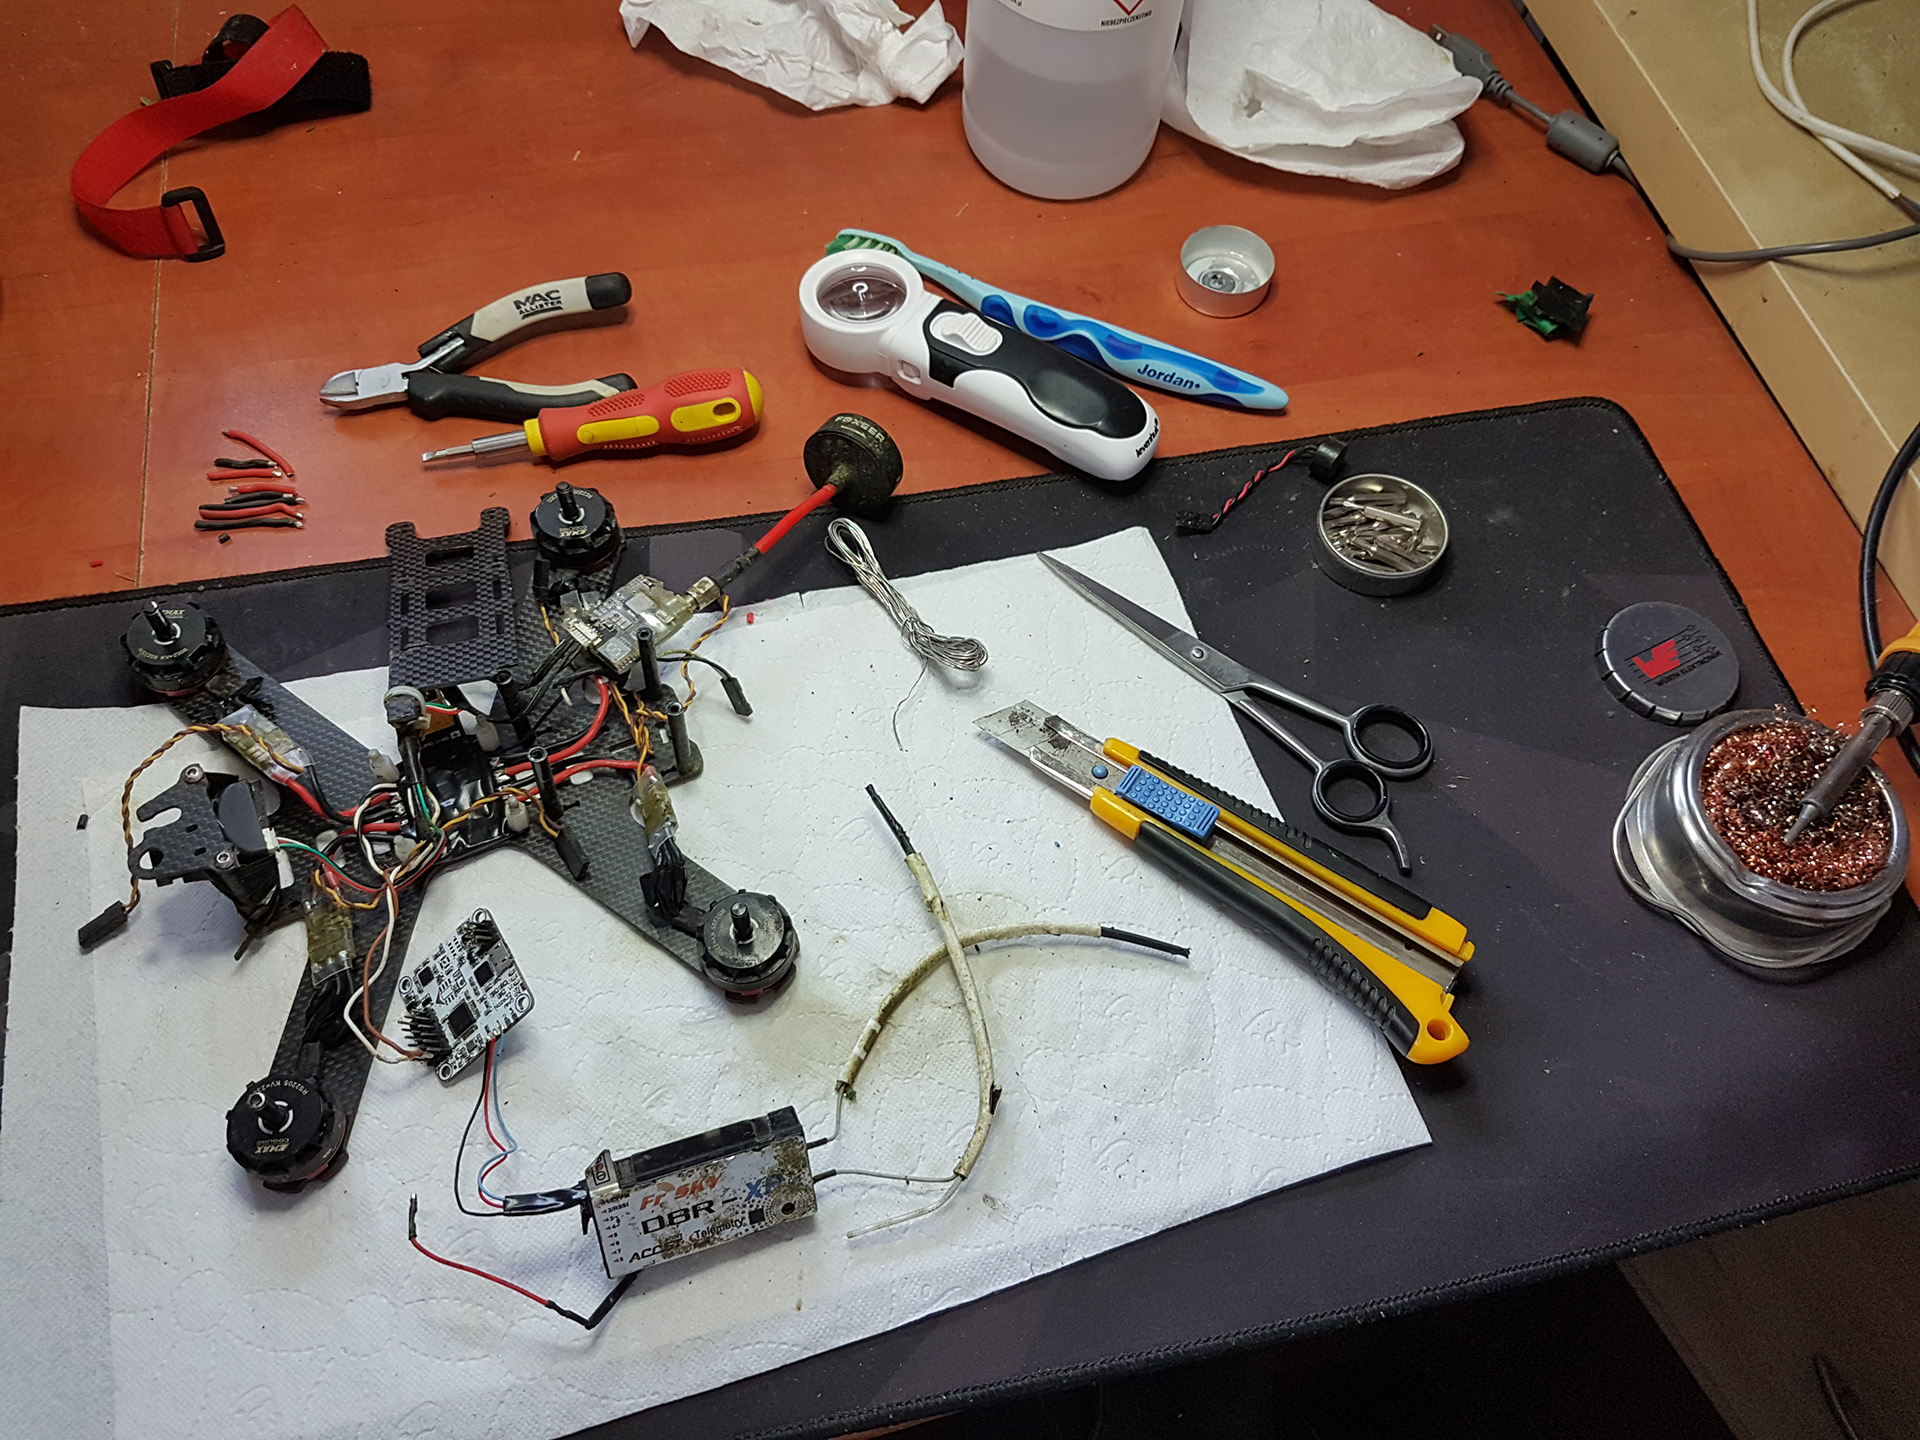
I kinda knew what things were in general, so I felt safe to completely disassemble everything, clean it thoroughly and put it back together. Also I made a lot of reference photos.
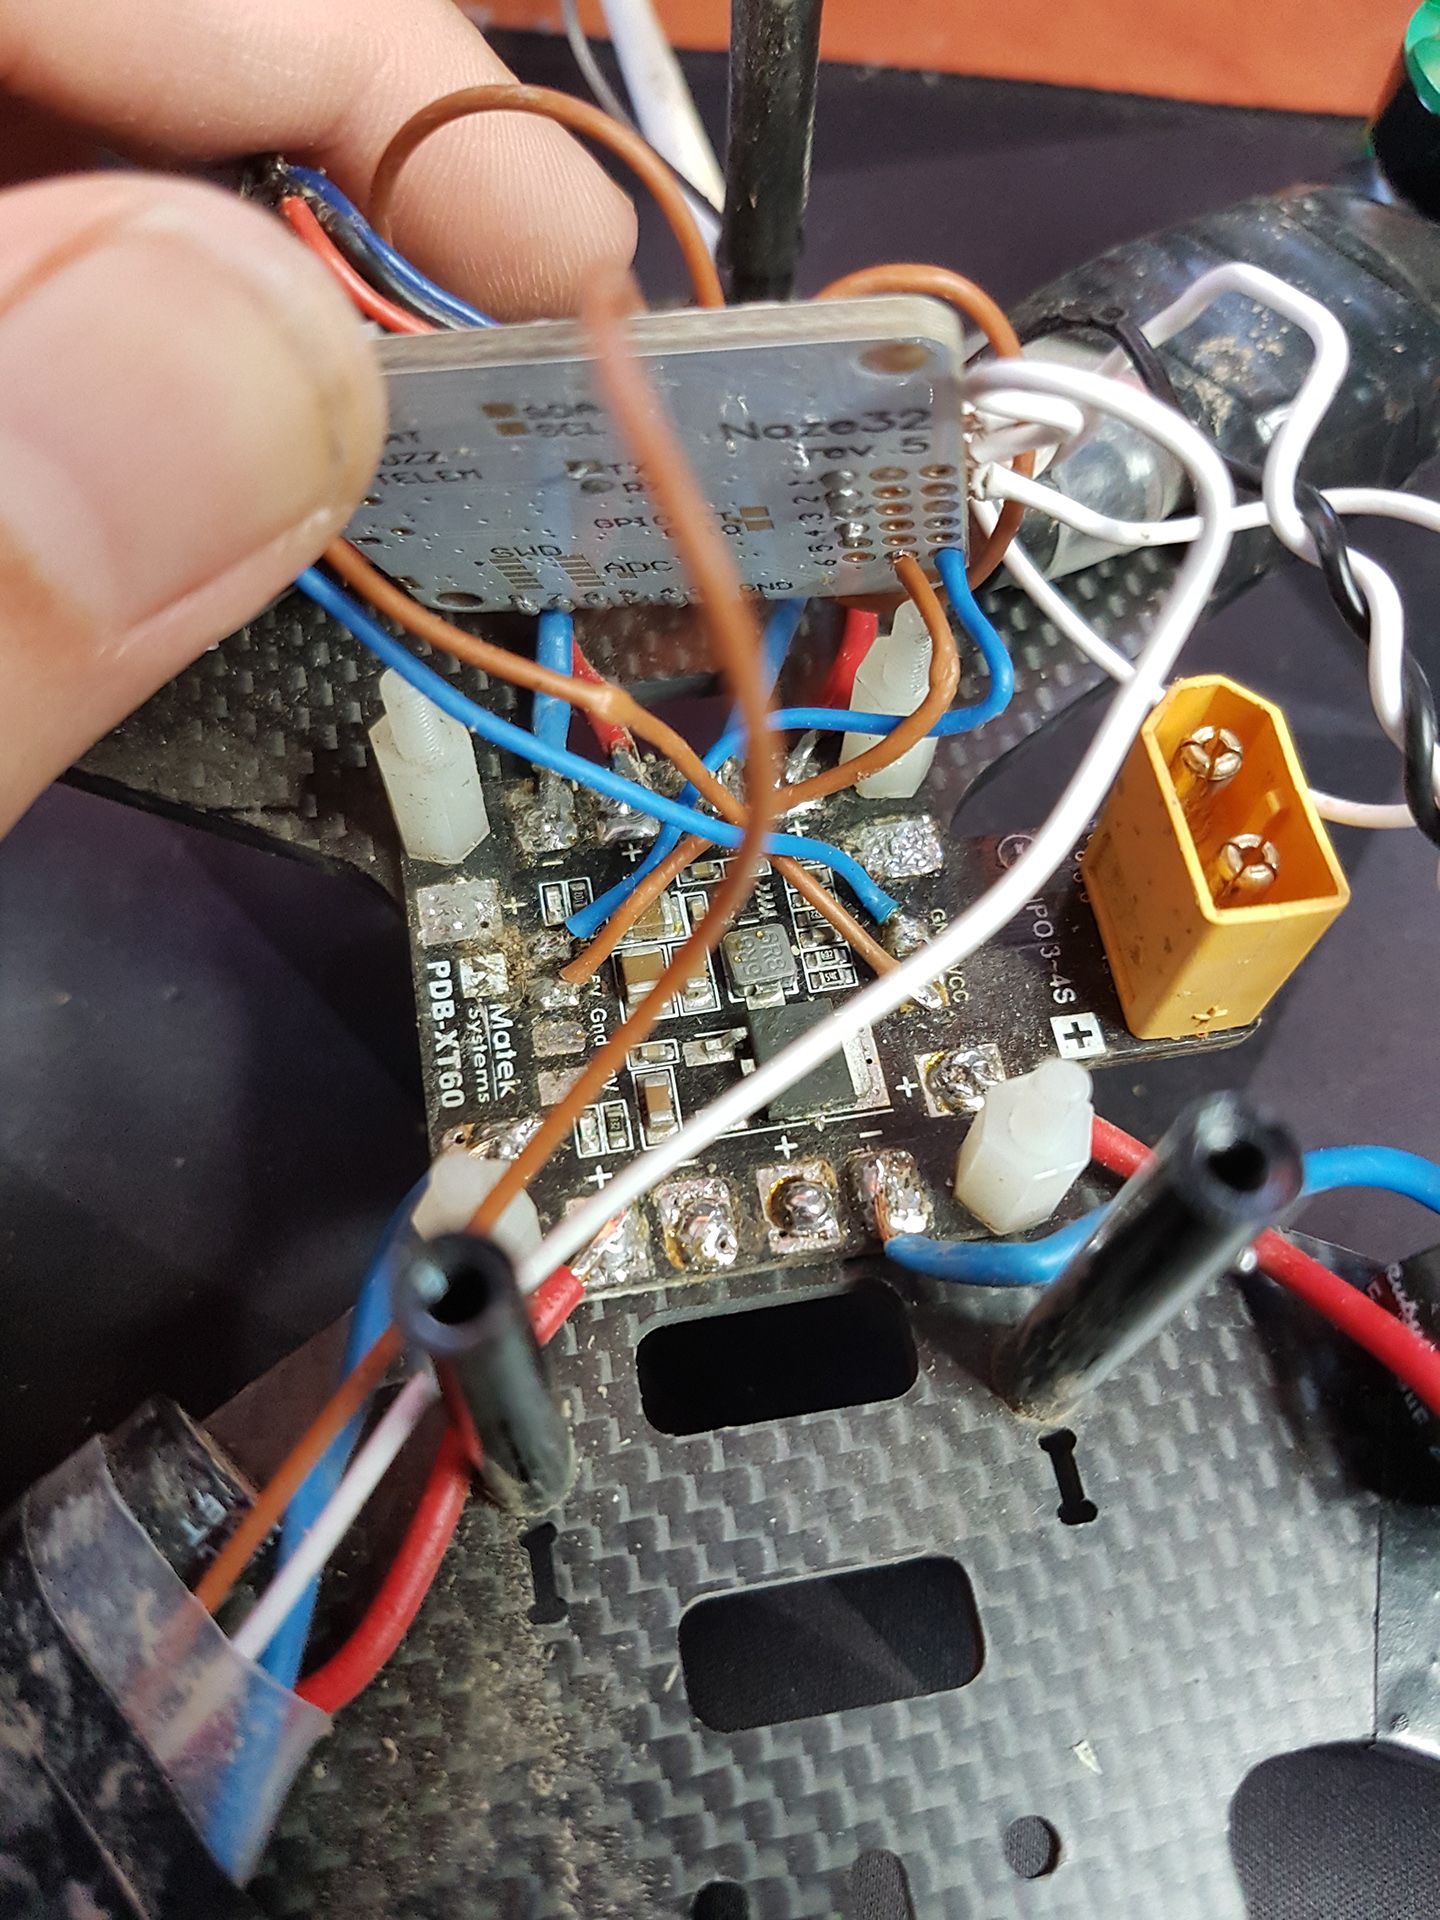
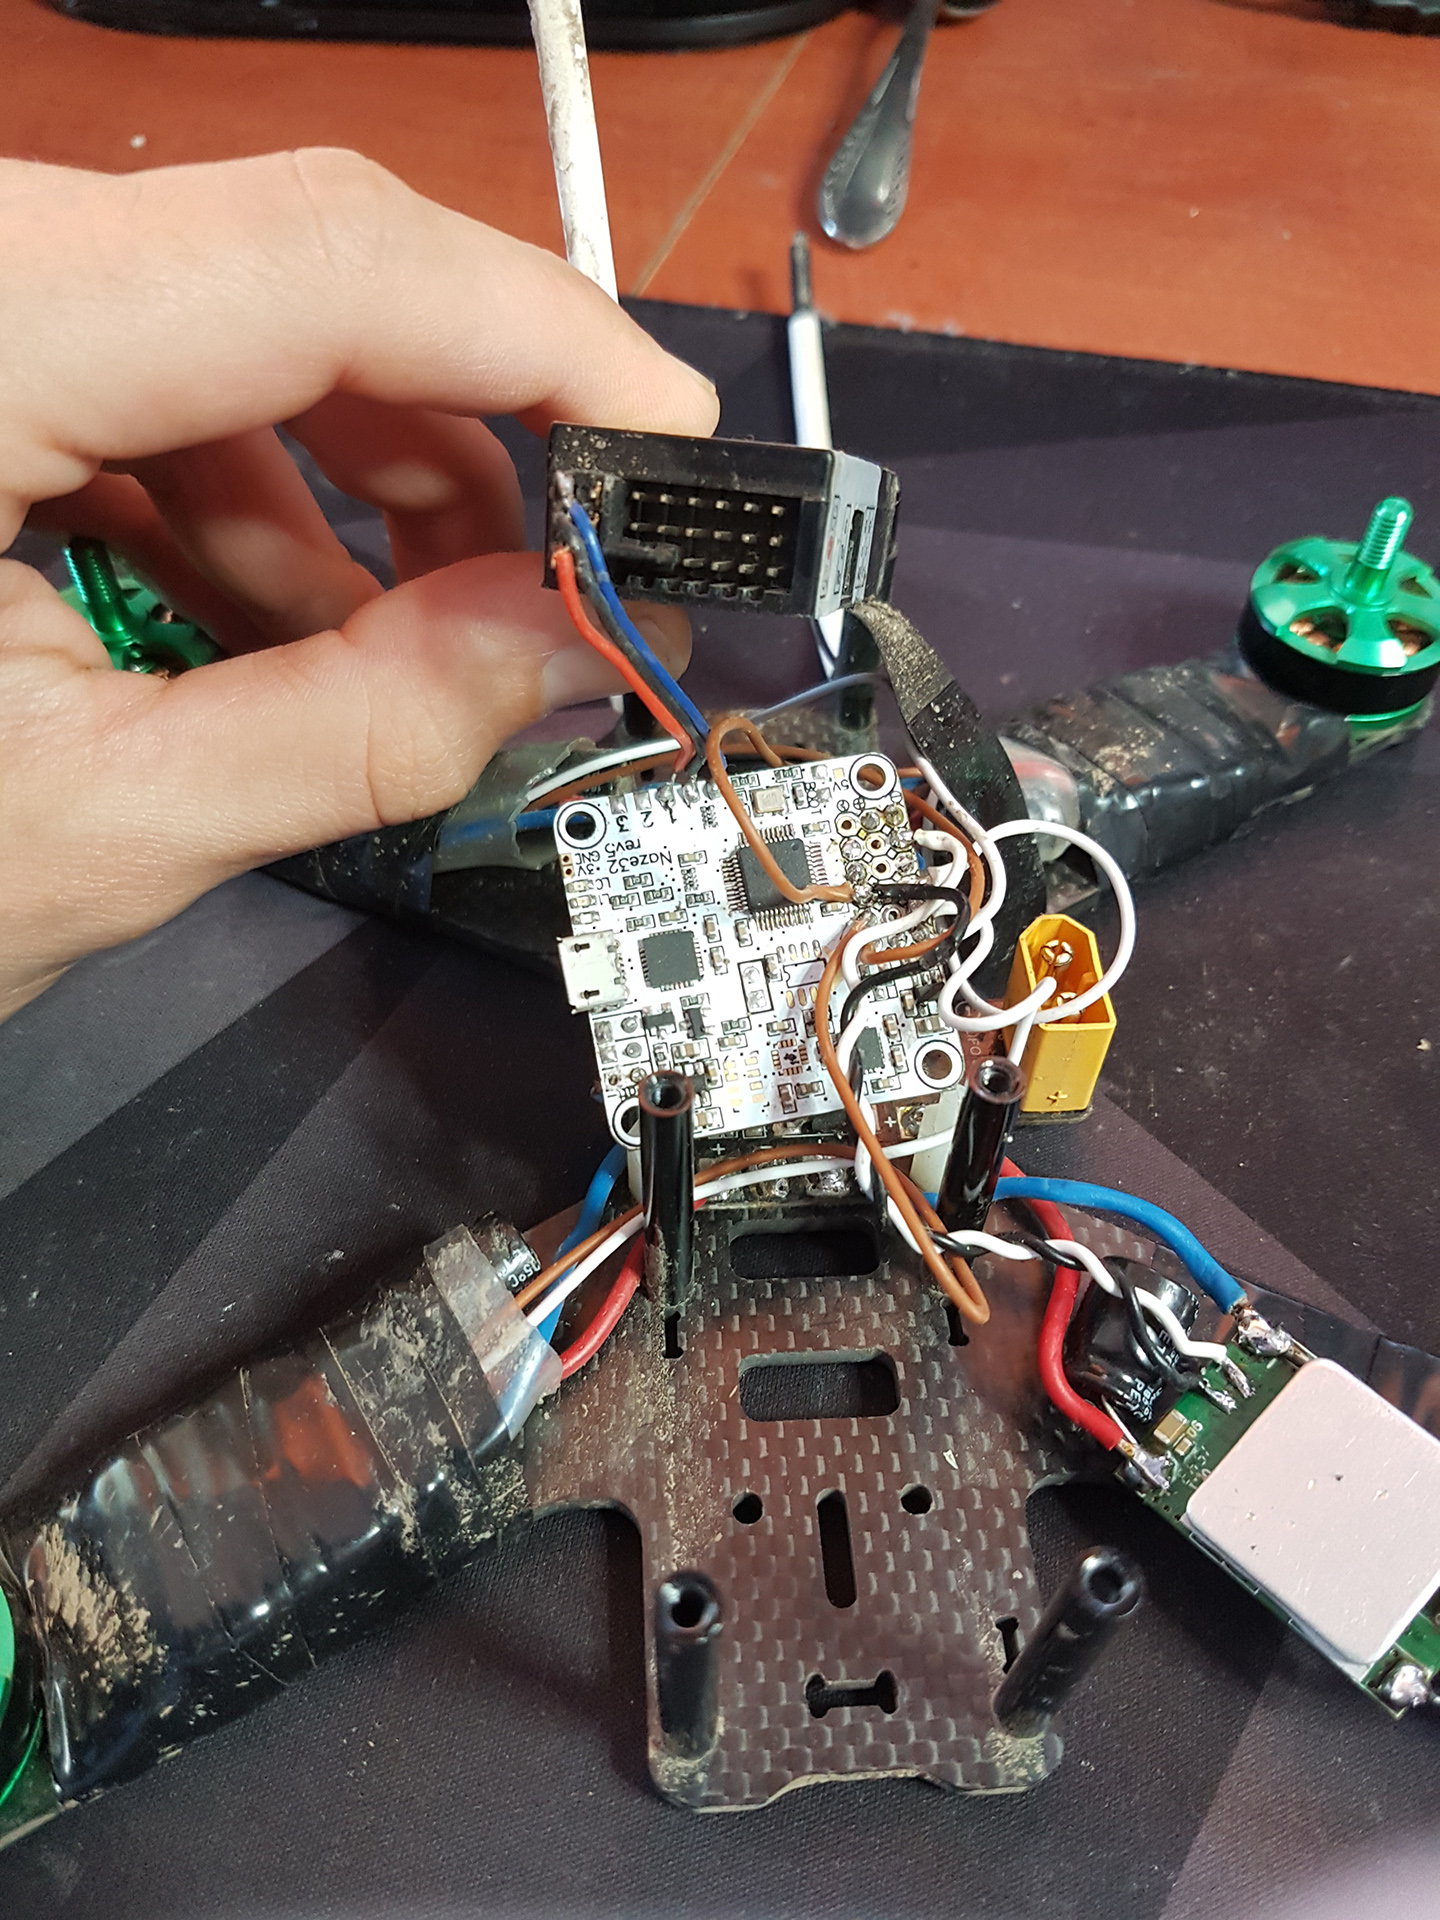
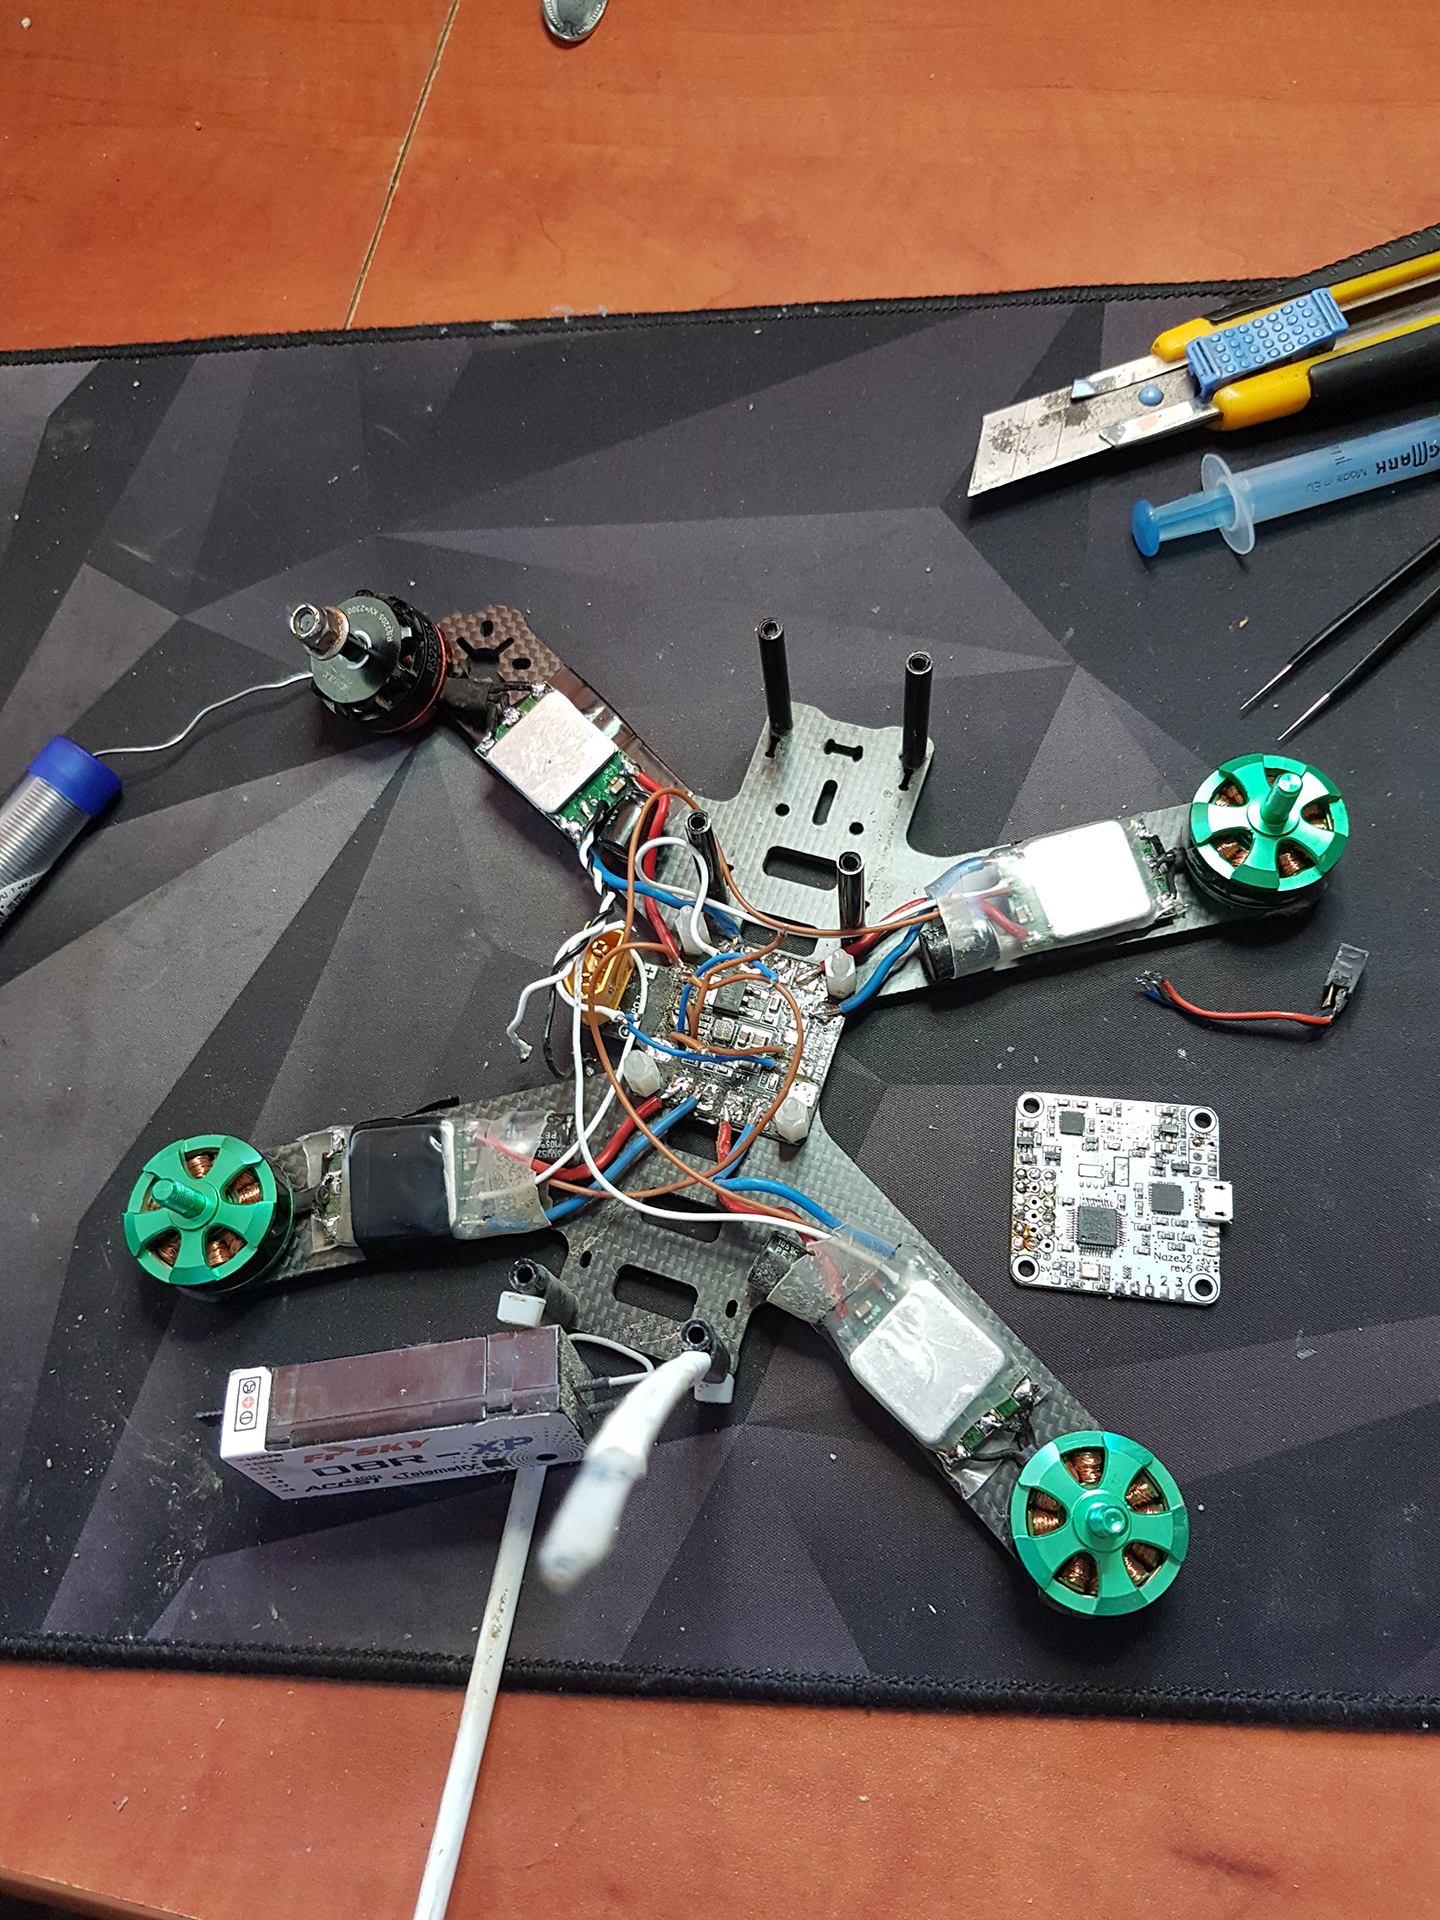
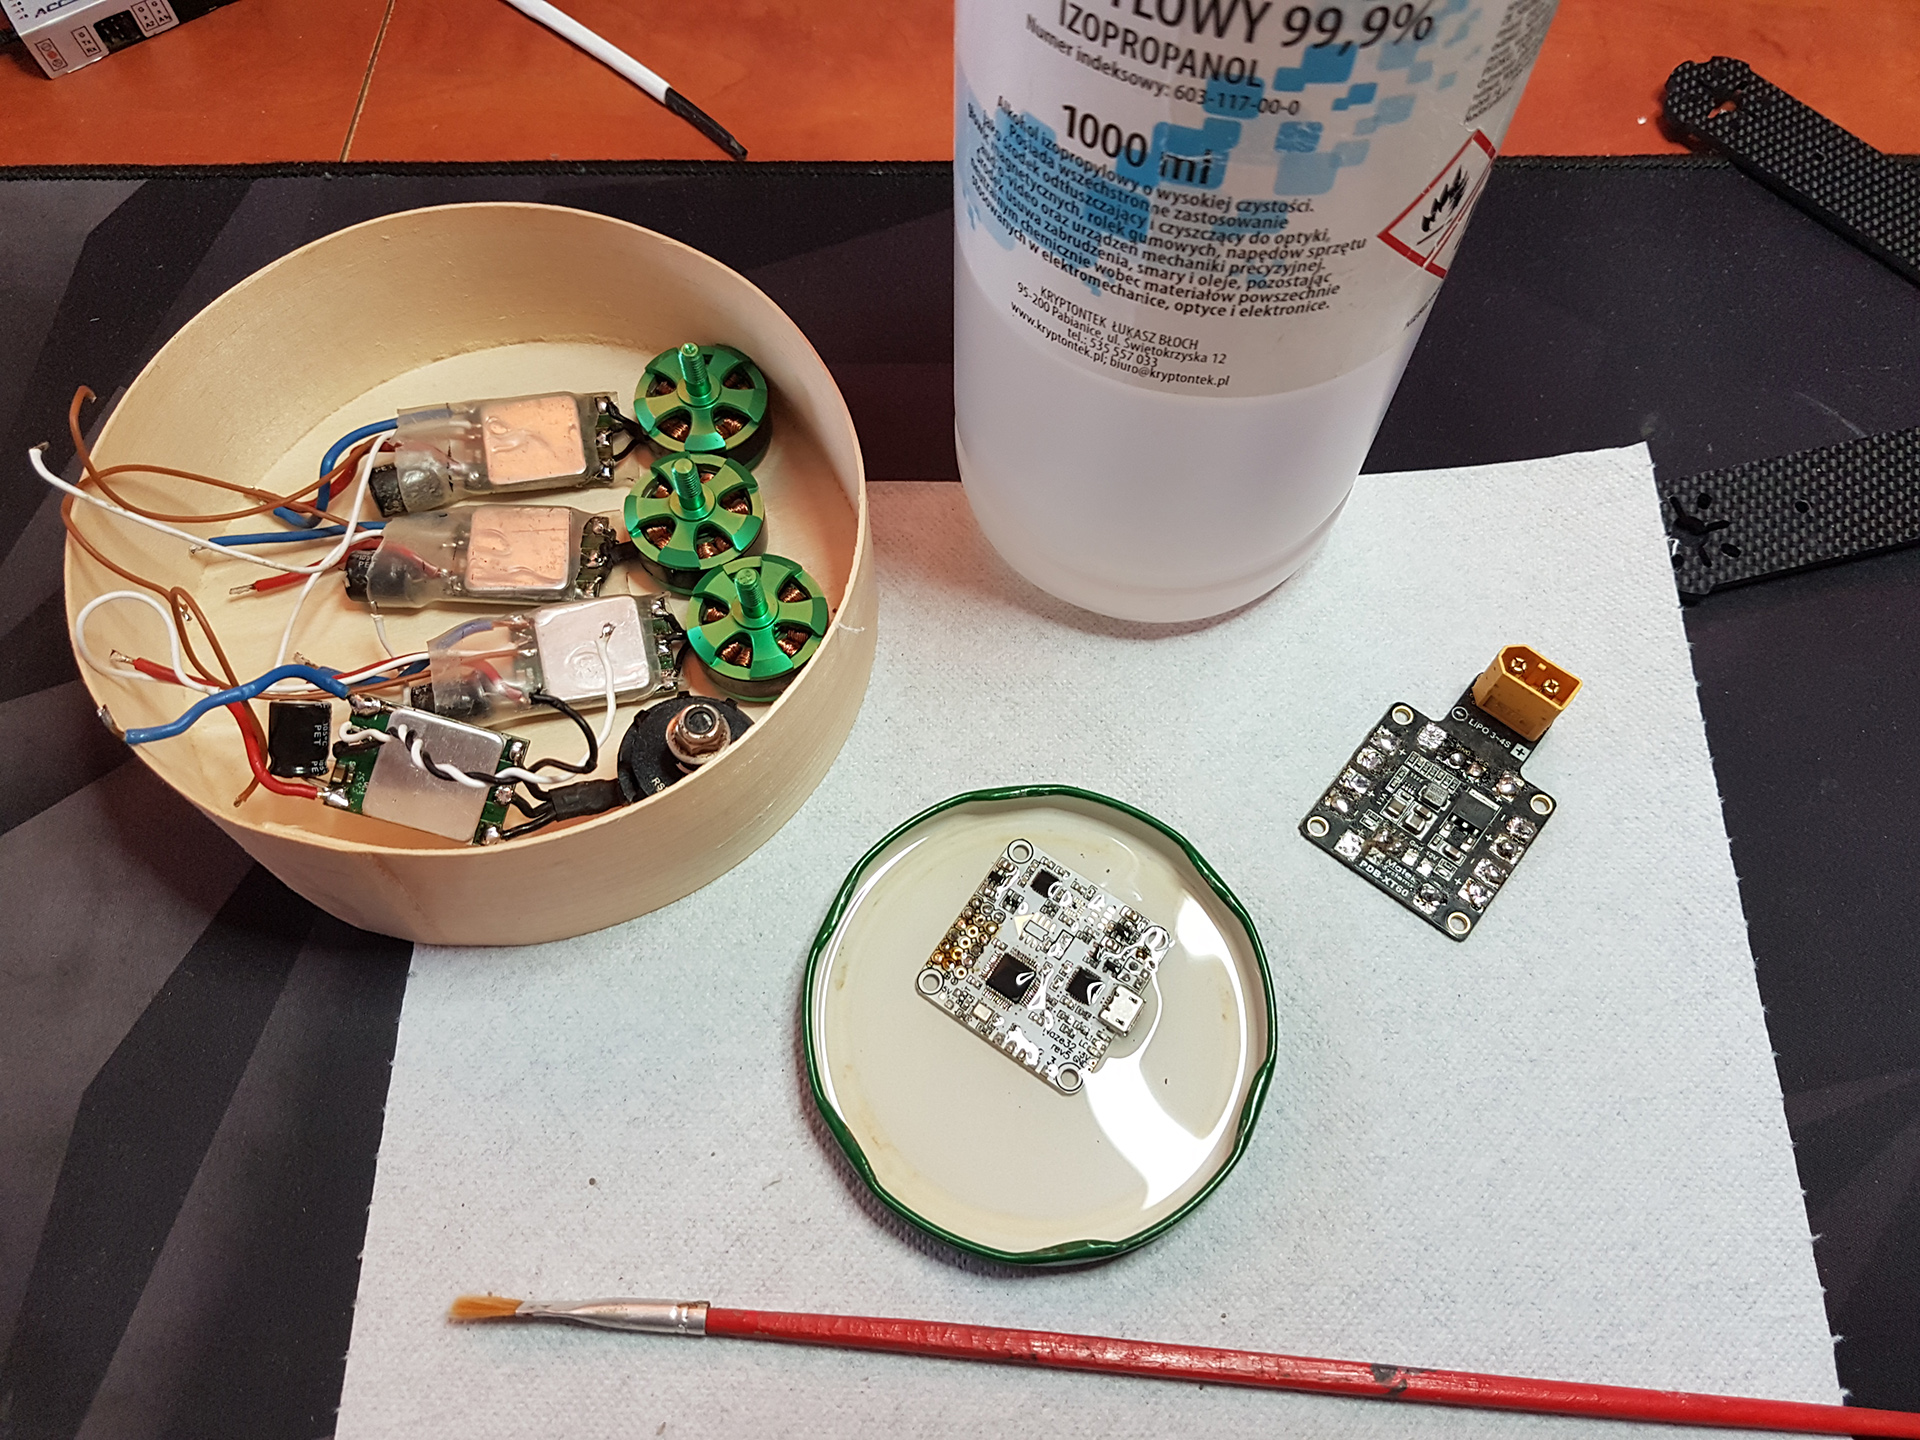
During this process I found out what interface do things have, what voltages and buses are connected and how the “data flow” and “power flow” work in the circuit.
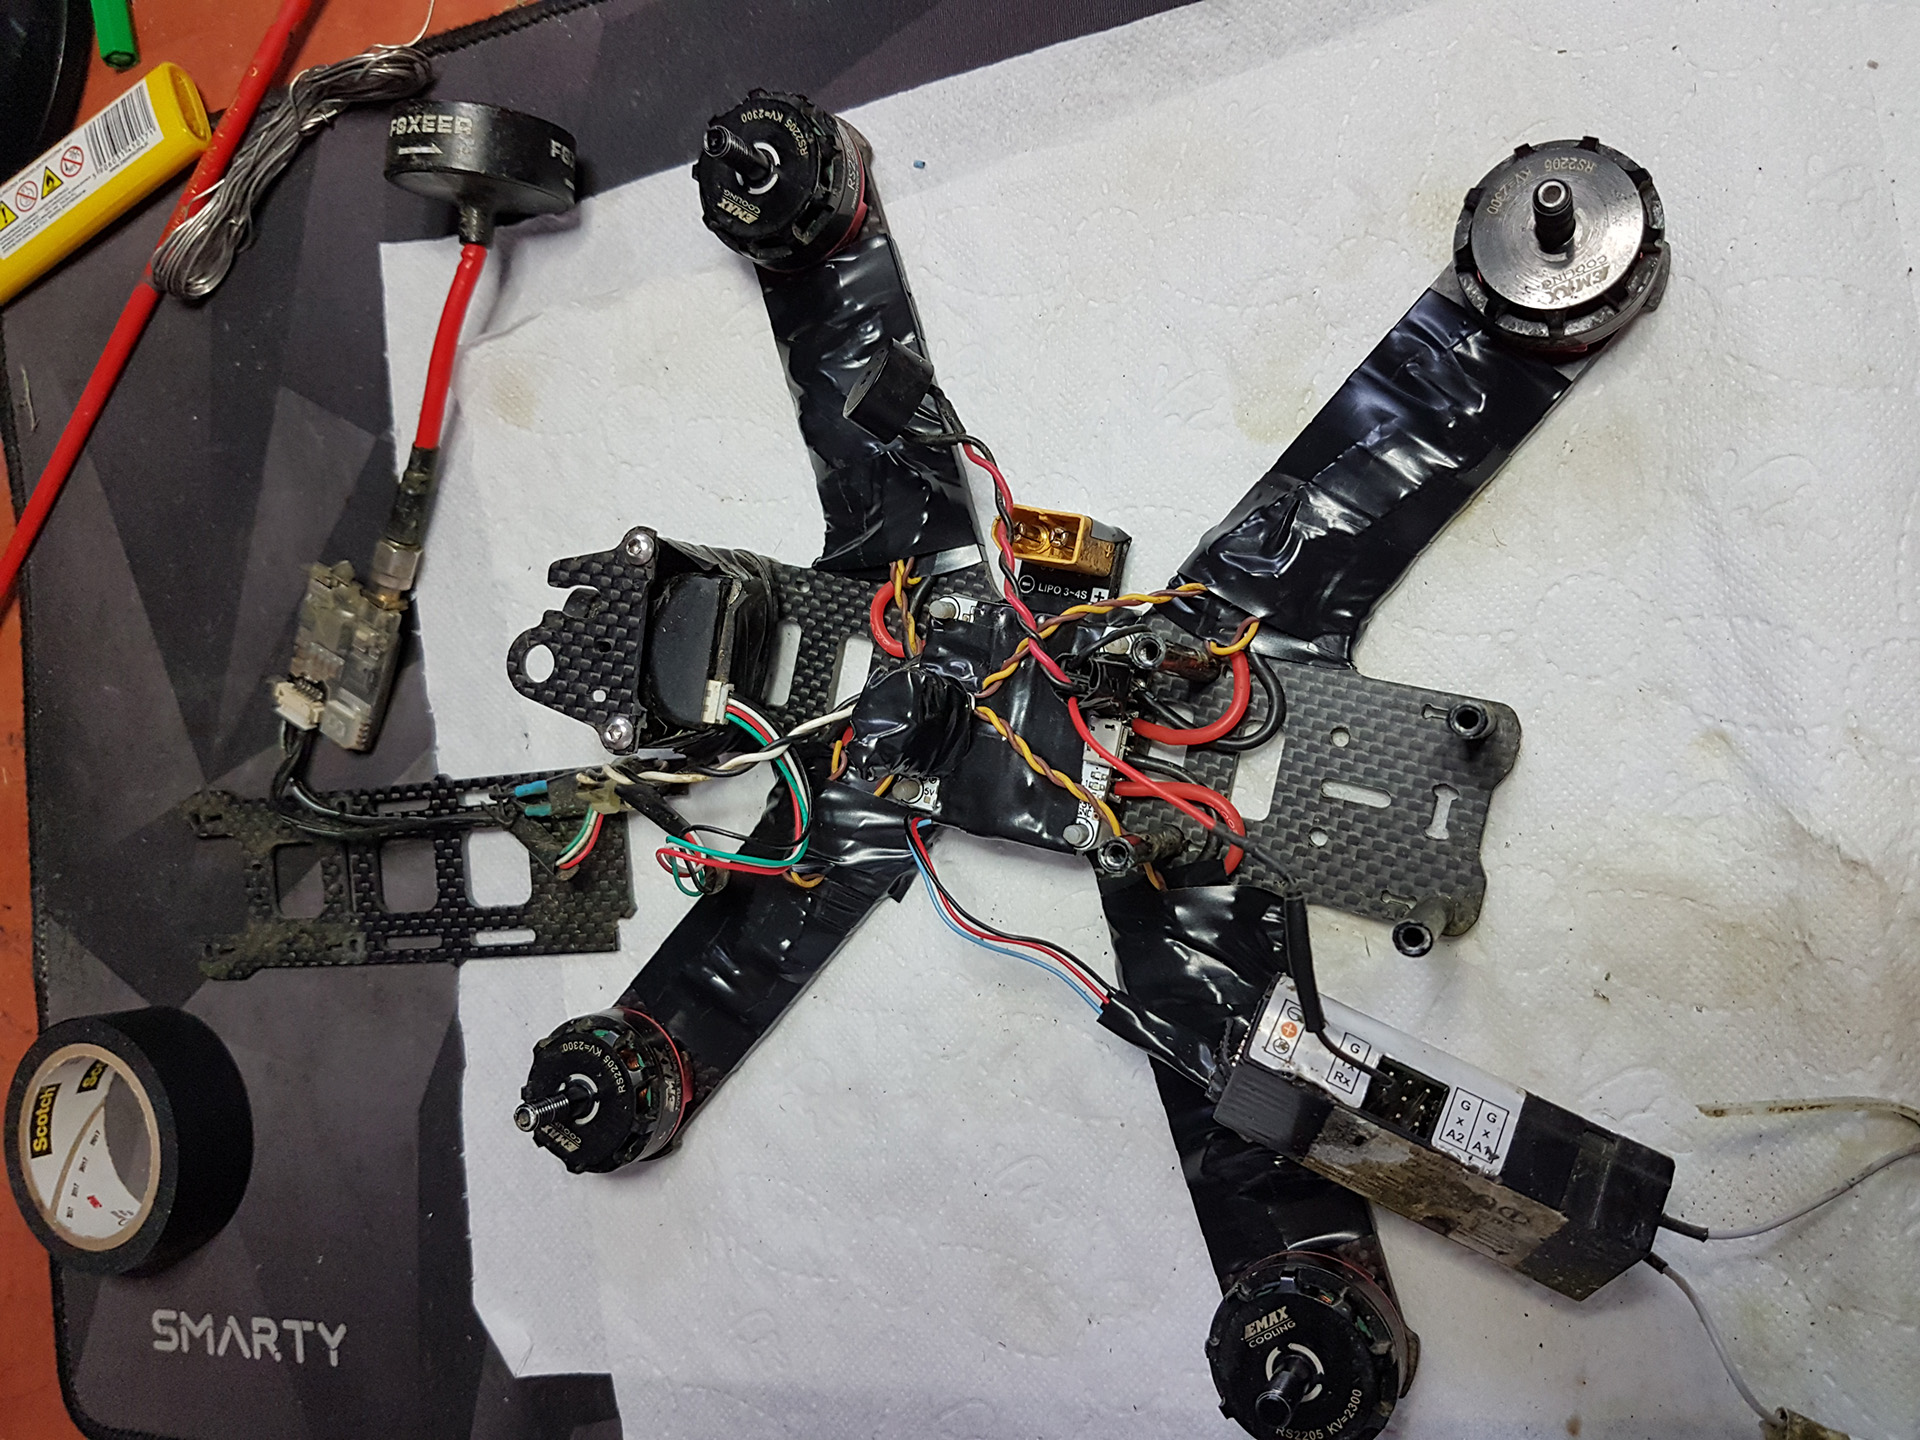
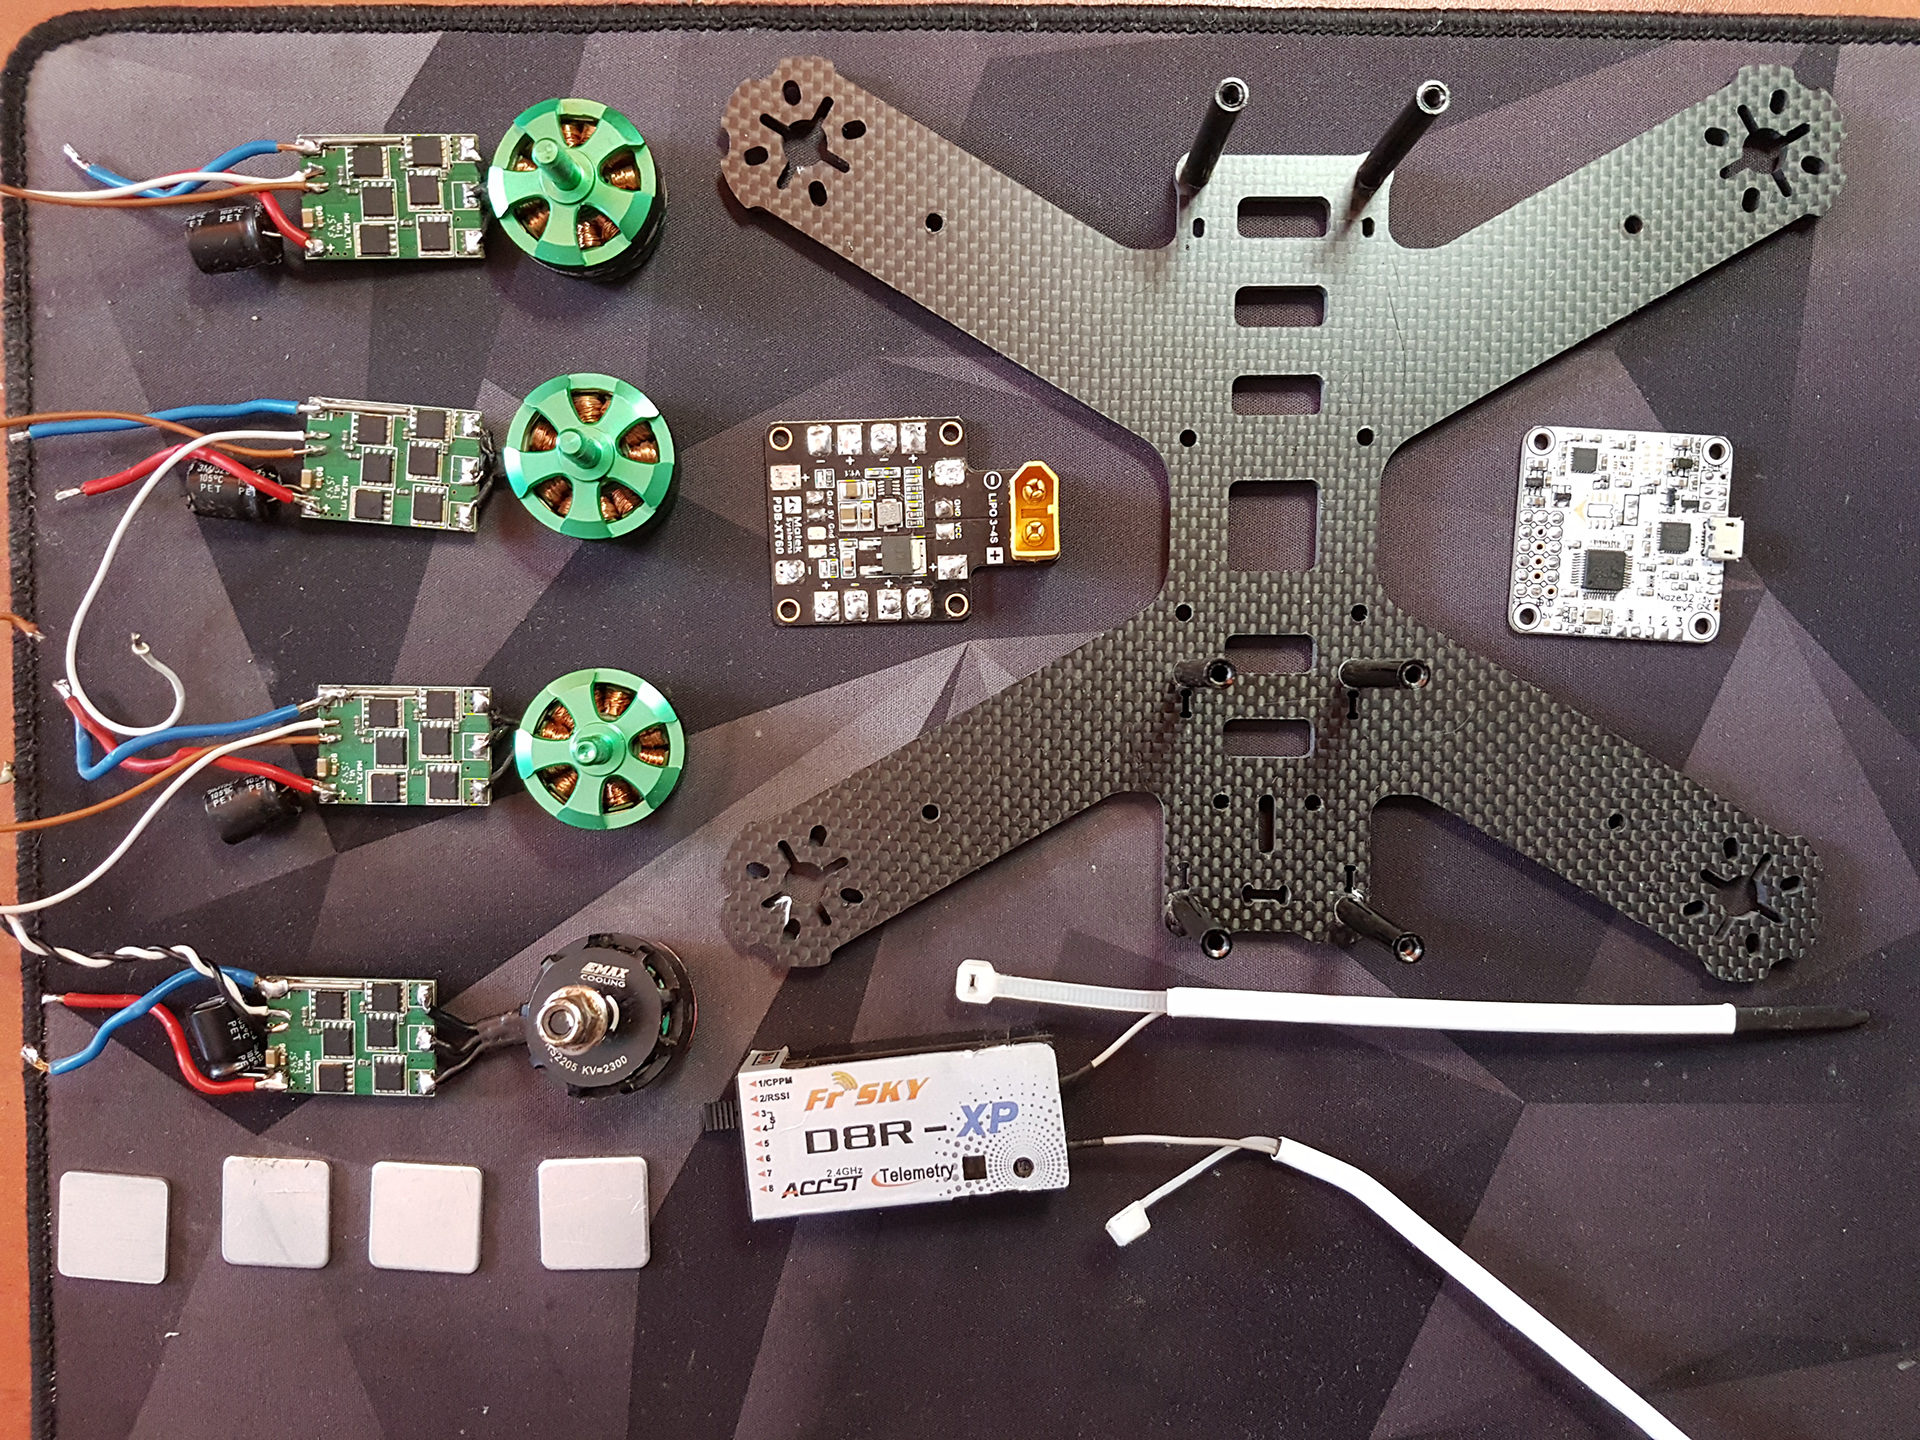
After the assembly was completed I plugged the flight controller to the PC via USB and run Betaflight Configurator. It turned out that one of the ESCs (Electronic Speed Controller) is dead. I actually had a spare one, which was working either. I was unpatient and wanted to fly so badly that I bought 4 new ESCs. The upside is the new ones are smaller and lighter. So I installed them:
At this point I pretty much had a functional flying machine. I even cut myself trying to start it. It turns out you actually do want to stay away from spinning blades and you also do want to configure your failsafe options. Do it – so you dont injure yourself. My previous experience with drones was using a toy quad that could easily be stopped with a finger. In this case you dont want any part of your body near while it’s operating.
Now – I knew that motors on a quad spin in different directions. Once you open a Betaflight Configurator you cann se a diagram of a typical setup:
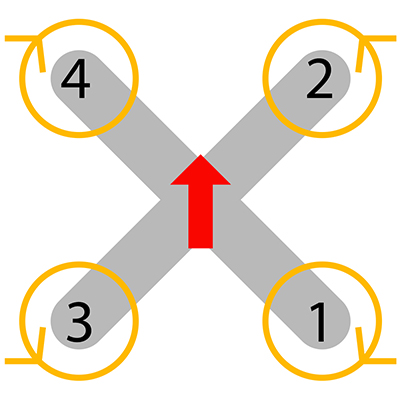
The motors I got have threaded shafts. This means that if you install then ‘backwards’ the cap may get loosened over time (motor spinning clockwise have reversed threading, whereas motor spinning counterclokwise have normally threaded shafts)
The setup I’ve got will only spin every motor in a single direction. The obvious way for me to change the dircetion if needed was to swap any two of their three wires. I think it’s also obvious at this point that props are also directional and need to be installed on the correct motors.
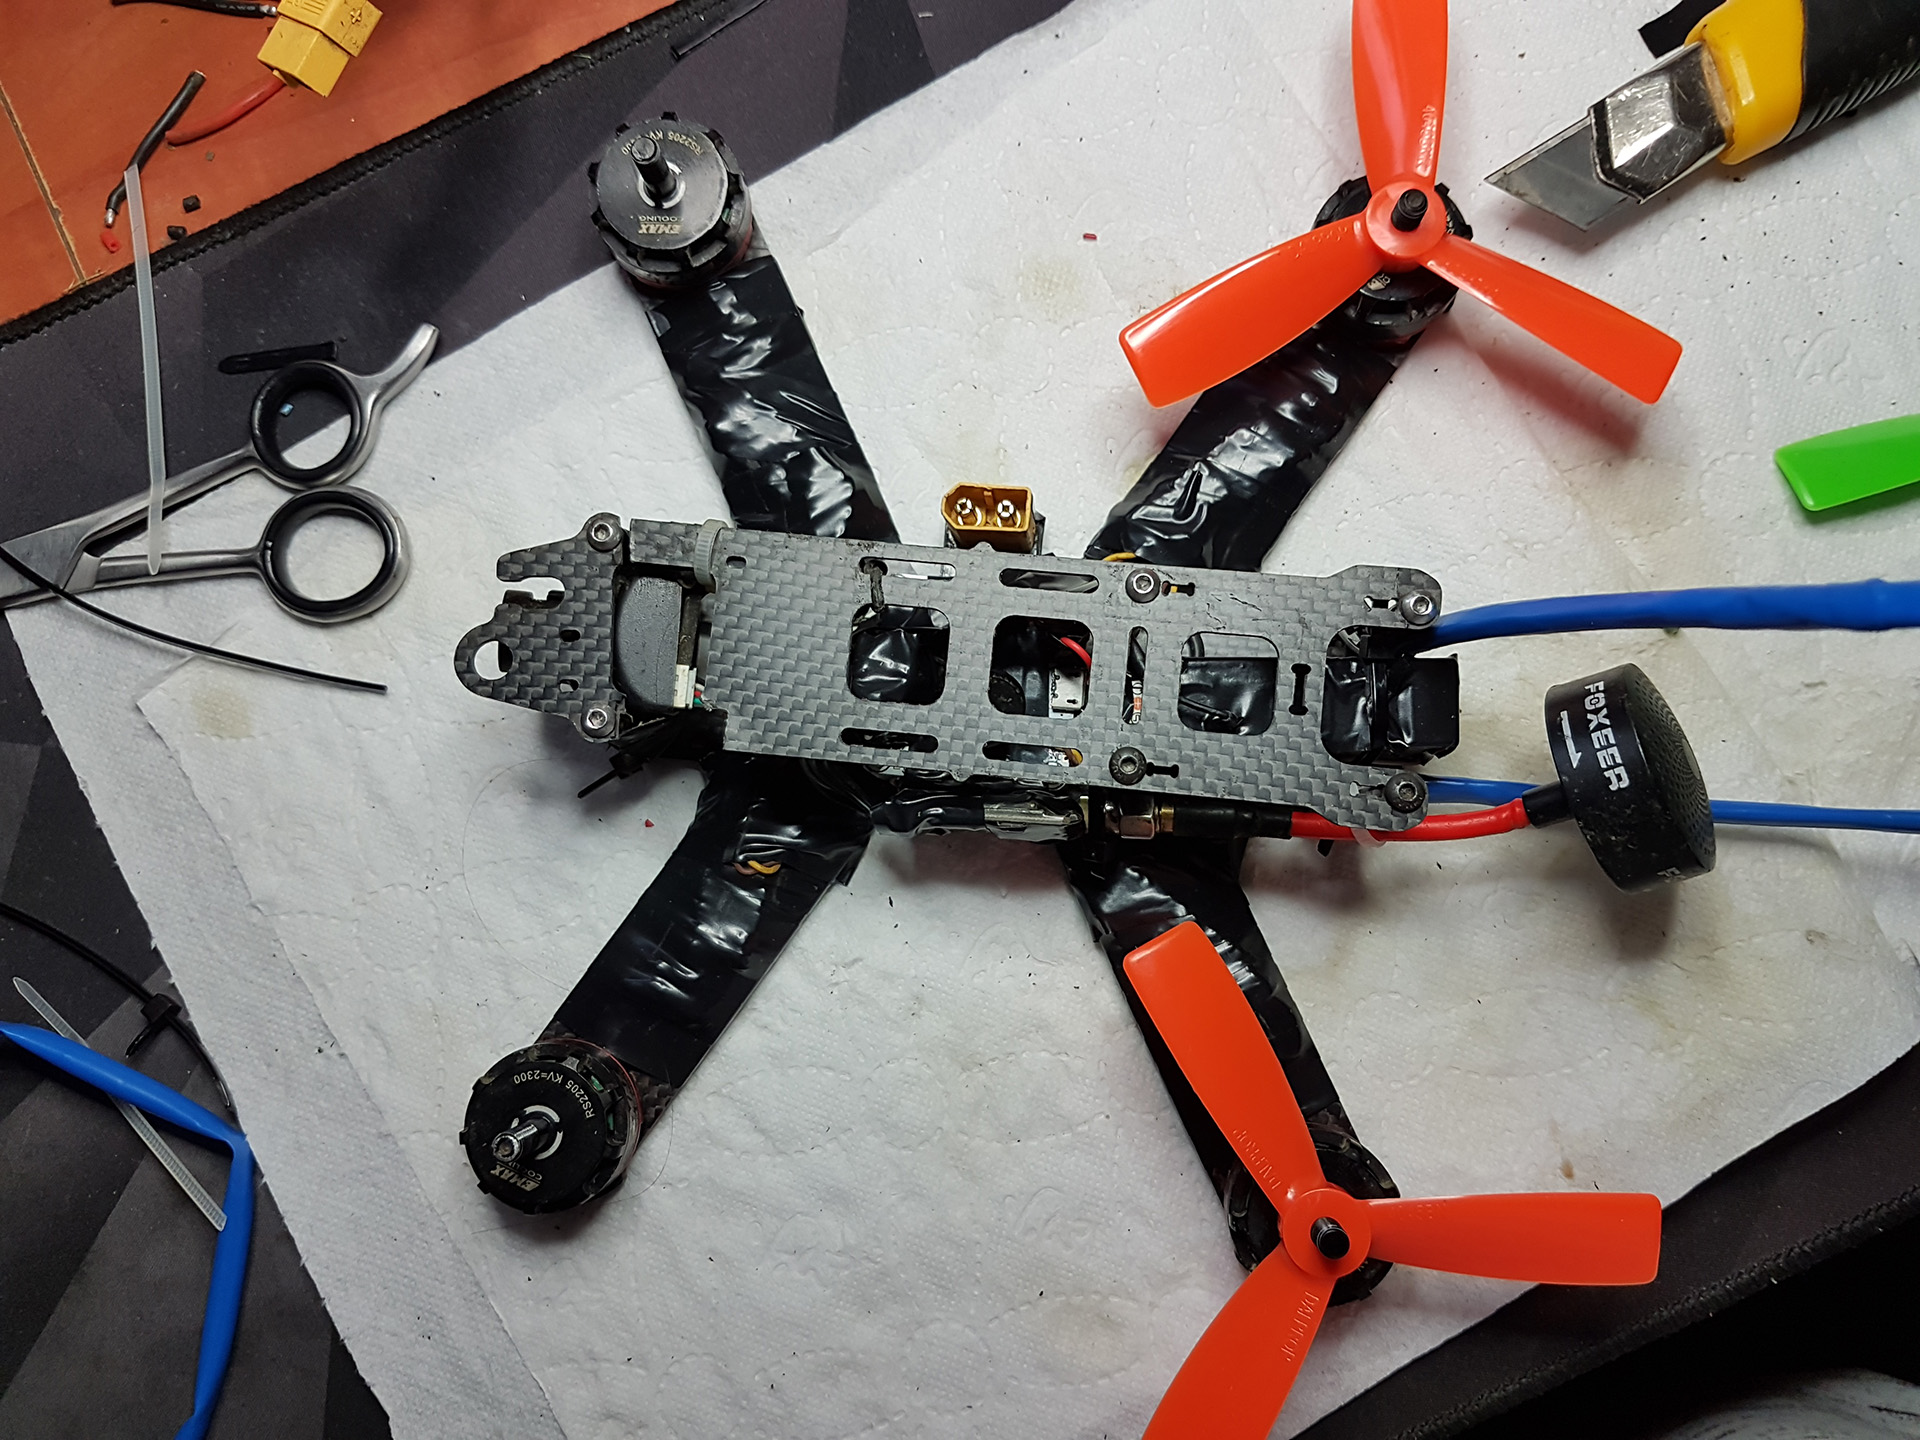
Only one and crucial thing to do, when it comes to what is installed on the frame: the quad needs eyes – or one eye to be exact:
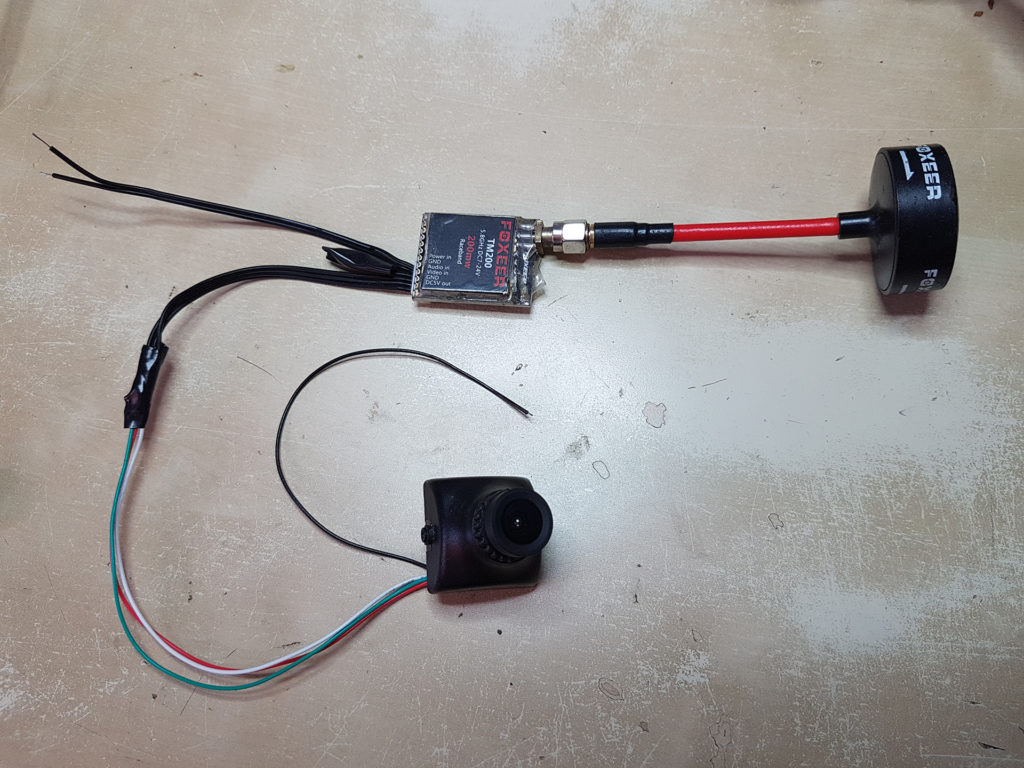
This is pretty much a ‘separate thing’ from the rest of the electronics. What I mean is you can only connect it to 5V power rail and it’s done – it will just transmit video on a selected channel (only later I found out about OSD – On Screen Display, but lets leave it for now).
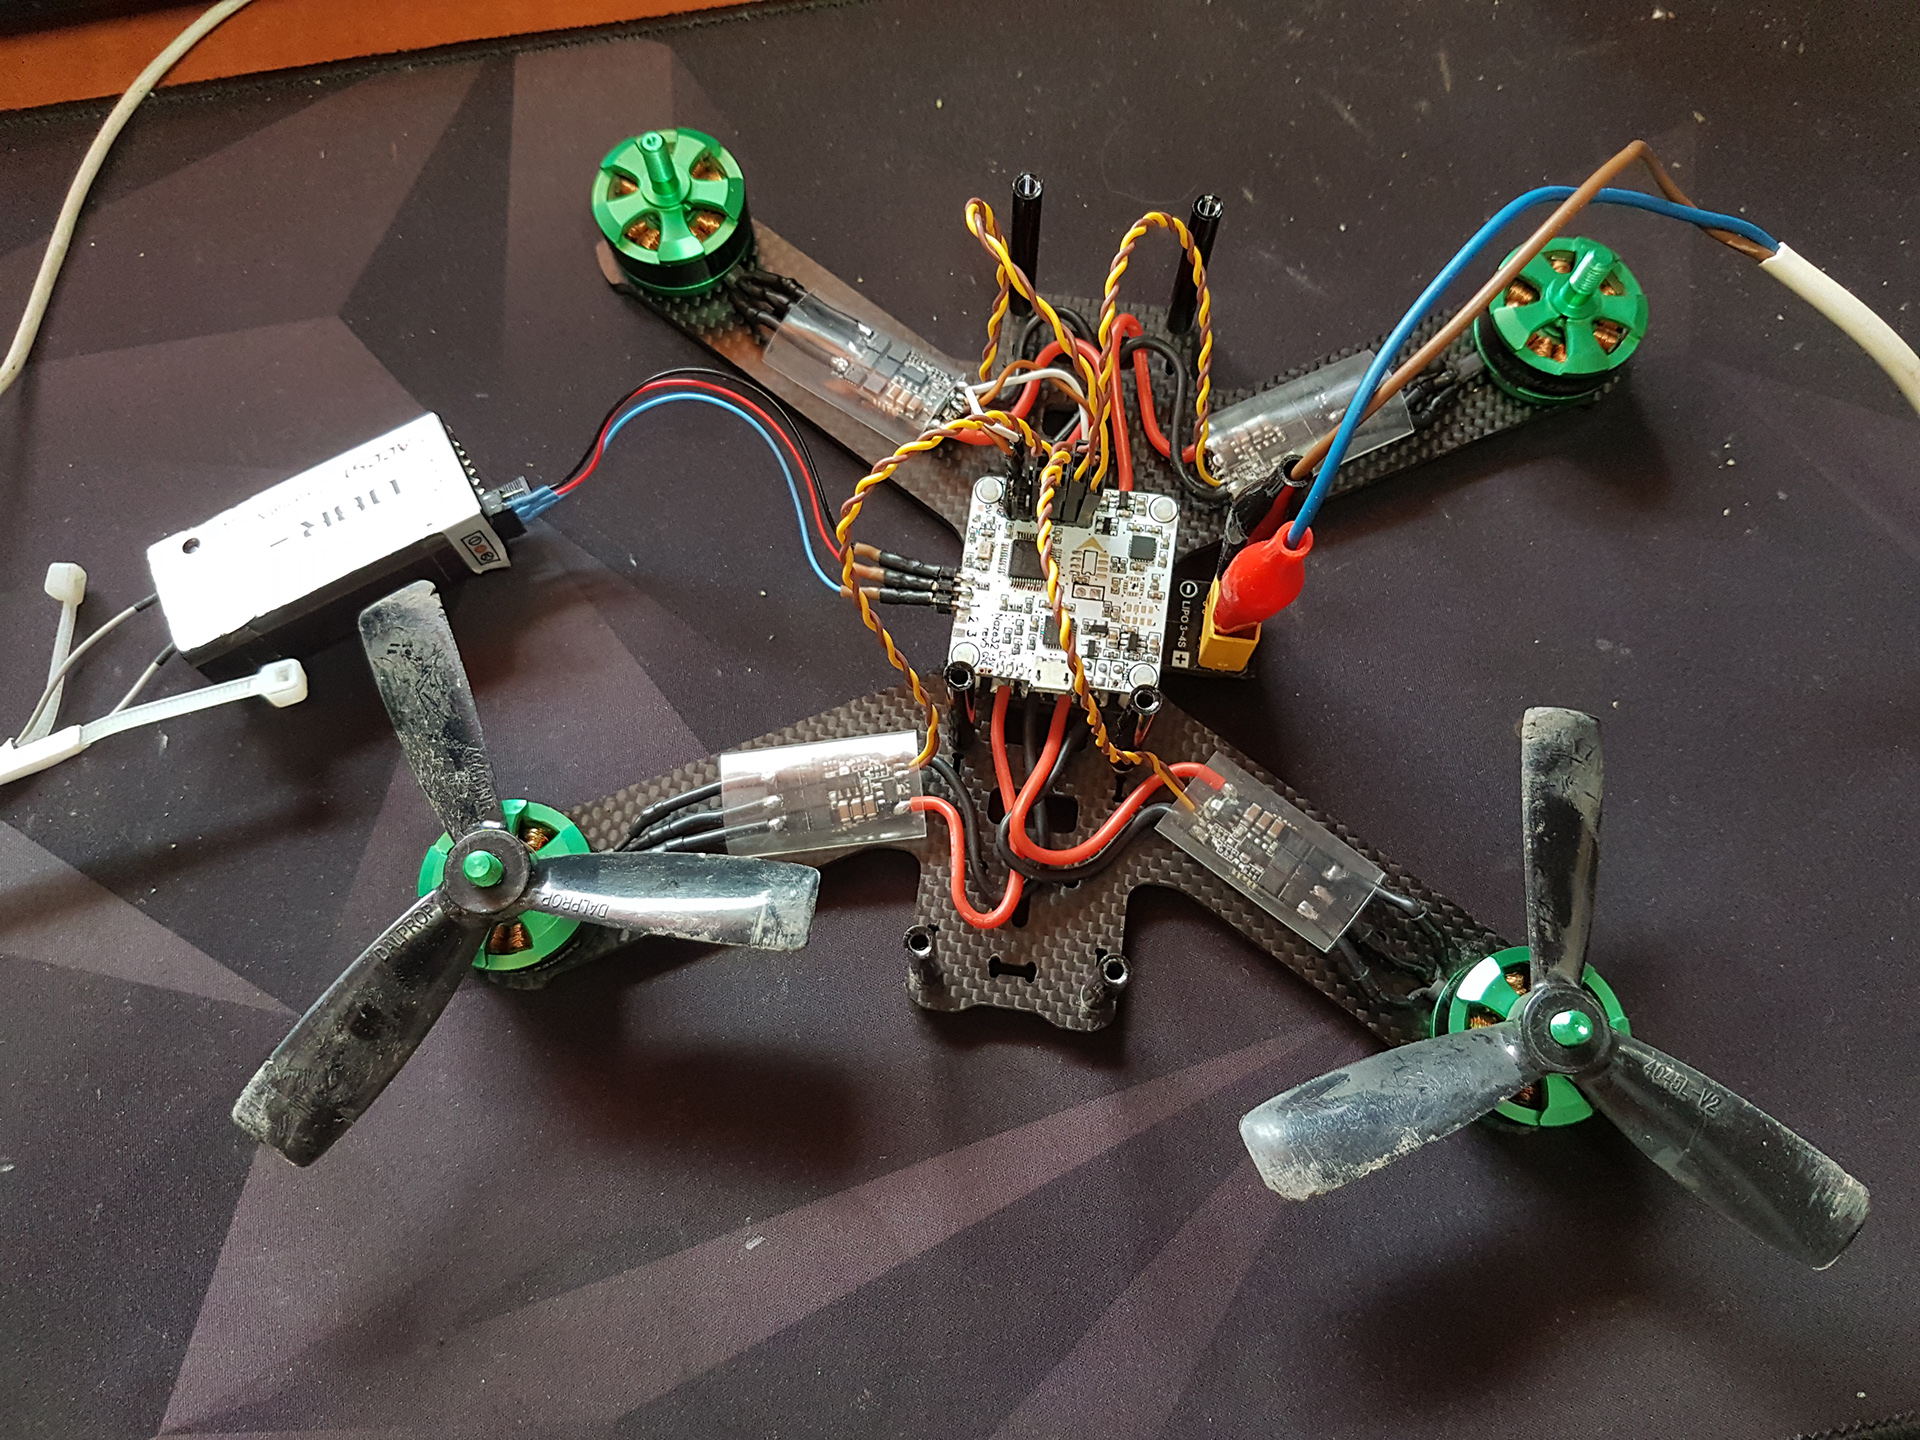
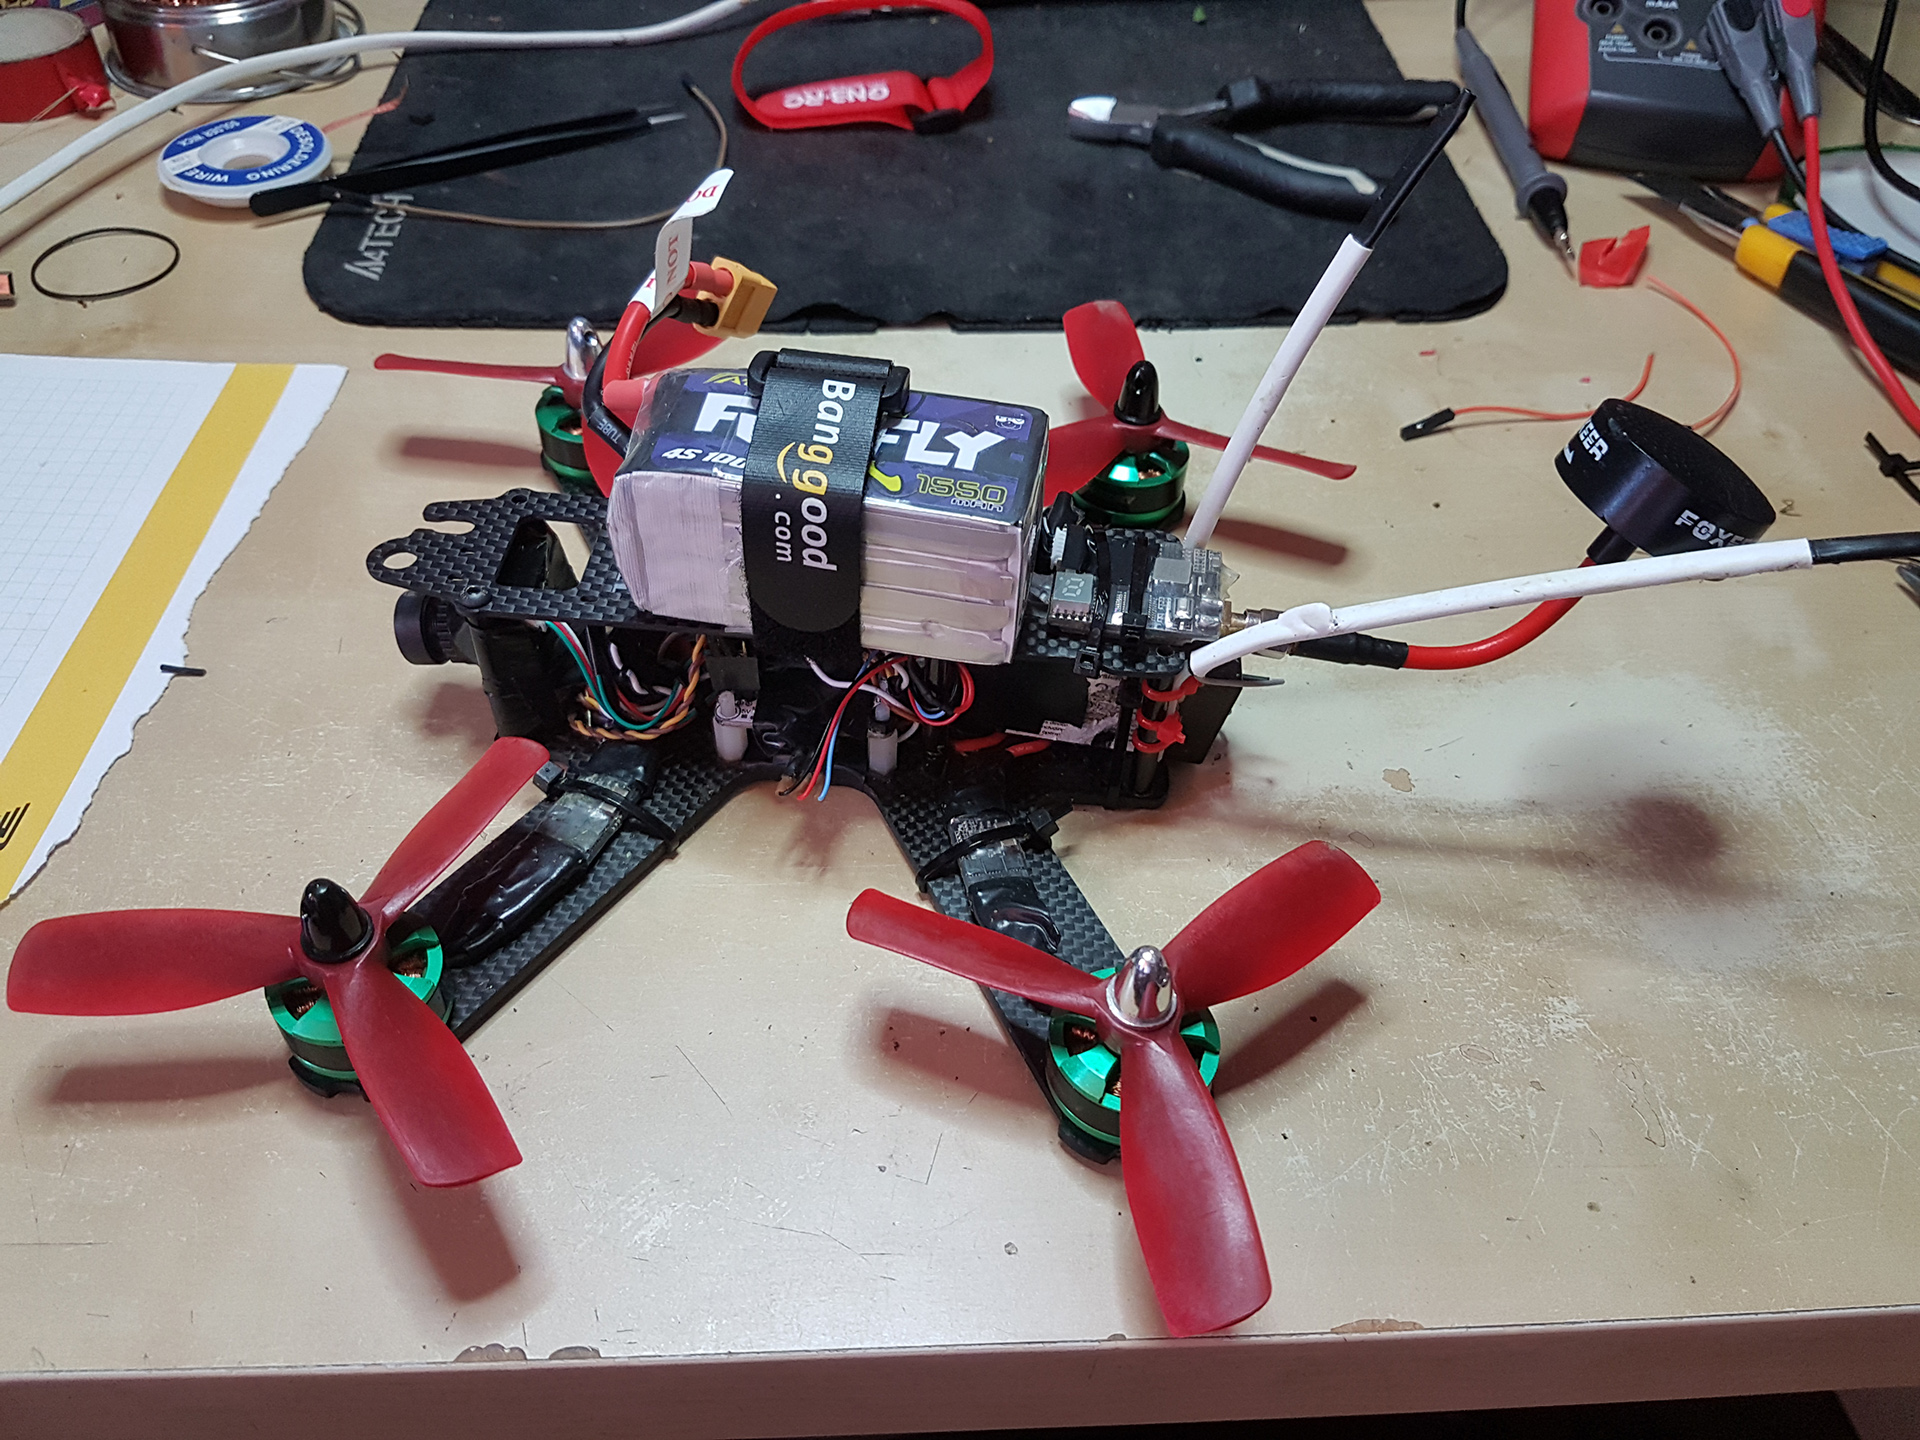
The mini challenge here now was to fit it all on the frame, keeping in mind that there’s gonna also be a battery, which is not the tiniest one. For the first tries I just tried to actually include all components and stay outside the reach of propellers. This is how it turned out:
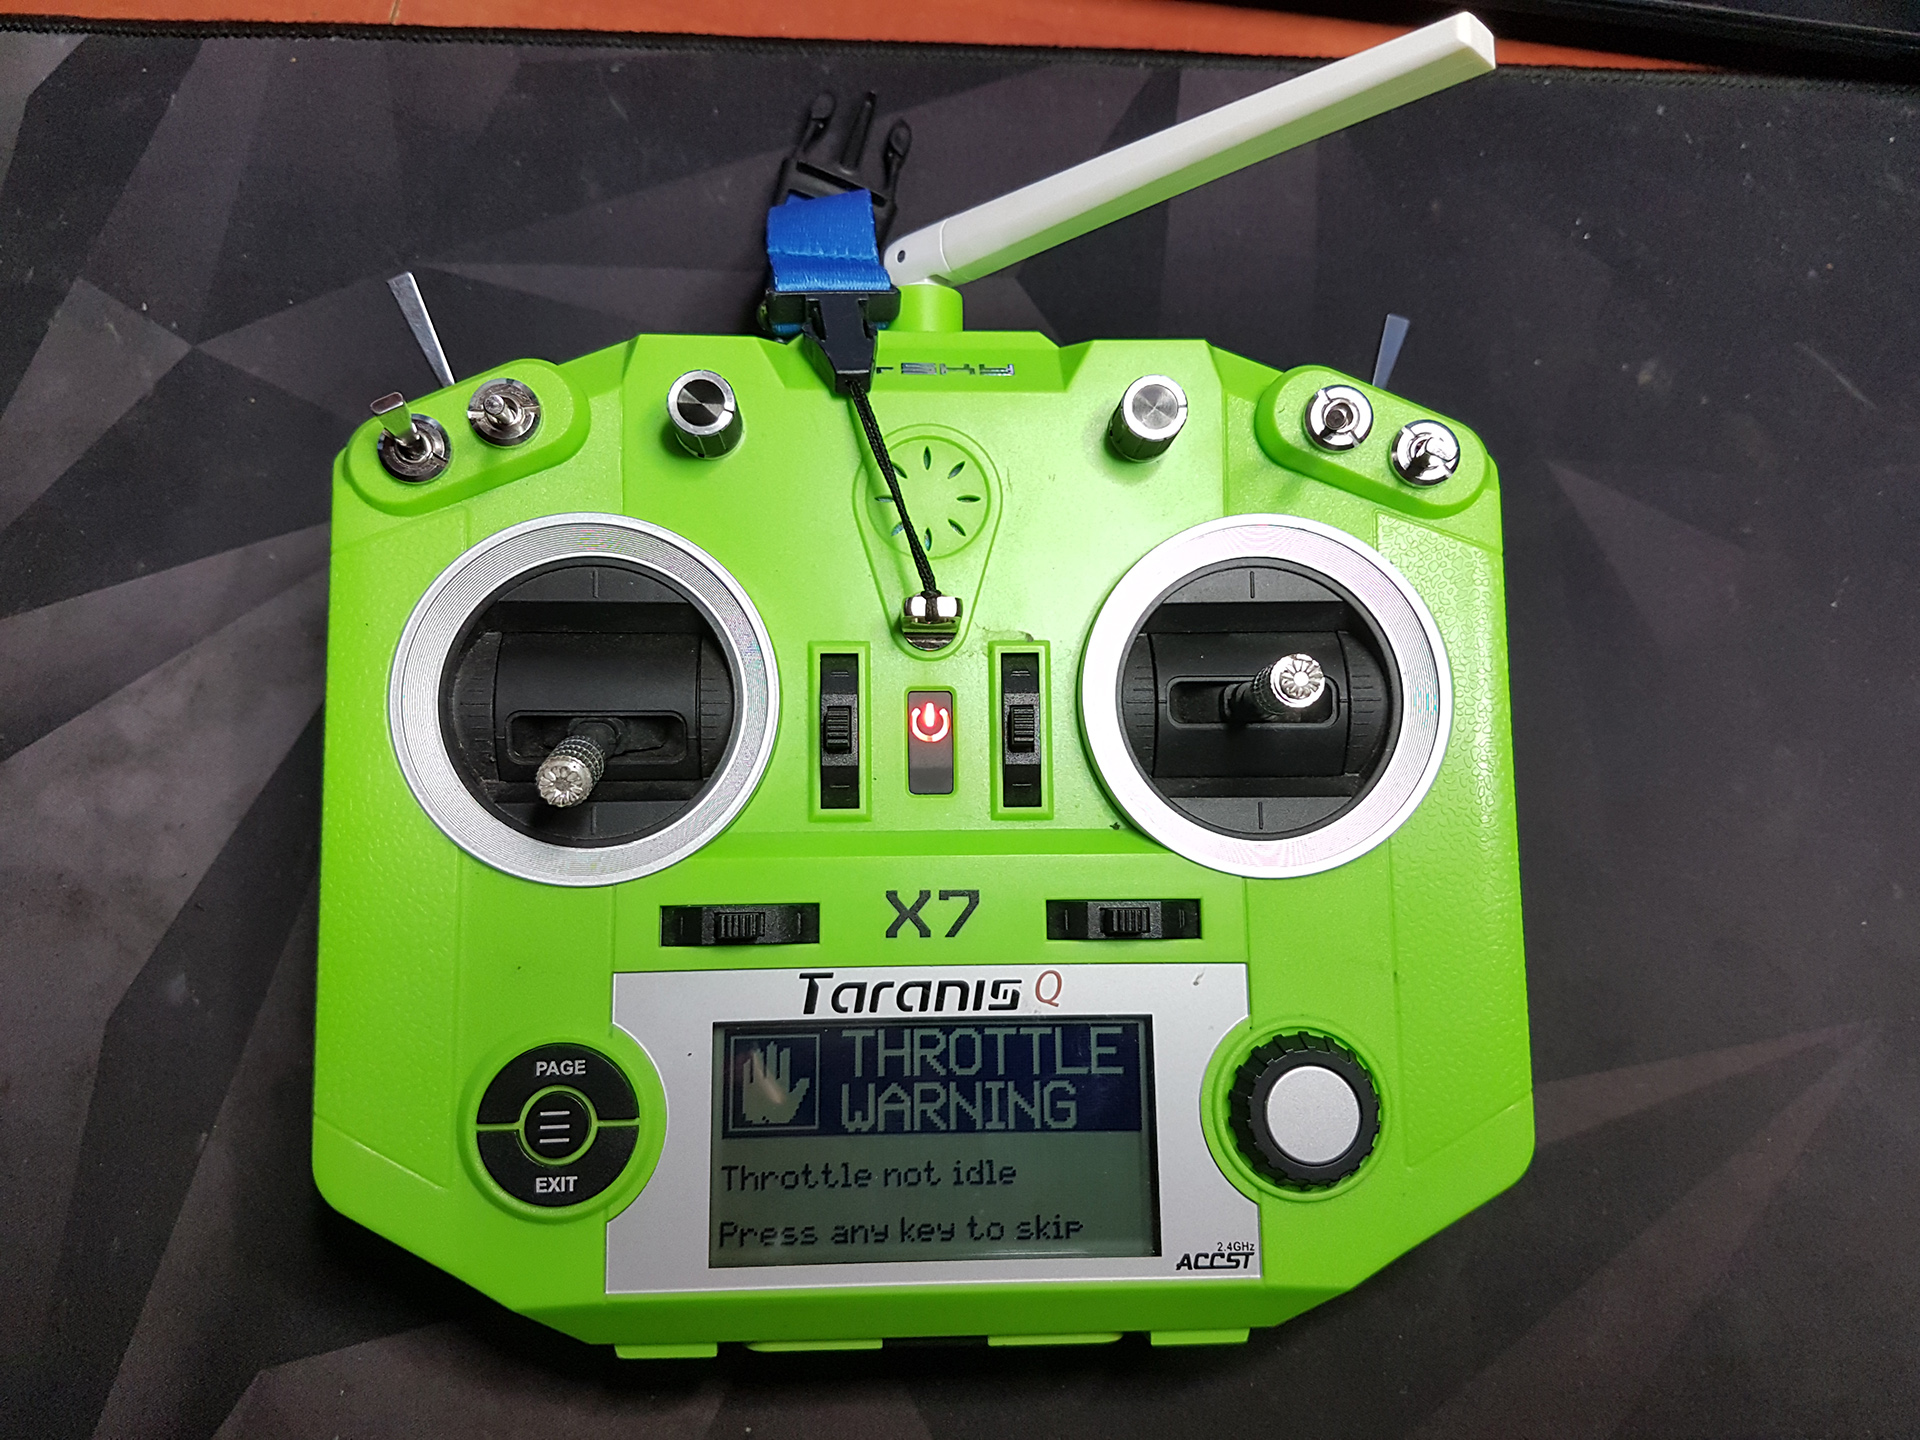
Luckily the radio was already more or less set up, so I only had to get to know important settings in Betaflight and check everything is configured properly. You might wanna pay attention to:
- Failsafe – what happens when you lose radio signal. Imagine your radio suddenly dies on you with your quad in the air. If it’s not programmed to react it may simply fly away never to be seen again.
- Arming – In order to fly a quad it must get armed first. In order to arm it specific requirements must be met. I configured mine to be a combination of two switches on the radio in particular positions.
- Motor limits – being a beginner its probably a good idea to place some limits on how much power you have available. The acceleration and agility of these machines is terryfingly awesome ^^,
There is still much more to say about setting up a quad, and that’s not even counting things I do not yet know are even a thing xD
Let’s learn to fly it and build more!
Coherence

“Coherence”
is hard to be found
Recorded using a MIDI keyboard (Casio CTK800), synthesised with FruityLoops.


